
Ingredients
Method
Step 1: Prepare Your Bacon Until Deeply Crisp
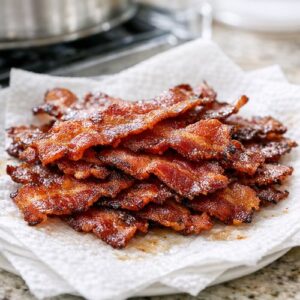
- Begin by cooking your bacon slices until they're deeply browned and nearly shattered when you bend them—we're aiming for maximum crispness, not that floppy diner-style bacon. Whether you bake them in a 400°F oven for 15-18 minutes or cook them in a skillet, the key is rendering out as much fat as possible while developing maximum flavor through browning (this is the Maillard reaction in action). Once cooked, lay the bacon on paper towels to cool and crisp further. Once completely cooled, crumble it into bite-sized pieces—not dust-fine, but irregular shards that provide textural contrast throughout the dip. This step shouldn't be rushed; crispy bacon makes or breaks this appetizer.
Step 2: Combine Your Creamy Base
- In a medium mixing bowl, whisk together your mayonnaise and sour cream until they're fully combined and completely smooth. Take about 30-45 seconds to really blend them together—you're not looking for visible streaks or separation. This creates an emulsified base that'll hold the dip together and provide silky mouthfeel. I always use room-temperature ingredients for this step because they blend more easily and create a smoother final texture. If your sour cream came straight from the fridge, let both components sit on the counter for about 15 minutes while you prepare other ingredients.

Step 3: Shred Your Cheese Fresh
- Using a box grater or the shredding attachment on a food processor, shred your sharp cheddar cheese from a block—never from a bag. Pre-shredded cheeses contain anti-caking agents that prevent them from melting smoothly and can create a slightly grainy texture in cold dips. You want approximately 2 cups of tightly packed shredded cheese. Sharp or extra-sharp cheddar is crucial here; mild cheddar lacks the bold flavor that defines this dip. We're looking for cheese with personality, something that announces itself on your palate and stands up to the bacon's smokiness.

Step 4: Fold in Cheese and Seasonings
- Add your shredded cheddar directly to the creamy base, then sprinkle in the garlic powder, dry mustard powder, white pepper, and hot sauce. Using a rubber spatula or wooden spoon, gently fold these ingredients together until the cheese is completely distributed and no white streaks of cream remain—this should take about 2-3 minutes of folding. Fold rather than stir here; folding preserves the airy texture of the base while distributing ingredients evenly. Aggressive stirring can overwork the mixture and create a slightly greasy appearance.

Step 5: Add Bacon and Green Onion
- Now fold in your crumbled bacon and the white and light green parts of your sliced green onions. Reserve a small handful of bacon pieces and some of the green onion for garnish—these fresh toppings add visual appeal right before serving. Fold gently until everything is distributed evenly throughout the dip, about 1-2 minutes. At this point, taste the dip and adjust seasonings. Remember that cold foods taste less salty and less spicy than room-temperature versions, so be cautious about under-seasoning. A small pinch of additional salt and a dash more hot sauce are common adjustments.

Step 6: Refrigerate and Let Flavors Meld
- Transfer your dip to a serving bowl and refrigerate for at least 1 hour before serving. This resting period allows the flavors to marry and deepen. The cheese will firm up slightly as it cools, and the seasonings will distribute evenly throughout. If you're preparing this ahead, it actually improves with time—we've found 4-6 hours is ideal. Just before serving, top with your reserved bacon pieces and fresh parsley. The parsley adds visual contrast and brightness to the finished dip. If you prefer your dip slightly warm, transfer it to a slow cooker or small serving bowl and heat gently, stirring occasionally.

Nutrition
Notes
- Use Freshly Shredded Cheese - Block cheese shreds consistently and melts more smoothly than pre-shredded varieties. The anti-caking agents in bagged cheese can create an unpleasant grainy texture, especially in cold dips where they don't melt away.
- Don't Skip the Resting Period - While this dip is technically ready immediately, the 1-hour refrigeration truly allows flavors to develop and meld. The texture also becomes perfectly firm for spreading.
- Render Bacon Properly - Take extra time cooking bacon until it's deeply crisp. Undercooked bacon becomes chewy in the dip and doesn't develop the full smoky flavor we're after. Baking is more forgiving than pan-frying for consistent results.
- Taste and Season Cold - Always taste your dip right before serving, not while making it. Flavors taste muted when cold, so what seemed under-seasoned at room temperature might be perfectly balanced when chilled.
- Serve with Variety - Pair this dip with crispy crackers, toasted bread cubes, fresh vegetables, and maybe some pretzels. Different vessels highlight different aspects of the flavor profile.
- Save Bacon Grease Strategically - If your bacon rendered significant fat, drain it well before crumbling. A tiny bit of rendered fat adds flavor, but excess fat can make the dip feel greasy sitting at room temperature.