Ingredients
Method
Step 1: Render the Bacon Until It's Perfectly Crispy
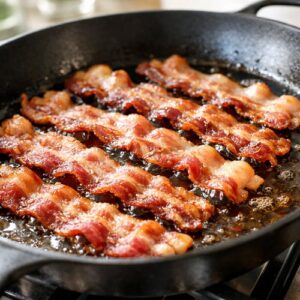
- Place your bacon strips in a cold skillet—I cannot stress this enough. Starting with cold bacon allows the fat to render slowly and evenly, giving you crispy, flavorful strips rather than curled, burnt edges. Set your burner to medium heat (not medium-high; patience is key here). Let the bacon cook for about 8 to 10 minutes, listening for the gentle sizzle. You'll see the fat begin to pool around the edges. When the bacon strips are deeply golden brown with some darker edges and the fat is mostly rendered, transfer them immediately to a paper towel-lined plate. The residual heat will continue cooking them slightly, so remove them just before they look completely done. Once cooled, cut each strip in half lengthwise. This serves two purposes: it makes layering easier, and it ensures every bite includes bacon rather than just some bites being bacon-lucky. Pat away any excess grease with paper towels—we want crispy, not greasy.
Step 2: Prepare Your Bread for Maximum Butter Distribution
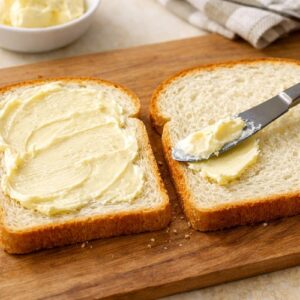
- While the bacon cools, take your two bread slices and arrange them on a cutting board. Using a butter knife, spread exactly 1 tablespoon of softened butter on one side of each slice. The butter should be cool enough to handle but soft enough to spread without tearing the bread. I always leave butter on the counter for 10 minutes before cooking to achieve this sweet spot. This buttered side will be the exterior of your sandwich—it's what creates that gorgeous golden-brown crust in the pan. Make sure your butter reaches into the corners; an evenly buttered surface browns evenly.
Step 3: Build Your Flavor Base With Ranch
- Take the bread slice that doesn't yet have anything on it besides butter. Using the back of a spoon or a small butter knife, spread 1 tablespoon of ranch dressing on the interior side (the side that won't be buttered on the outside). This becomes your flavor foundation and helps keep the bread from drying out during cooking. The creamy dressing acts as a moisture barrier and flavor delivery system. Don't skimp here—the ranch is what makes this sandwich special. A thin layer of dressing isn't enough; you want visible coverage.

Step 4: Layer the Cheese Foundation
- On top of the ranch-dressed bread, distribute half of your extra-sharp cheddar cheese. The key is even distribution—if all the cheese clumps in one spot, you'll have cold spots in your sandwich. Lay down your cheese slices in a slight overlap, or if shredding, sprinkle it across the entire surface. Why add cheese first? Cheese acts as an insulator and flavor amplifier. When it melts directly against the bread, it helps develop a better texture than if you layer proteins first.

Step 5: Layer Your Proteins for Even Distribution
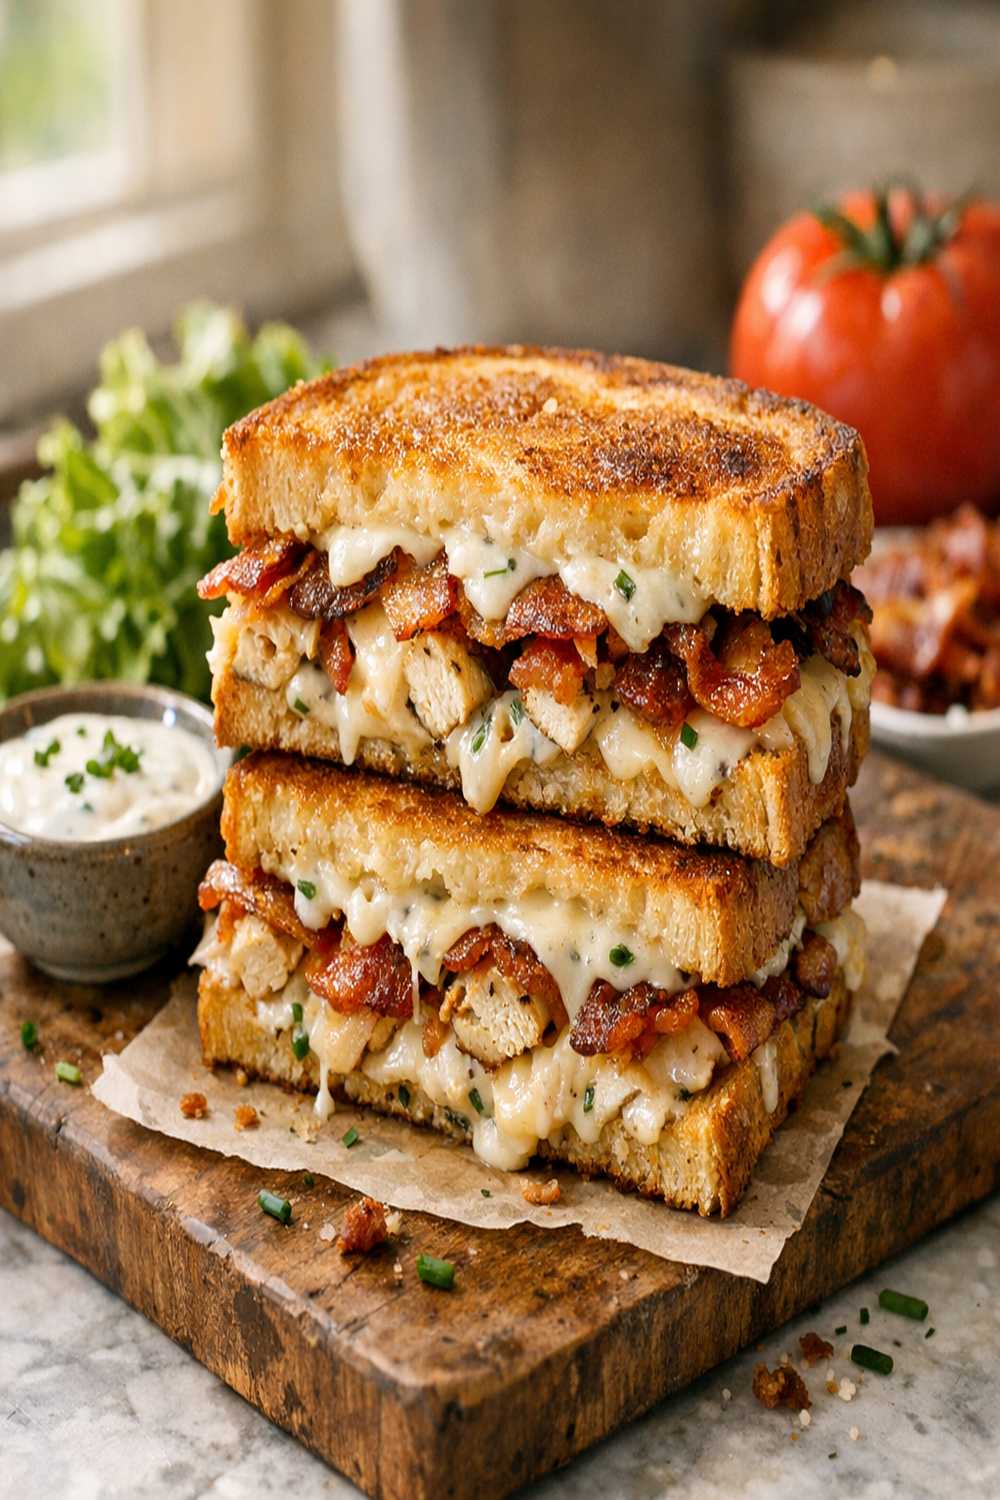
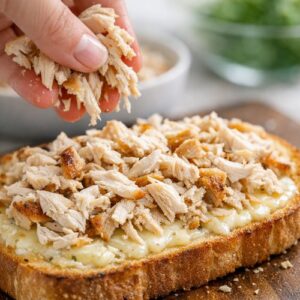
- Now comes the protein layer. Distribute your roasted chicken evenly across the cheese. If it's shredded, scatter it loosely; if it's sliced, lay the pieces out slightly overlapping. You want every bite to include chicken, not just lucky bites. On top of the chicken, arrange your bacon halves. I typically do a criss-cross pattern, which ensures structure and even distribution. The bacon should be visible—don't hide it under the next layer of cheese.
Step 6: Crown With Remaining Cheese and Dressing
- Place the remaining cheddar cheese on top of the bacon layer. This layer of cheese will meld with the cheese below, creating one cohesive, melted blanket. Sprinkle with a tiny pinch of smoked paprika and cracked black pepper if you're using them—this adds a professional finishing touch. Finally, spread the remaining 1 tablespoon of ranch dressing on the interior of your second bread slice (the one that's only buttered on the outside so far). Place it ranch-side down onto your cheese pile, with the butter side facing up. You've now created a complete sandwich that's seasoned on the inside and ready to be crisped on the outside.

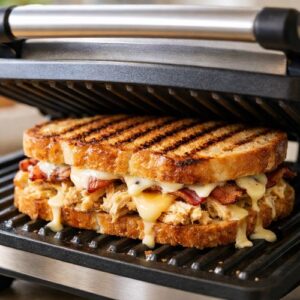
Step 7: Achieve the Perfect Sear (Two Methods)
- Method A: Panini Press (The Easy Route) Preheat your panini press according to manufacturer instructions—usually about 5 minutes. Once hot, carefully transfer your sandwich onto the press. Close the lid and let it cook for 3 to 4 minutes. You're looking for the bread to turn golden brown with light grill marks, and you should hear the cheese starting to sizzle inside. The panini press applies even heat and pressure, which is why it's my preferred method. It's nearly foolproof and produces consistent results. Method B: Skillet (The Traditional Route) Heat a nonstick skillet or cast-iron pan over medium heat for about 2 minutes—you want the pan hot but not smoking. Carefully place your assembled sandwich in the center of the pan, buttered side down. You should hear an immediate, gentle sizzle. This is your confirmation that the heat is right. Let it cook undisturbed for 3 to 4 minutes. Resist the urge to move it around. You're building a golden crust, and that happens through sustained contact with the pan. Peek underneath after 3 minutes to check for color. You want deep golden brown, almost the color of honey. Once the first side is properly browned, flip the sandwich carefully using a sturdy spatula. Here's a pro tip: if you're nervous about it falling apart, place a flat plate or cutting board on top of the sandwich, then flip the entire pan onto that surface, then slide the sandwich back into the pan cooked-side-up. Cook the second side for another 2 to 3 minutes, until it achieves the same golden-brown color. The cheese should be melting—you might see it oozing slightly from the sides, which is exactly what we want. Pro Tip: If your bread is browning too quickly but your cheese isn't melting yet, reduce heat to medium-low and place a lid (or even a baking sheet) over the skillet for the final minute. This traps steam and helps the cheese melt without burning the bread.
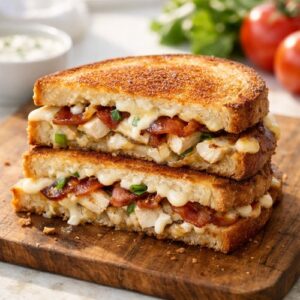
Step 8: Rest and Serve Immediately
- Remove your sandwich from the heat and place it on a cutting board. I know it's tempting to dive right in, but let it rest for 1 to 2 minutes. This allows the cheese to set slightly and makes it less likely to burn your mouth on melted cheddar (a lesson I learned the hard way).p> Using a sharp serrated knife, cut the sandwich diagonally—this isn't just for presentation, though it does look more appealing. Diagonal cuts make the sandwich easier to hold and create two perfectly equal halves. Serve immediately while the cheese is still flowing and the bread is at peak crispness.
Nutrition
Notes
- Use room-temperature chicken - If your chicken is cold from the refrigerator, it won't heat through properly before the cheese melts and the bread browns. If using leftover refrigerated chicken, warm it gently in a skillet or microwave first.
- Don't skip the extra-sharp cheddar - I specify extra-sharp for a reason. Sharp cheddar has more developed, complex flavors than mild varieties. It won't feel overwhelmed by the other ingredients. Mild cheddar can taste one-dimensional alongside ranch and bacon.
- Make homemade ranch for restaurant-quality results - If you have the time, whisk together ½ cup mayo, ¼ cup buttermilk, 1 tablespoon fresh dill, 1 teaspoon chives, ½ teaspoon garlic powder, and salt and pepper. This tastes infinitely better than most store-bought versions and elevates the entire sandwich.
- Invest in quality bacon - Bacon is the supporting actor here, and supporting actors deserve respect. Buy from a butcher if possible; the quality difference between premium bacon and grocery store bacon is noticeable and worthwhile.
- Butter generously but evenly - I cannot overstate how important even butter distribution is. Thin spots won't brown properly and will taste dry; thick spots might burn. Take your time with this step.
- Monitor your heat carefully - Medium heat is your sweet spot. Higher heat will burn the bread before melting the cheese; lower heat will take forever and create a greasy sandwich. If you're using an electric stove, preheat the pan thoroughly.