This post contains affiliate links. As an Amazon Associate I earn from qualifying purchases.
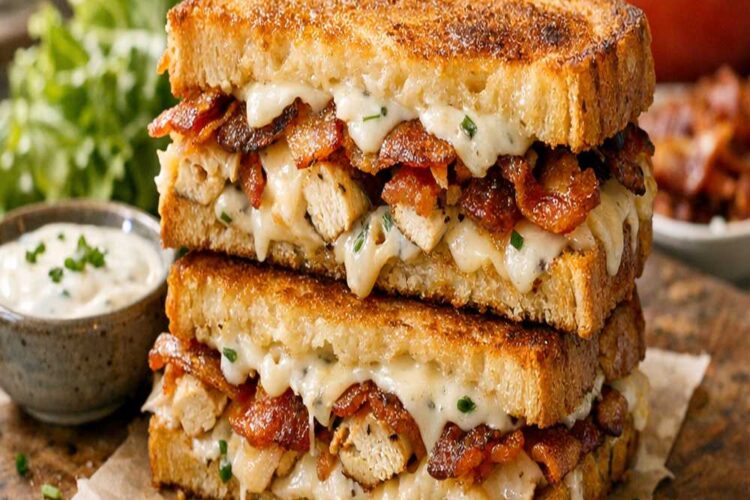
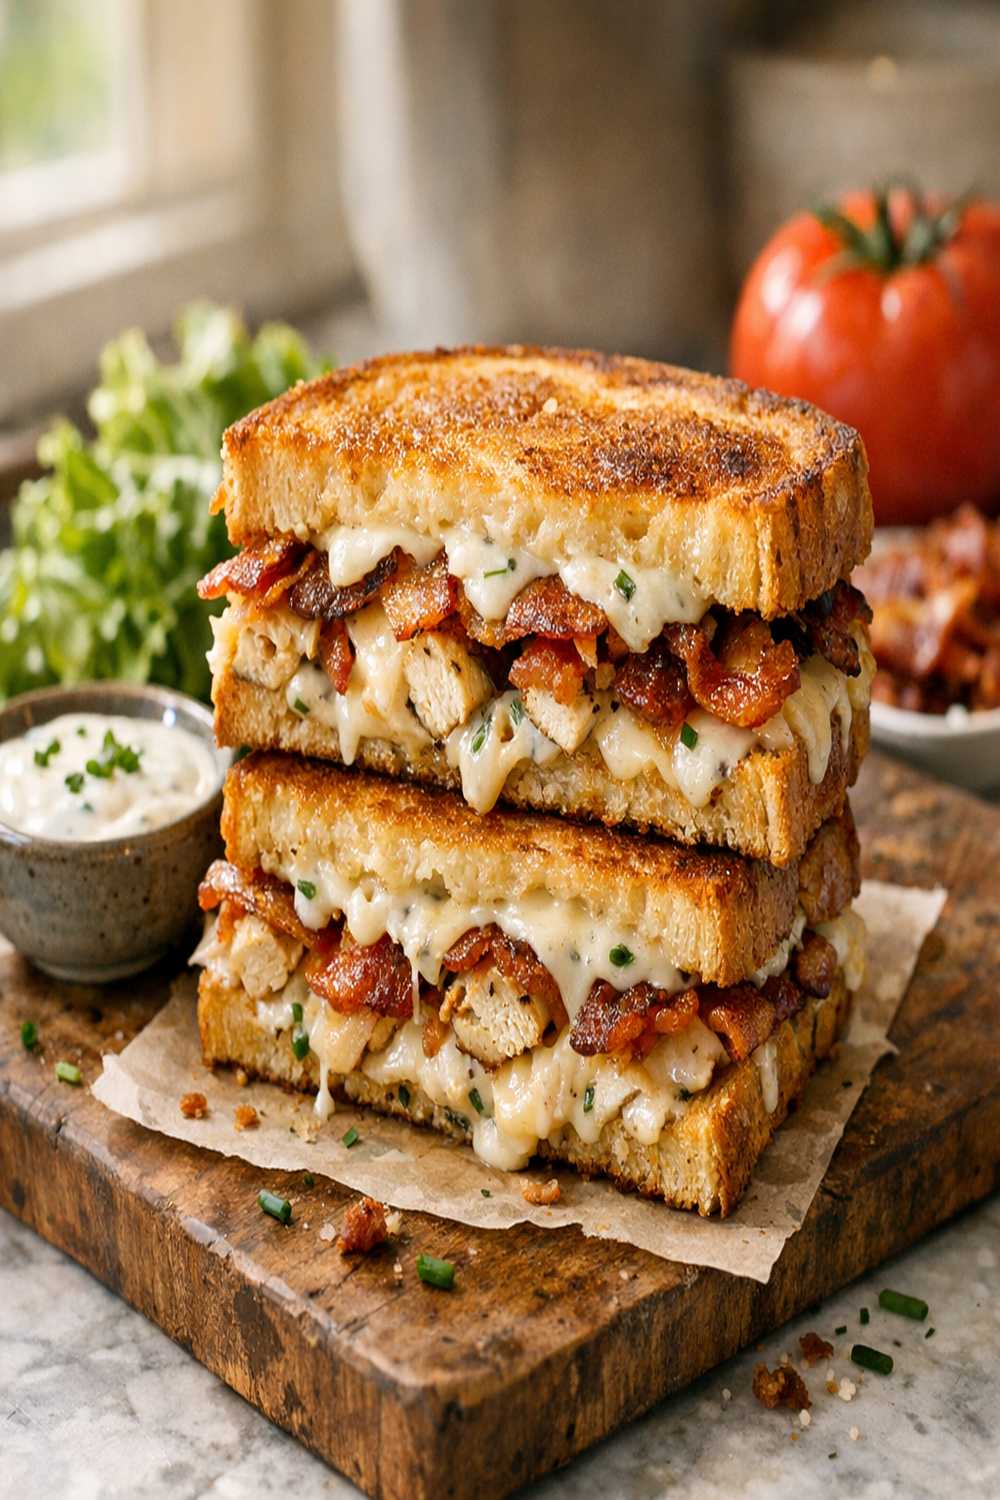
There’s something deeply satisfying about biting into a warm, melty grilled cheese sandwich—especially when it’s loaded with crispy bacon, tender chicken, and that irresistible ranch flavor. This sandwich isn’t just lunch; it’s a celebration of everything we love about classic American comfort food. Pair it with roasted baby carrots for a balanced meal, and you’ve got a plate that’ll have everyone asking for seconds.
The Story Behind This Beloved Sandwich
I’ll never forget the afternoon my grandmother taught me the art of the perfect grilled cheese. I was maybe eight years old, standing on a step stool in her kitchen, watching her butter bread with the precision of an artist. But this recipe? This specific combination of chicken, bacon, and ranch? That came much later, during my culinary travels through the American South and Midwest, where I discovered that ranch dressing isn’t just a condiment—it’s a way of life.
I remember sitting in a tiny deli in Austin, Texas, biting into a similar creation and thinking, “This is the sandwich that bridges the gap between simple elegance and bold flavor.” The creamy ranch plays beautifully against the salty bacon, the cheese melts into every crevice, and the chicken adds substance without heaviness. It’s the kind of sandwich that makes you feel comforted and satisfied all at once.
Since then, I’ve made this countless times—for quick weeknight dinners, casual entertaining, and those moments when I need something warm and reassuring. Today, I’m thrilled to share my perfected version with you, complete with all the professional tips I’ve gathered over years of recipe development and global food exploration.
What is Chicken Bacon Ranch Grilled Cheese Recipe?
This is a gourmet take on the classic grilled cheese sandwich, elevated with protein-rich ingredients that transform it from a simple cheese pull to a complete, satisfying meal. Unlike traditional grilled cheese, which relies solely on cheese for richness, this version layers shredded or sliced roasted chicken, crispy bacon strips, and creamy ranch dressing between buttered bread and melted cheddar cheese.
The beauty of this sandwich lies in its balance of textures and flavors. You get the smoke and saltiness from bacon, the creamy tang of ranch, the richness of extra-sharp cheddar, and the tender protein of chicken—all held together by bread that’s toasted to golden perfection with a crispy exterior and soft interior.
The American grilled cheese has evolved significantly from its Depression-era roots, where it was simply buttered bread and a slice of cheese. This modern interpretation reflects our culinary sophistication and our love of combining flavors from different traditions. Ranch dressing itself is an American classic, developed in the 1950s and now deeply embedded in our food culture.
Why You’ll Love This Chicken Bacon Ranch Grilled Cheese Recipe
- Absolutely crave-worthy flavor combination – The umami-rich bacon, creamy ranch, and savory chicken create a symphony of tastes that work together rather than compete. Each element enhances the others, creating a sandwich that’s greater than the sum of its parts.
- Quick enough for weeknight dinners – From start to finish, this takes about 20 minutes, making it perfect for busy families who refuse to sacrifice flavor for speed.
- Customizable to your preferences – Prefer sourdough over Italian bread? Swap it. Want smoked cheddar instead of extra-sharp? Go for it. This recipe is your foundation, not your prison.
- Packed with protein and satisfaction – Unlike grilled cheese made with just cheese, the addition of chicken and bacon means you’re getting sustained energy. Your hunger won’t return in 30 minutes.
- Impressive enough for guests – Serve these at a casual lunch party or game day gathering, and people will ask for the recipe. It feels restaurant-quality but is completely achievable at home.
- Budget-friendly when planned right – By using rotisserie chicken and cooking bacon yourself, you’ll spend less than you would ordering this at a sandwich shop.
The Ingredients
I’ve sourced each ingredient specifically for how it contributes to the final sandwich. There are no fillers here—everything serves a purpose, from the bread choice to the dressing amount. Let me walk you through what we need and why each component matters.
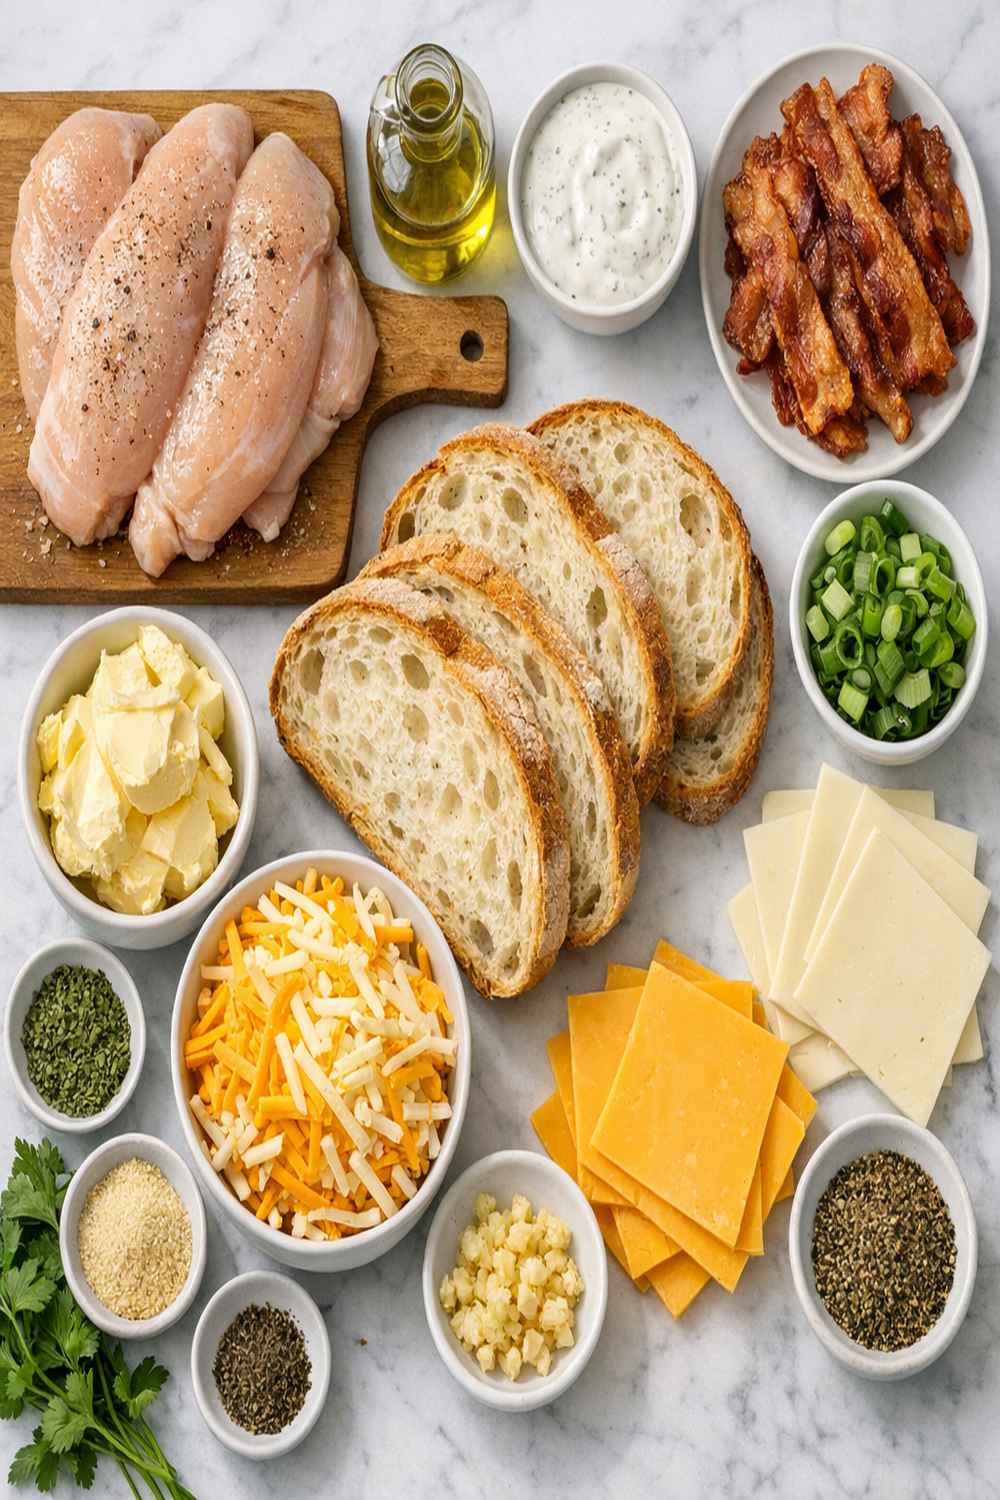
- 2 slices Italian bread (or ciabatta, approximately ½-inch thick for structural integrity)
- ½ teaspoon smoked paprika (optional but highly recommended for depth)
- 2 tablespoons unsalted butter (softened slightly for easier spreading, divided between two bread slices)
- ¼ teaspoon freshly cracked black pepper (to sprinkle between layers for brightness)
- 3 strips bacon (high-quality, not thin-cut—we need substance and smoke flavor)
- 2 ounces extra-sharp cheddar cheese (sliced or shredded, this sharpness prevents the sandwich from feeling one-dimensional)
- 3 ounces roasted chicken (either store-bought rotisserie or homemade, shredded or sliced)
- 2 tablespoons ranch dressing (homemade or quality store-bought—this is your flavor bridge)
Yield: 1 sandwich (easily doubled)
How to Make Chicken Bacon Ranch Grilled Cheese Recipe?
The following steps are where technique meets creativity. I’ve developed this method through extensive testing, and each step builds on the last. Pay attention to temperatures, timing, and the sensory cues I mention—they’re your indicators that you’re on track.
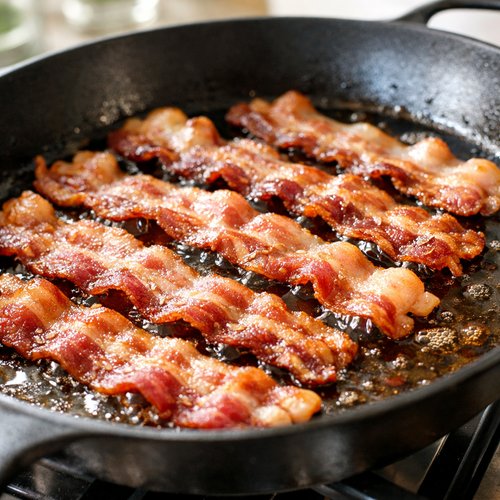
Step 1: Render the Bacon Until It’s Perfectly Crispy
Place your bacon strips in a cold skillet—I cannot stress this enough. Starting with cold bacon allows the fat to render slowly and evenly, giving you crispy, flavorful strips rather than curled, burnt edges. Set your burner to medium heat (not medium-high; patience is key here).
Let the bacon cook for about 8 to 10 minutes, listening for the gentle sizzle. You’ll see the fat begin to pool around the edges. When the bacon strips are deeply golden brown with some darker edges and the fat is mostly rendered, transfer them immediately to a paper towel-lined plate. The residual heat will continue cooking them slightly, so remove them just before they look completely done.
Once cooled, cut each strip in half lengthwise. This serves two purposes: it makes layering easier, and it ensures every bite includes bacon rather than just some bites being bacon-lucky. Pat away any excess grease with paper towels—we want crispy, not greasy.
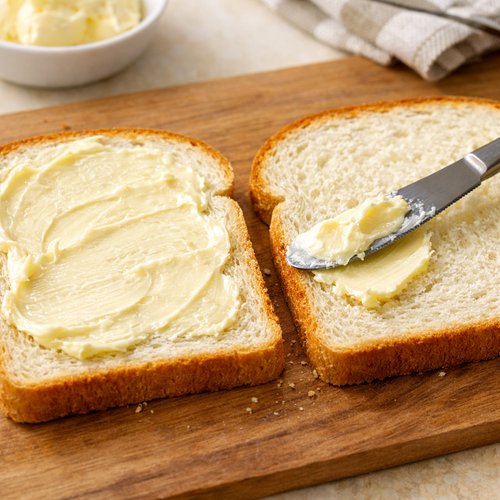
Step 2: Prepare Your Bread for Maximum Butter Distribution
While the bacon cools, take your two bread slices and arrange them on a cutting board. Using a butter knife, spread exactly 1 tablespoon of softened butter on one side of each slice. The butter should be cool enough to handle but soft enough to spread without tearing the bread. I always leave butter on the counter for 10 minutes before cooking to achieve this sweet spot.
This buttered side will be the exterior of your sandwich—it’s what creates that gorgeous golden-brown crust in the pan. Make sure your butter reaches into the corners; an evenly buttered surface browns evenly.
Step 3: Build Your Flavor Base With Ranch
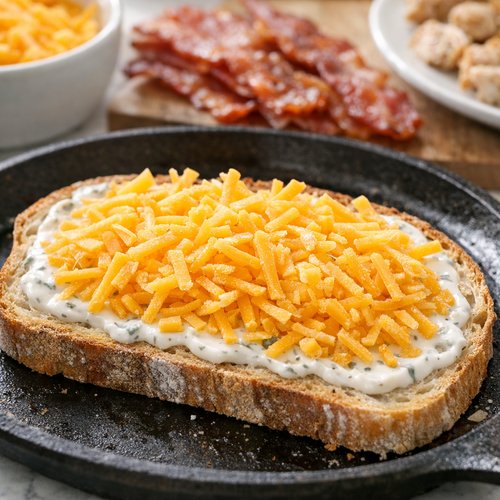
Take the bread slice that doesn’t yet have anything on it besides butter. Using the back of a spoon or a small butter knife, spread 1 tablespoon of ranch dressing on the interior side (the side that won’t be buttered on the outside). This becomes your flavor foundation and helps keep the bread from drying out during cooking.
The creamy dressing acts as a moisture barrier and flavor delivery system. Don’t skimp here—the ranch is what makes this sandwich special. A thin layer of dressing isn’t enough; you want visible coverage.

Step 4: Layer the Cheese Foundation
On top of the ranch-dressed bread, distribute half of your extra-sharp cheddar cheese. The key is even distribution—if all the cheese clumps in one spot, you’ll have cold spots in your sandwich. Lay down your cheese slices in a slight overlap, or if shredding, sprinkle it across the entire surface.
Why add cheese first? Cheese acts as an insulator and flavor amplifier. When it melts directly against the bread, it helps develop a better texture than if you layer proteins first.
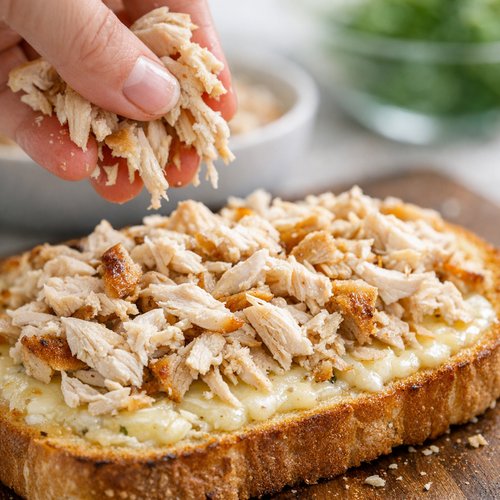
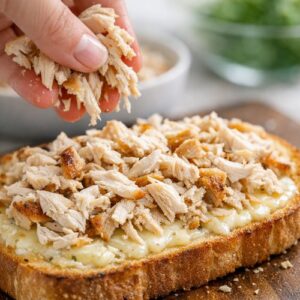
Step 5: Layer Your Proteins for Even Distribution
Now comes the protein layer. Distribute your roasted chicken evenly across the cheese. If it’s shredded, scatter it loosely; if it’s sliced, lay the pieces out slightly overlapping. You want every bite to include chicken, not just lucky bites.
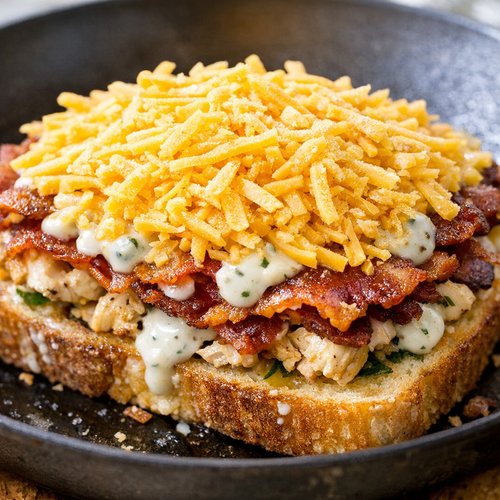
On top of the chicken, arrange your bacon halves. I typically do a criss-cross pattern, which ensures structure and even distribution. The bacon should be visible—don’t hide it under the next layer of cheese.
Step 6: Crown With Remaining Cheese and Dressing
Place the remaining cheddar cheese on top of the bacon layer. This layer of cheese will meld with the cheese below, creating one cohesive, melted blanket. Sprinkle with a tiny pinch of smoked paprika and cracked black pepper if you’re using them—this adds a professional finishing touch.
Finally, spread the remaining 1 tablespoon of ranch dressing on the interior of your second bread slice (the one that’s only buttered on the outside so far). Place it ranch-side down onto your cheese pile, with the butter side facing up. You’ve now created a complete sandwich that’s seasoned on the inside and ready to be crisped on the outside.
Step 7: Achieve the Perfect Sear (Two Methods)
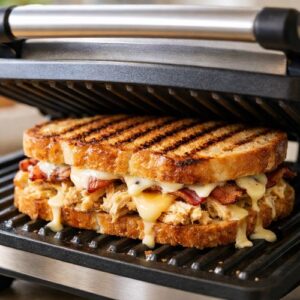
Method A: Panini Press (The Easy Route)
Preheat your panini press according to manufacturer instructions—usually about 5 minutes. Once hot, carefully transfer your sandwich onto the press. Close the lid and let it cook for 3 to 4 minutes. You’re looking for the bread to turn golden brown with light grill marks, and you should hear the cheese starting to sizzle inside.
The panini press applies even heat and pressure, which is why it’s my preferred method. It’s nearly foolproof and produces consistent results.
Method B: Skillet (The Traditional Route)
Heat a nonstick skillet or cast-iron pan over medium heat for about 2 minutes—you want the pan hot but not smoking. Carefully place your assembled sandwich in the center of the pan, buttered side down. You should hear an immediate, gentle sizzle. This is your confirmation that the heat is right.
Let it cook undisturbed for 3 to 4 minutes. Resist the urge to move it around. You’re building a golden crust, and that happens through sustained contact with the pan. Peek underneath after 3 minutes to check for color. You want deep golden brown, almost the color of honey.
Once the first side is properly browned, flip the sandwich carefully using a sturdy spatula. Here’s a pro tip: if you’re nervous about it falling apart, place a flat plate or cutting board on top of the sandwich, then flip the entire pan onto that surface, then slide the sandwich back into the pan cooked-side-up.
Cook the second side for another 2 to 3 minutes, until it achieves the same golden-brown color. The cheese should be melting—you might see it oozing slightly from the sides, which is exactly what we want.
Pro Tip: If your bread is browning too quickly but your cheese isn’t melting yet, reduce heat to medium-low and place a lid (or even a baking sheet) over the skillet for the final minute. This traps steam and helps the cheese melt without burning the bread.

Step 8: Rest and Serve Immediately
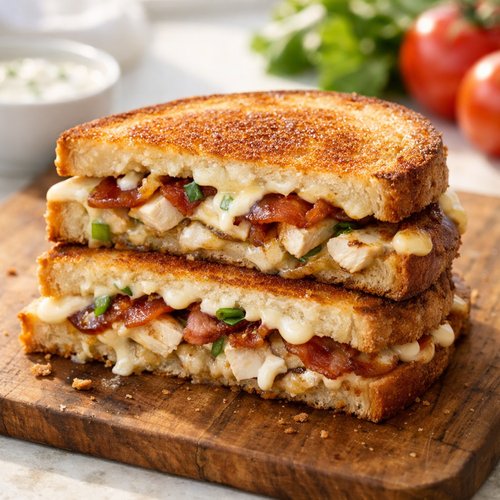
Remove your sandwich from the heat and place it on a cutting board. I know it’s tempting to dive right in, but let it rest for 1 to 2 minutes. This allows the cheese to set slightly and makes it less likely to burn your mouth on melted cheddar (a lesson I learned the hard way).p>
Using a sharp serrated knife, cut the sandwich diagonally—this isn’t just for presentation, though it does look more appealing. Diagonal cuts make the sandwich easier to hold and create two perfectly equal halves. Serve immediately while the cheese is still flowing and the bread is at peak crispness.
Tips and Tricks
- Use room-temperature chicken – If your chicken is cold from the refrigerator, it won’t heat through properly before the cheese melts and the bread browns. If using leftover refrigerated chicken, warm it gently in a skillet or microwave first.
- Don’t skip the extra-sharp cheddar – I specify extra-sharp for a reason. Sharp cheddar has more developed, complex flavors than mild varieties. It won’t feel overwhelmed by the other ingredients. Mild cheddar can taste one-dimensional alongside ranch and bacon.
- Make homemade ranch for restaurant-quality results – If you have the time, whisk together ½ cup mayo, ¼ cup buttermilk, 1 tablespoon fresh dill, 1 teaspoon chives, ½ teaspoon garlic powder, and salt and pepper. This tastes infinitely better than most store-bought versions and elevates the entire sandwich.
- Invest in quality bacon – Bacon is the supporting actor here, and supporting actors deserve respect. Buy from a butcher if possible; the quality difference between premium bacon and grocery store bacon is noticeable and worthwhile.
- Butter generously but evenly – I cannot overstate how important even butter distribution is. Thin spots won’t brown properly and will taste dry; thick spots might burn. Take your time with this step.
- Monitor your heat carefully – Medium heat is your sweet spot. Higher heat will burn the bread before melting the cheese; lower heat will take forever and create a greasy sandwich. If you’re using an electric stove, preheat the pan thoroughly.
- The press-down trick works if you don’t have a panini press – Place a heavy cast-iron skillet or press on top of your sandwich while it cooks on the first side. This increases contact between bread and pan, creating more even browning and faster cheese melting.
Expert’s Nutritional Insight
As someone who’s spent years studying how ingredients interact nutritionally, I want to highlight something important about this sandwich: the combination of chicken, bacon, and ranch creates a complete protein profile. While some home cooks worry about the fat content from bacon and cheese, these aren’t “empty” fats—they’re nutrient-dense fats that facilitate absorption of fat-soluble vitamins and provide satiety. The chicken adds lean protein, which helps stabilize blood sugar. Pair this with those roasted vegetables, and you’re looking at a nutritionally balanced meal, not just comfort food.
Make-Ahead Guide
One of my favorite aspects of developing recipes is figuring out how to make them work with real life. Most of us don’t have time to cook elaborate lunches during the workweek, so here’s how I prepare this sandwich for busy days.
The Evening Before (15 minutes of prep): Cook your bacon and let it cool completely, then store it in an airtight container in the refrigerator. This bacon will stay crispy for up to 4 days and actually tastes better when it’s cooled and stored—it becomes even crispier. Prepare your ranch dressing if making homemade; it keeps for up to a week.
The Morning Of (5 minutes to assemble and cook): Assemble the sandwich exactly as instructed, using the pre-cooked bacon. The only step that cannot be done ahead is the actual grilling, as you need the bread warm and cheese melted. However, because all your components are prepared, you can go from zero to sandwich in about 5 minutes of total cooking time.
Alternative: Assemble Completely, Then Freeze: You can actually assemble the entire sandwich, wrap it tightly in plastic wrap, and freeze it for up to 2 weeks. When ready to cook, add 1 to 2 minutes to your cooking time (don’t thaw first). The bread will be slightly denser after freezing, but the sandwich will still be delicious. I do this on Sunday nights for quick lunches throughout the week.
Common Mistakes to Avoid
- Using bread that’s too thin – Thin bread will tear during flipping and won’t provide enough structure for a satisfying bite. Aim for bread that’s at least ½-inch thick. Thin white bread is the enemy here.
- Not rendering bacon properly – If your bacon is still floppy after cooking, it won’t add the textural contrast this sandwich needs. Cook it until it’s legitimately crispy. If it’s not making snapping sounds, it needs more time.
- Using cold cheese straight from the package – Cheese that comes directly from refrigeration melts slower and less evenly. I often let my cheese sit out for 15 minutes before assembling, or I use pre-shredded cheese that melts more quickly due to its composition.
- Overcrowding the sandwich – More ingredients doesn’t equal better. The measurements I’ve provided create the perfect ratio of flavors. Going overboard with chicken or cheese throws off the balance.
Seasonal Variations
Spring Version: Add fresh arugula or peppery greens inside the sandwich for brightness. The greens will slightly wilt from the heat, adding texture without heaviness. This works beautifully and adds a seasonal freshness.
Summer Version: Incorporate roasted red peppers or sun-dried tomatoes between the chicken and bacon layers. These add sweetness and acidity that balance the richness of the cheese. Serve with a cold side salad instead of warm vegetables.
Fall Version: Brush the exterior bread with a tiny amount of chipotle mayo before buttering (so the butter goes on top). Add a small amount of crispy sage leaves to the chicken layer. The earthiness of sage complements bacon beautifully and feels seasonal.
Winter Version: Add a thin smear of whole-grain mustard under the ranch layer for complexity. Use smoked cheddar instead of extra-sharp. These additions make the sandwich feel richer and more warming.
Can I Store Chicken Bacon Ranch Grilled Cheese?
Once cooked, grilled cheese sandwiches are best enjoyed immediately. The moment the sandwich cools, the cheese becomes firm and the bread starts to harden. That said, I understand that sometimes you have leftovers or need to pack lunch.
Short-term storage (same day): Wrap the cooled sandwich in foil and store at room temperature for up to 2 hours. Reheat in a 350°F oven for 5 to 7 minutes to revive the cheese.
Refrigerator storage: Store in an airtight container for up to 2 days. The sandwich will taste decent cold but best when reheated. Reheat in a skillet over low heat for 2 to 3 minutes per side, or in the oven at 350°F for 8 to 10 minutes wrapped in foil.
Freezer storage: As mentioned in the Make-Ahead section, you can freeze assembled uncooked sandwiches for up to 2 weeks. Frozen cooked sandwiches are not recommended—the texture changes significantly.
Nutrition Information
Based on USDA data for standard portions, a single chicken bacon ranch grilled cheese sandwich contains approximately:
- Calories: 620-680 (depending on bread and dressing brand)
- Protein: 34 grams (excellent for satiety)
- Total Fat: 38 grams (including healthy fats from cheese and bacon)
- Saturated Fat: 15 grams
- Carbohydrates: 42 grams
- Fiber: 2 grams
- Sodium: 1,100 mg (primarily from bacon and dressing)
This sandwich works best as part of a balanced meal that includes vegetables and perhaps a lighter side. The protein content is substantial, which means it keeps you satisfied for hours. If you’re watching sodium, homemade ranch and lower-sodium bacon can reduce the salt content meaningfully.
What Can I Serve With Chicken Bacon Ranch Grilled Cheese?
While this sandwich is hearty enough to stand alone, thoughtful sides elevate it from lunch to a memorable meal. I love pairing it with complementary flavors and textures that won’t overshadow the sandwich itself.
Try apple cider vinegar coleslaw for a tangy, crunchy contrast that cuts through the richness of the cheese and bacon. The brightness of vinegar-based slaw is the perfect counterpoint to creamy ranch.
For those wanting something warm, roasted baby carrots bring natural sweetness and caramelized depth without competing for attention. The sweetness of roasted carrots complements the savory sandwich beautifully.
- Tomato soup – The classic pairing. Creamy or broth-based tomato soup echoes the comfort of the sandwich and creates a cohesive meal. A 1-cup serving pairs perfectly.
- Green salad with light vinaigrette – This keeps the meal from feeling too heavy. I suggest a simple lemon-Dijon vinaigrette to add brightness without cream.
- Pickles or pickle spears – The acidity and crunch provide textural contrast. Dill or bread-and-butter pickles both work, depending on your preference.
- Sweet potato fries – If you want to lean into the comfort food angle, crispy sweet potato fries add sweetness and create a satisfying finger-food element.
- Cold beverages – Iced tea, lemonade, or a crisp apple cider (in fall and winter) pair beautifully. Avoid heavy sodas that compete with the sandwich’s flavors.
Substitutes
- Different cheese varieties – Gruyère adds nutty complexity; smoked gouda brings depth; sharp white cheddar offers tanginess. The key is choosing a cheese that melts well and has flavor to stand up to bacon and ranch. Avoid soft cheeses like brie or fresh mozzarella, which melt too quickly and don’t create the binding effect we need.
- Alternative proteins – Ground turkey can replace chicken for a leaner option. Turkey bacon (though less flavorful) works if you’re reducing fat intake. Smoked ham adds a different pork flavor. Rotisserie duck would be luxurious if you’re feeling fancy.
- Bread options – Sourdough adds tanginess; brioche adds richness and sweetness; focaccia adds herb notes and olive oil flavor. Ciabatta is my second choice after Italian bread—slightly airier but still sturdy. Avoid sandwich bread, which is too thin and soft.
- Ranch dressing alternatives – Creamy garlic aioli for a more sophisticated route; buttermilk blue cheese dressing for bold flavor; herb cream cheese thinned with a little milk for richness. Homemade versions always outperform commercial bottles.
- Bacon alternatives – Pancetta for Italian flair; applewood-smoked bacon for deeper smoke flavor; Canadian bacon for leaner protein. Turkey bacon works in a pinch but lacks the richness that makes this sandwich special.
Chicken Bacon Ranch Grilled Cheese Recipe
Ingredients
Method
- Place your bacon strips in a cold skillet—I cannot stress this enough. Starting with cold bacon allows the fat to render slowly and evenly, giving you crispy, flavorful strips rather than curled, burnt edges. Set your burner to medium heat (not medium-high; patience is key here). Let the bacon cook for about 8 to 10 minutes, listening for the gentle sizzle. You'll see the fat begin to pool around the edges. When the bacon strips are deeply golden brown with some darker edges and the fat is mostly rendered, transfer them immediately to a paper towel-lined plate. The residual heat will continue cooking them slightly, so remove them just before they look completely done. Once cooled, cut each strip in half lengthwise. This serves two purposes: it makes layering easier, and it ensures every bite includes bacon rather than just some bites being bacon-lucky. Pat away any excess grease with paper towels—we want crispy, not greasy.

- While the bacon cools, take your two bread slices and arrange them on a cutting board. Using a butter knife, spread exactly 1 tablespoon of softened butter on one side of each slice. The butter should be cool enough to handle but soft enough to spread without tearing the bread. I always leave butter on the counter for 10 minutes before cooking to achieve this sweet spot. This buttered side will be the exterior of your sandwich—it's what creates that gorgeous golden-brown crust in the pan. Make sure your butter reaches into the corners; an evenly buttered surface browns evenly.

- Take the bread slice that doesn't yet have anything on it besides butter. Using the back of a spoon or a small butter knife, spread 1 tablespoon of ranch dressing on the interior side (the side that won't be buttered on the outside). This becomes your flavor foundation and helps keep the bread from drying out during cooking. The creamy dressing acts as a moisture barrier and flavor delivery system. Don't skimp here—the ranch is what makes this sandwich special. A thin layer of dressing isn't enough; you want visible coverage.

- On top of the ranch-dressed bread, distribute half of your extra-sharp cheddar cheese. The key is even distribution—if all the cheese clumps in one spot, you'll have cold spots in your sandwich. Lay down your cheese slices in a slight overlap, or if shredding, sprinkle it across the entire surface. Why add cheese first? Cheese acts as an insulator and flavor amplifier. When it melts directly against the bread, it helps develop a better texture than if you layer proteins first.

- Now comes the protein layer. Distribute your roasted chicken evenly across the cheese. If it's shredded, scatter it loosely; if it's sliced, lay the pieces out slightly overlapping. You want every bite to include chicken, not just lucky bites. On top of the chicken, arrange your bacon halves. I typically do a criss-cross pattern, which ensures structure and even distribution. The bacon should be visible—don't hide it under the next layer of cheese.
- Place the remaining cheddar cheese on top of the bacon layer. This layer of cheese will meld with the cheese below, creating one cohesive, melted blanket. Sprinkle with a tiny pinch of smoked paprika and cracked black pepper if you're using them—this adds a professional finishing touch. Finally, spread the remaining 1 tablespoon of ranch dressing on the interior of your second bread slice (the one that's only buttered on the outside so far). Place it ranch-side down onto your cheese pile, with the butter side facing up. You've now created a complete sandwich that's seasoned on the inside and ready to be crisped on the outside.

- Method A: Panini Press (The Easy Route) Preheat your panini press according to manufacturer instructions—usually about 5 minutes. Once hot, carefully transfer your sandwich onto the press. Close the lid and let it cook for 3 to 4 minutes. You're looking for the bread to turn golden brown with light grill marks, and you should hear the cheese starting to sizzle inside. The panini press applies even heat and pressure, which is why it's my preferred method. It's nearly foolproof and produces consistent results. Method B: Skillet (The Traditional Route) Heat a nonstick skillet or cast-iron pan over medium heat for about 2 minutes—you want the pan hot but not smoking. Carefully place your assembled sandwich in the center of the pan, buttered side down. You should hear an immediate, gentle sizzle. This is your confirmation that the heat is right. Let it cook undisturbed for 3 to 4 minutes. Resist the urge to move it around. You're building a golden crust, and that happens through sustained contact with the pan. Peek underneath after 3 minutes to check for color. You want deep golden brown, almost the color of honey. Once the first side is properly browned, flip the sandwich carefully using a sturdy spatula. Here's a pro tip: if you're nervous about it falling apart, place a flat plate or cutting board on top of the sandwich, then flip the entire pan onto that surface, then slide the sandwich back into the pan cooked-side-up. Cook the second side for another 2 to 3 minutes, until it achieves the same golden-brown color. The cheese should be melting—you might see it oozing slightly from the sides, which is exactly what we want. Pro Tip: If your bread is browning too quickly but your cheese isn't melting yet, reduce heat to medium-low and place a lid (or even a baking sheet) over the skillet for the final minute. This traps steam and helps the cheese melt without burning the bread.
- Remove your sandwich from the heat and place it on a cutting board. I know it's tempting to dive right in, but let it rest for 1 to 2 minutes. This allows the cheese to set slightly and makes it less likely to burn your mouth on melted cheddar (a lesson I learned the hard way).p> Using a sharp serrated knife, cut the sandwich diagonally—this isn't just for presentation, though it does look more appealing. Diagonal cuts make the sandwich easier to hold and create two perfectly equal halves. Serve immediately while the cheese is still flowing and the bread is at peak crispness.

Nutrition
Notes
Tried this recipe?
Let us know how it was!FAQs
Can I make this sandwich with a waffle iron instead of a panini press?
Yes, though with caveats! Waffle irons create deeper indentations and cook faster than panini presses. You’ll need to assemble a slightly thinner sandwich and watch carefully—typically 2 to 3 minutes max. The texture will be different (more textured exterior, not smooth grill marks), and you risk cheese leaking out the sides more easily. It works in a pinch, but a panini press or skillet is preferable.
Is it okay to use deli-sliced roasted chicken instead of rotisserie chicken?
Absolutely. Deli turkey or rotisserie chicken from your local market both work wonderfully. The advantage of rotisserie is that it’s already seasoned and comes in convenient shreds. If using deli slices, tear them into smaller pieces so they distribute evenly. Avoid pre-packaged “roast chicken salad” with added mayo, as this changes the flavor profile.
My cheese isn’t melting enough before the bread browns. What should I do?
This typically happens when: (1) your pan or press isn’t hot enough—ensure proper preheating; (2) your cheese is cold—let it sit out 15 minutes; or (3) you’re cooking too fast on high heat, which browns bread before cheese melts. Solution: reduce heat slightly and place a cover over the sandwich to trap steam, which accelerates cheese melting without browning the bread further. Usually adds just 1 to 2 minutes to cooking time but solves the problem.
Can I use mayonnaise instead of butter to cook the sandwich?
Mayo contains water and emulsifiers that behave differently than butter under heat. While mayo-cooked grilled cheese is a legitimate technique (and produces a different texture), it’s not what I recommend here. Butter creates a cleaner crust and superior browning. If you want to use mayo, use a 50/50 blend of butter and mayo for best results, which gives you the browning power of butter with a slight texture twist from the mayo.
How do I prevent the bacon from getting soggy from the other ingredients?
This is actually hard to do if your bacon is crispy when you add it. The key is: (1) render your bacon until it’s very crispy, not just barely cooked; (2) don’t let the assembled sandwich sit for more than 2 to 3 minutes before cooking—moisture from the chicken and dressing will start migrating to the bacon; (3) cook immediately once assembled. If you’re doing the make-ahead approach, store the bacon separately and add it during cooking rather than before. This preserves crispiness.
More Recipes You’ll Love
- Bacon Cheddar Dip – If you love the bacon-cheddar combination, this creamy appetizer delivers those same flavors in a different format. Perfect for game day or casual entertaining.
- BLT Wraps With Secret Sauce – Another bacon-forward recipe that plays with similar flavor profiles but in a lighter, wrap-based format for those who want something less heavy than a grilled cheese.
- Alice Springs Chicken Sauce – This restaurant-famous sauce combines bacon, cheese, and creamy elements similar to what makes our grilled cheese special. A wonderful way to vary how you use roasted chicken.
- This Easy Chicken Dinner – Worth adding to your recipe collection.
- This Flavorful Chicken Dish – Worth adding to your recipe collection.
There’s deep magic in the simplicity of a truly excellent grilled cheese sandwich. This version honors that tradition while celebrating the American flavors we crave—bacon, ranch, cheese, and chicken coming together in perfect harmony. Whether you’re making this for a quick lunch, packing it for a picnic, or serving it to guests who need impressing, you now have all the knowledge and techniques to execute it flawlessly.
I’ve walked you through not just the recipe, but the why behind every decision—the science of rendering bacon, the balance of flavors, the technique of achieving perfect browning. Cook this once, and you’ll develop instincts that will let you make it blindfolded. Make it twice, and it becomes yours to customize and adapt.
The next time you bite into one of these sandwiches—that moment when the melted cheese and crispy bacon hit your palate together—I hope you feel the same contentment I feel every single time. This is comfort food elevated, tradition honored, and flavor celebrated all at once. Enjoy!