This post contains affiliate links. As an Amazon Associate I earn from qualifying purchases.
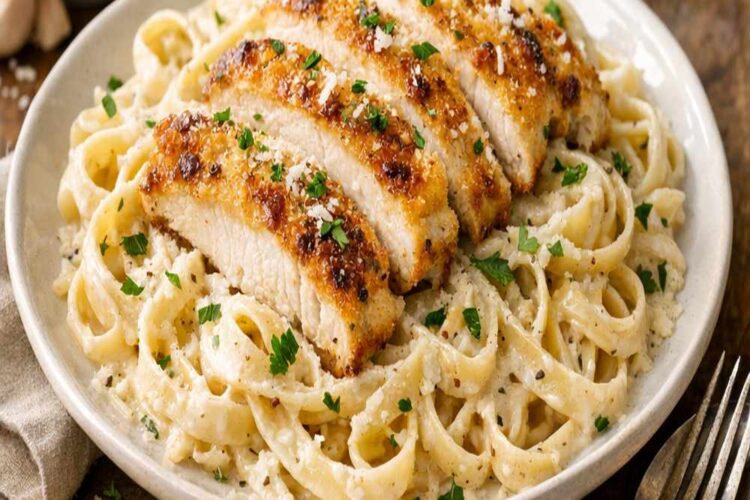
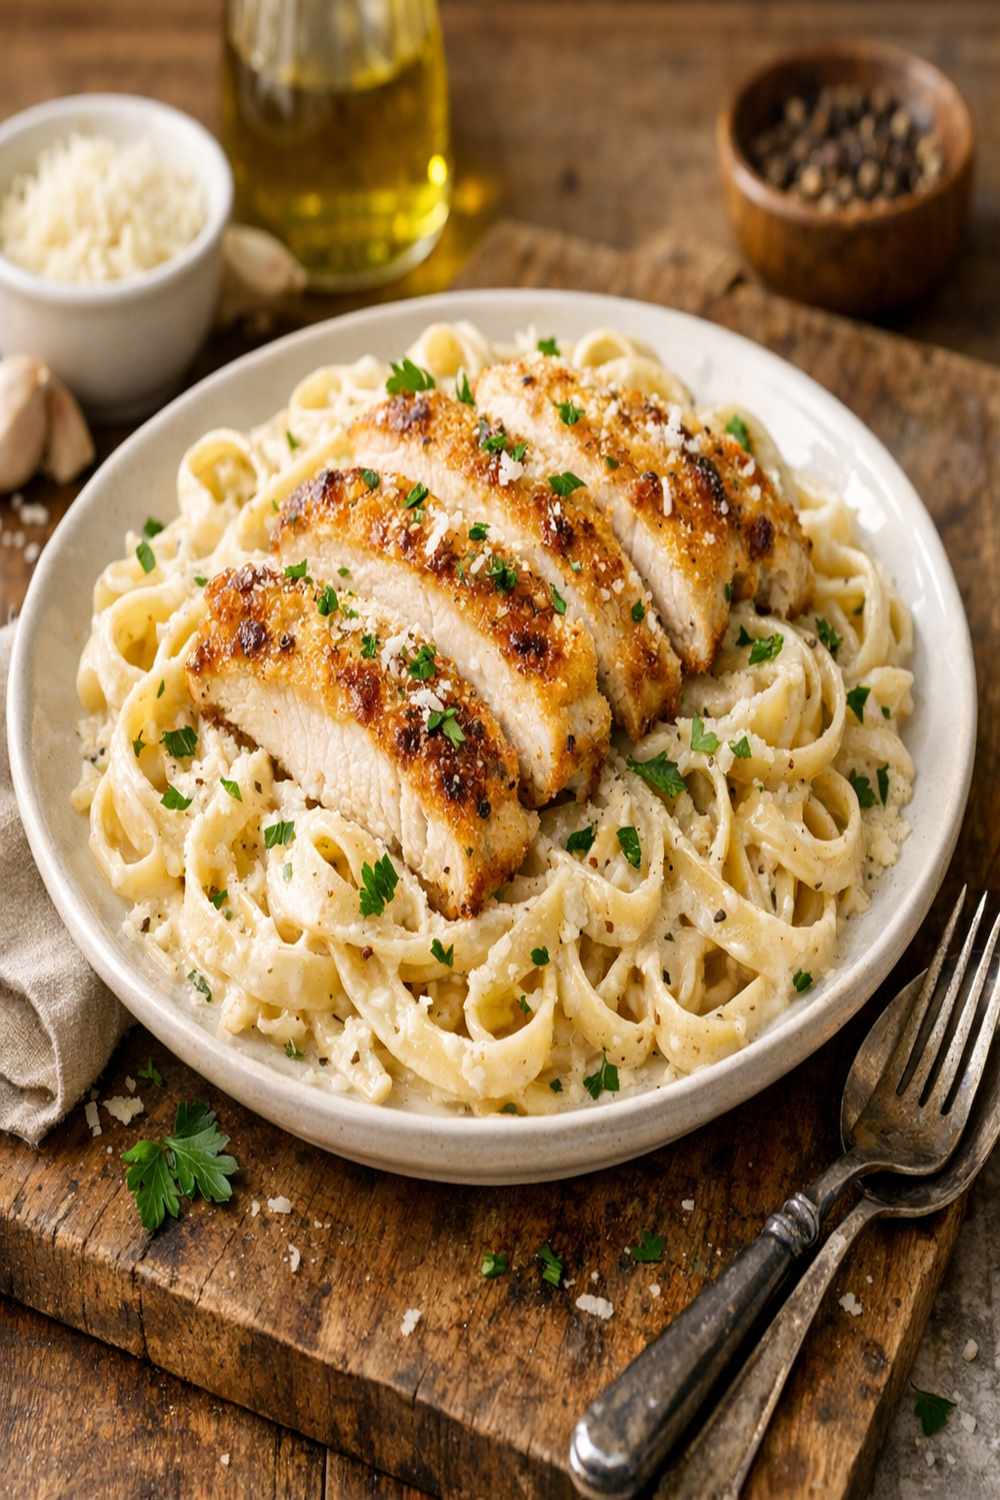
There’s something absolutely magical about twirling a fork through silky, cream-laden fettuccine topped with perfectly seared chicken. This Chicken Alfredo Parmesan recipe has been a weeknight hero in my kitchen for years—it’s elegant enough for date night, yet simple enough that you’ll make it again and again. I love serving it alongside roasted baby carrots or a crisp green salad for a completely satisfying meal.
How This Classic Italian-American Dish Became My Family’s Favorite
I grew up watching my Italian grandmother make variations of Alfredo sauce in her tiny kitchen in Boston, where she’d arrived with nothing but her recipes and an unshakeable determination to feed her family well. She never measured—just intuition, cream, butter, and cheese. But when I started developing recipes professionally, I realized that home cooks needed structure, confidence, and the science behind why these flavors work so beautifully together.
This recipe represents that perfect marriage: my grandmother’s soul and my professional precision. The first time I made it for my husband, he looked up from his plate and said, “This tastes like Sunday dinner at your nonna’s house.” That’s when I knew I’d cracked the code. It’s creamy without being heavy, the sauce clings perfectly to each strand of pasta, and the chicken stays incredibly tender because we respect its cooking time and temperature.
What I love most? This dish comes together in under 30 minutes, which means you’re not spending your entire evening in the kitchen.
What is Chicken Alfredo Parmesan Recipe?
Authentic Alfredo sauce originated in Rome during the 1920s, created by chef Alfredo di Lelio for his pregnant wife who needed something nourishing and easy to digest. The original recipe contained just three ingredients: butter, cream, and Parmigiano-Reggiano cheese. It was pure simplicity—a philosophy I’ve carried into this version.
What makes this particular Chicken Alfredo Parmesan recipe special is the balance. We’re not adding cream cheese, heavy cream thickeners, or unnecessary ingredients that cloud the delicate cheese flavor. Instead, we’re building layers of savory depth through proper seasoning, the gentle cooking of garlic and spices, and high-quality Parmesan that melts into the sauce like silk.
The chicken isn’t an afterthought—it’s carefully seared to develop a golden crust while staying juicy inside, then sliced and nestled on top where it becomes the star alongside those luxurious ribbons of pasta.
Why You’ll Love This Chicken Alfredo Parmesan Recipe
- Under 30 Minutes from Start to Table – This is a genuine weeknight dinner that doesn’t require you to sacrifice quality or flavor for speed. The entire process, from water boiling to plating, takes approximately 25-28 minutes.
- Restaurant-Quality Results at Home – You’ll achieve that silky, luxurious sauce that seems impossible to recreate in a home kitchen. The secret lies in temperature control and proper emulsification, which I’ll explain in the steps.
- Foolproof Technique for All Skill Levels – Whether you’re cooking your first dinner or your hundredth, the step-by-step approach ensures success. I’ve included troubleshooting tips for every potential pitfall.
- Customizable for Your Preferences – This recipe serves as a beautiful canvas. You can add mushrooms, sun-dried tomatoes, spinach, or fresh herbs without disrupting the core technique.
- Pantry-Friendly Ingredients – Everything here is accessible at any grocery store. No exotic imports or hard-to-find specialty items required, though using the highest quality cheese and cream does make a noticeable difference.
- Naturally Satisfying and Elegant – This isn’t a side dish kind of meal. Chicken Alfredo is complete in itself—protein, carbs, and rich, savory satisfaction all on one plate.
The Ingredients
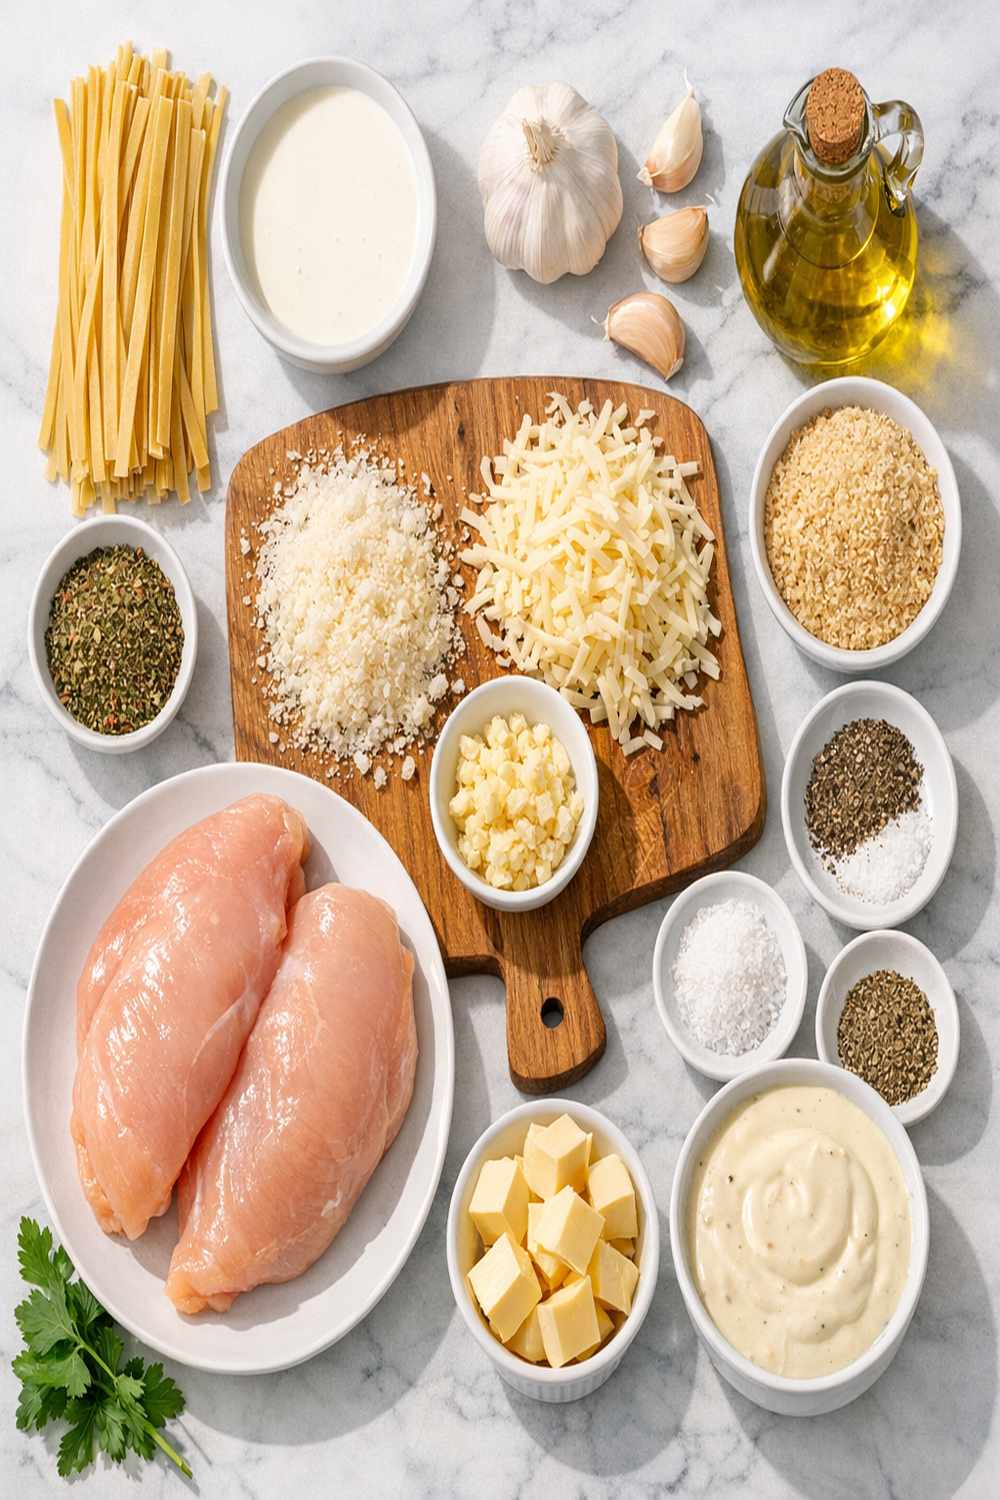
I’ve organized these ingredients by their role in the dish. Each component matters, and I encourage you to source the best quality versions you can find. Fresh garlic, real butter, and authentic Parmigiano-Reggiano make an absolutely noticeable difference here.
For the Pasta and Chicken
- 1 tablespoon unsalted butter (for finishing the chicken)
- 16 ounces dry fettuccine pasta (bronze-cut preferred for better sauce cling)
- 1/4 teaspoon freshly ground black pepper
- 3/4 teaspoon kosher salt (for seasoning the chicken)
- 1 teaspoon Italian seasoning (dried blend of oregano, basil, and marjoram)
- 1 pound boneless, skinless chicken breasts (about 2 large breasts, pounded to even thickness)
- 2 tablespoons extra-virgin olive oil (for searing)
For the Alfredo Sauce
- 2 cups freshly grated Parmigiano-Reggiano cheese (never pre-shredded, which contains anti-caking agents)
- 1/4 teaspoon freshly ground black pepper
- 3/4 teaspoon Italian seasoning
- 1/4 teaspoon kosher salt
- 1/2 cup unsalted butter (cut into cubes for even melting)
- 1 clove garlic (minced extremely fine, almost to a paste)
- 2 cups heavy whipping cream (full-fat, cold or room temperature)
- Fresh parsley (optional, for garnish)
- 1/2 cup reserved pasta cooking water (starchy liquid to adjust sauce consistency)
- 3/4 teaspoon garlic powder (as backup flavor, since fresh garlic alone can be variable)
Yield: Serves 4 generously as a main course
How to Make Chicken Alfredo Parmesan Recipe?
We’re going to work in three phases: pasta, chicken, and sauce. The beautiful part about this recipe is that once you understand the core technique, you can adjust timing based on your kitchen and stove. Let me walk you through each stage with the exact sensory cues that tell you when something is ready.
Step 1: Cook the Fettuccine Perfectly
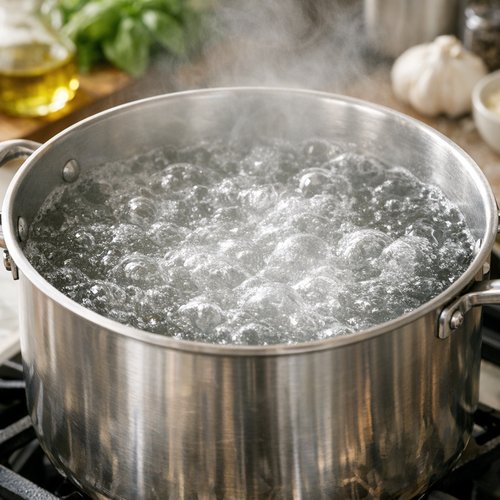
Fill a large pot with about 4-5 quarts of water and bring it to a rolling boil over high heat. This typically takes 8-10 minutes depending on your stove and pot size. Add a generous handful of kosher salt—your water should taste like the sea. This is your only opportunity to season the pasta itself.
Once the water is at a full boil, add your fettuccine and give it an immediate stir to prevent sticking. Set a timer according to package directions—usually 9-11 minutes for al dente. We want the pasta to have a slight firmness when you bite it, not soft or mushy.
About 2 minutes before the pasta finishes cooking, reserve 1/2 cup of the cooking water in a small bowl or measuring cup. This starchy water will become your secret weapon for adjusting the sauce consistency. Then drain the pasta thoroughly in a colander, but don’t rinse it—the surface starch helps the sauce cling beautifully.
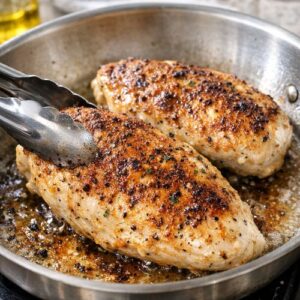
Step 2: Season and Sear the Chicken Breasts
While the pasta cooks, pat your chicken breasts dry with paper towels—moisture is the enemy of a good sear. If your breasts are particularly thick, you can gently pound them to even thickness (about 3/4 inch) between plastic wrap using a meat mallet. This ensures even cooking.
In a small bowl, combine the Italian seasoning, kosher salt, and black pepper. Season both sides of the chicken generously and evenly. Let the seasoned chicken sit for about 2 minutes—this allows the salt to penetrate slightly.
Heat the extra-virgin olive oil in a large nonstick skillet over medium-high heat. Wait until the oil shimmers and moves easily when you tilt the pan—this indicates it’s around 375-400°F. The pan should be hot enough that the chicken sizzles immediately upon contact.
Add the chicken breasts and resist the urge to move them. Leave them completely undisturbed for 5-7 minutes. During this time, a golden-brown crust will develop through the Maillard reaction—the same chemical process that creates delicious browning on a steak. You’ll know it’s ready when the chicken releases easily from the pan and has a deep golden color.
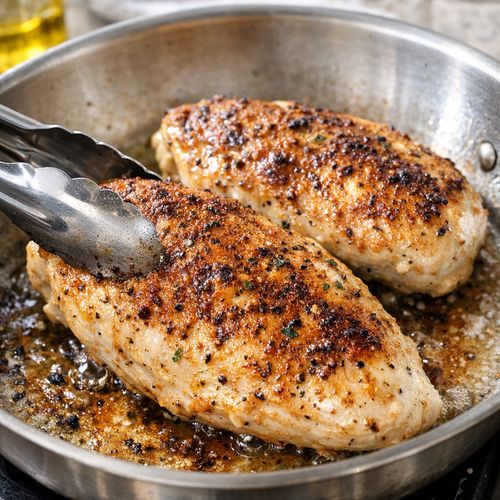
Flip the chicken and immediately add the 1 tablespoon of butter. Swirl the pan gently so the melting butter coats the chicken. Cook for another 5-7 minutes. Check for doneness by inserting an instant-read thermometer into the thickest part—it should read exactly 165°F. If you don’t have a thermometer, cut into the thickest part; the juices should run clear with no pink.
Transfer the chicken to a clean cutting board and tent loosely with aluminum foil. It will continue cooking slightly from residual heat. Rest it for exactly 3 minutes—this allows the juices to redistribute throughout the meat, keeping it moist when you slice it.
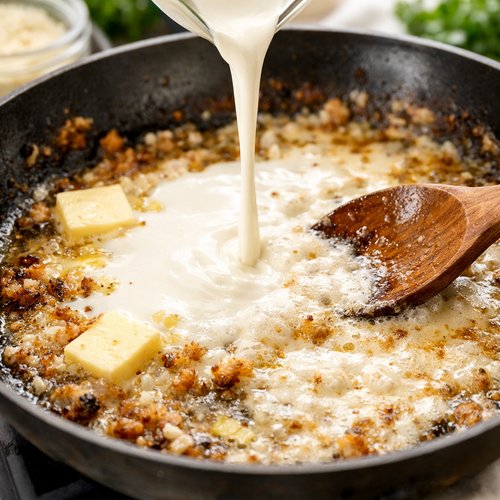
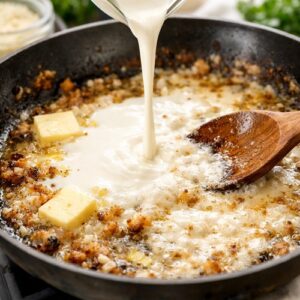
Step 3: Build the Alfredo Sauce
This is where the magic happens. In the same skillet where you cooked the chicken (don’t wash it—those browned bits add incredible flavor), reduce the heat to medium-low. Add the butter cubes and cream simultaneously, whisking constantly.
The butter should melt within about 1 minute as it disperses into the cream. Watch for the mixture to become smooth and combined before moving forward. If you add other ingredients before the butter is fully integrated, you risk a broken sauce.
Once you have a smooth, creamy base, add the minced garlic, garlic powder, Italian seasoning, salt, and pepper. Whisk everything together thoroughly until you see no visible specks of garlic. The spices should be evenly distributed throughout the sauce.
Increase the heat very slightly to medium-low to medium and let the sauce come to a gentle simmer. You’re looking for tiny bubbles that break at the surface, not a rolling boil. Whisk constantly for 3-4 minutes. During this time, the sauce will thicken slightly as the cream reduces and concentrates its flavors. The constant whisking prevents sticking and ensures even cooking.
After 3-4 minutes, remove the pan from heat completely. This is critical: adding cheese to a boiling sauce can cause it to break and become grainy. Add the freshly grated Parmigiano-Reggiano in two batches, whisking gently after each addition until fully melted. The residual heat will melt the cheese perfectly without breaking the emulsion.
The sauce should be smooth, glossy, and luxuriously thick. If it’s thicker than you’d like (sauce should coat the back of a spoon but still flow), add the reserved pasta water a few tablespoons at a time, whisking constantly, until you reach your desired consistency. Start conservatively—you can always add more, but you can’t take it out.
Step 4: Combine Everything
Return the sauce to the heat briefly—just enough to warm it if it’s cooled while you were working—then immediately add the cooked fettuccine. Using tongs or two forks, toss the pasta gently but thoroughly so every strand becomes coated with the creamy sauce. This should take about 1-2 minutes of gentle tossing.
The heat from the pasta will help the sauce adhere without creating clumping. If you’re tossing and the sauce seems to be setting up too quickly, add another tablespoon of the reserved cooking water.
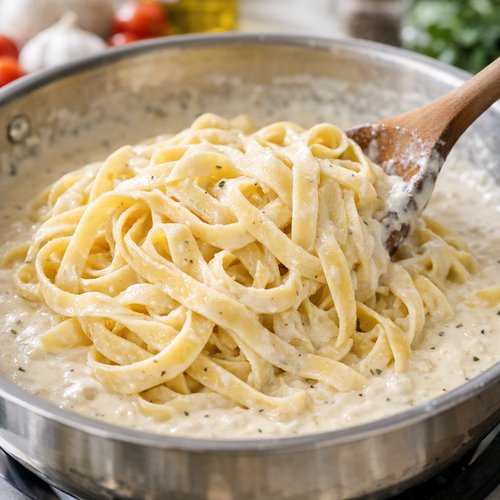
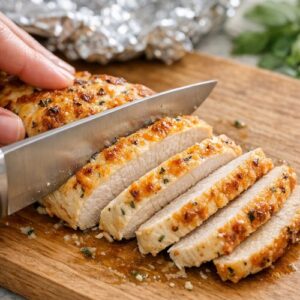
Step 5: Slice the Chicken and Plate
Remove the foil from the chicken and cut it into approximately 1/2-inch-thick slices using a sharp knife. If you’re slicing through to the cutting board, you’re going too thick. These slices should be substantial enough to showcase the tender, juicy interior but thin enough to sit gracefully on top of the pasta.
Divide the sauced pasta among four serving bowls. Arrange several slices of chicken on top of each portion. Garnish with fresh parsley if desired, a light grating of fresh Parmigiano-Reggiano, and a few cracks of black pepper.
Serve immediately while everything is hot. The residual heat will keep the sauce glossy and the chicken warm.

Tips and Tricks
- Always Use Freshly Grated Cheese – Pre-shredded Parmigiano-Reggiano contains cellulose and anti-caking agents that prevent melting and create a grainy, broken sauce. Invest in a block of cheese and a microplane grater. Your sauce will transform immediately.
- Temperature Control is Everything – The most common mistake is cooking the sauce too hot. You want a gentle simmer, never a boil. High heat causes the proteins in the cream to break down and the fat to separate, resulting in a grainy, separated sauce. If you have a thermometer, aim for 160-170°F.
- Don’t Skip the Pasta Water – That starchy liquid is liquid gold. The starch helps emulsify the sauce and creates a silkier texture. Even if your sauce seems fine, a splash of pasta water elevates it dramatically.
- Pound Your Chicken Evenly – Uneven thickness means uneven cooking. Some parts will be dry while others remain undercooked. Use a meat mallet and plastic wrap for an even 3/4-inch thickness throughout.
- Let Your Pan Get Hot Before Adding Chicken – A properly heated pan creates a crust in 5-7 minutes. A lukewarm pan will steam the chicken instead. You want sizzle and browning, not steaming.
- Rest Your Meat – I know three minutes seems short, but it’s enough time for carryover cooking to complete and juices to redistribute. This prevents that disappointing moment when you slice into chicken and clear liquid runs everywhere.
- Taste and Adjust Before Serving – The final sauce should taste savory and rich with the cheese flavor prominent. If it tastes flat, add a pinch more salt. If it’s too salty, add a splash more cream. These small adjustments at the end make an enormous difference.
- Reserve Pasta Water Before Draining – Write this on a sticky note and put it on your monitor. I’ve seen so many home cooks drain the pasta and then realize they forgot to save the water. The moment you remember you need it, that water is gone forever.
Expert’s Nutritional Tip
Here’s something my years developing recipes for diverse dietary needs taught me: the combination of whole-food fat (butter and cream) with high-quality protein (Parmigiano-Reggiano) creates lasting satiety. Your body processes these foods slowly, keeping you satisfied for hours. The chicken adds lean protein while the cream and butter provide the fat-soluble vitamins A, D, E, and K that your body needs to absorb the nutrients in any vegetables you serve alongside this dish.
The carbohydrates in the pasta are refined, so pair this meal with a fiber-rich side like a salad or steamed vegetables to improve blood sugar stability. This is why this dish traditionally comes with a simple green salad—it’s not just tradition, it’s nutritional wisdom.
Common Mistakes to Avoid
- Breaking the Sauce with High Heat – The number-one reason Alfredo breaks is high temperature. If you notice your sauce looking grainy or separated, immediately remove it from heat and whisk in a splash of cold cream. Reduce the temperature and whisk constantly until smooth.
- Adding Cheese to a Boiling Sauce – Hot sauce can cause cheese to seize and become stringy. Always remove from heat before adding cheese, and add it gradually while whisking gently.
- Using Pre-Grated Cheese – I know I mentioned this in the tips, but it’s worth repeating because it’s the single most impactful change you can make. One batch with real cheese will convert you forever.
- Overcooking the Chicken – Beyond 165°F, chicken begins to dry out noticeably. Use an instant-read thermometer and pull it at exactly 165°F. The residual heat during resting will push it to 167°F, which is perfect.
Make-Ahead Guide
From my years of recipe development for busy families, I’ve learned that strategic make-ahead work can turn a weeknight into a stress-free evening. Here’s exactly how I approach this dish:
The Day Before: Pound and season your chicken, then cover it tightly with plastic wrap and refrigerate. You can also grate your cheese and store it in an airtight container—it won’t dry out for 3-4 days. Bring both to room temperature about 20 minutes before cooking.
Make the Sauce Ahead (with caution): The Alfredo sauce can be made 2-3 hours before serving. Cool it completely, transfer to an airtight container, and refrigerate. To reheat, combine the sauce with 2-3 tablespoons of cream in a saucepan over very low heat, whisking constantly. The sauce will loosen and smooth out. Never microwave Alfredo sauce—you’ll break the emulsion.
Cook Pasta and Chicken Fresh: These components are best made the same day you serve them, though you can cook the pasta up to 4 hours ahead. Toss it with 1 tablespoon of olive oil to prevent sticking, and store it in an airtight container at room temperature. The chicken can be cooked ahead and refrigerated, then sliced cold (though warm is preferred).
Seasonal Variations
- Spring: Add 1 cup of fresh English peas and 2 tablespoons of fresh lemon juice to the sauce. Include fresh chives and mint in the garnish. The brightness cuts through the richness beautifully.
- Summer: Incorporate fresh basil directly into the sauce along with the garlic, or add fresh corn kernels. Serve with a squeeze of fresh lemon juice and grilled chicken for a lighter feel.
- Fall: Add 1/2 teaspoon of nutmeg to the sauce—it’s traditional in Italian cooking and adds a subtle warmth. Include crispy sage leaves on top. Consider adding sautéed mushrooms or roasted butternut squash for earthiness.
- Winter: Add 1/4 teaspoon of white pepper instead of black pepper for a softer heat. Include truffle oil for luxury (just a drizzle), or add crispy prosciutto and fresh thyme. Consider adding roasted garlic instead of raw for deeper flavor.
Can I Store Chicken Alfredo Parmesan Recipe?
The assembled dish keeps best for 1-2 days in an airtight container in the refrigerator. The sauce will thicken significantly as it cools. To reheat, combine it with 2-3 tablespoons of cream or milk in a nonstick skillet over low heat, stirring constantly until the sauce loosens and becomes silky again. Add more liquid as needed, a tablespoon at a time.
Alternatively, separate the components and store them individually. The sauce keeps for 3-4 days, the pasta for 3-4 days, and the cooked chicken for 3-4 days. Reheating them separately and then assembling gives you fresher texture overall.
This dish is not recommended for freezing. The cream-based sauce doesn’t freeze well and breaks upon thawing. If you must freeze, do so for no longer than 1 month, and be prepared for texture changes. Reheat slowly and whisk constantly, adding fresh cream to restore smoothness.
Nutrition Information
Per serving (based on USDA nutritional database standards): This recipe provides approximately 825 calories, 42 grams of protein, 68 grams of carbohydrates, and 48 grams of total fat (of which about 28 grams are saturated fat). The sodium content is approximately 580 milligrams.
This is a rich, indulgent dish meant for occasional enjoyment rather than daily consumption. The high saturated fat content comes from the butter, cream, and cheese—all traditional components of authentic Alfredo. The protein from the chicken and cheese makes this a complete meal that provides lasting satiety.
To increase vegetables and fiber, pair this with a substantial salad or steamed broccoli. To reduce calories, you could substitute half the cream with chicken or vegetable broth, though this changes the character of the dish significantly.
What Can I Serve With Chicken Alfredo Parmesan Recipe?
The beauty of Chicken Alfredo is that it’s a complete meal unto itself, but the right accompaniments elevate it from dinner to an experience. I’ve learned through years of entertaining that the best pairings either provide contrast or enhance the richness. Try apple cider vinegar coleslaw for a sharp, acidic contrast that cuts beautifully through the cream. Or consider these classic pairings:
- Simple Green Salad – Toss mixed greens with lemon vinaigrette made from lemon juice, extra-virgin olive oil, and Dijon mustard. The acidity and brightness provide perfect balance to the rich sauce.
- Garlic Bread – A classic pairing that works because everyone loves it. Use a good quality loaf, slice it lengthwise, brush with garlic butter, and toast until golden and crispy.
- Roasted Asparagus – Simple, elegant, and traditional. Toss with olive oil, salt, and pepper, then roast at 400°F for 12-15 minutes until tender with slightly crispy tips.
- Steamed Broccoli with Lemon – The broccoli becomes an edible vegetable that complements rather than competes. A squeeze of fresh lemon brings brightness without adding heaviness.
- Caprese Salad – Layers of fresh tomato, mozzarella, and basil with balsamic reduction. The fresh tomato is absolutely essential here for contrast.
- Roasted Brussels Sprouts – Toss with olive oil, salt, and pepper, then roast until the edges are dark and caramelized. The slight bitterness provides sophisticated balance.
For beverages, Italian white wines like Pinot Grigio or Vermentino pair beautifully. The acidity in white wine complements the richness of the sauce. You could also serve with a crisp sparkling water with lemon, or an unsweetened iced tea for non-alcoholic options.
Substitutes
- For Fettuccine Pasta: Pappardelle, linguine, or bucatini work beautifully. Avoid delicate pastas like angel hair—they break under the weight of this sauce. Avoid small shapes like penne or rigatoni; the sauce won’t cling properly. Stay with long, flat ribbons.
- For Heavy Whipping Cream: You could use half-and-half, though your sauce won’t be quite as luxuriously thick. Use a 1:1 ratio and add 1 tablespoon of cornstarch dissolved in 2 tablespoons of cold milk to help thicken. Never use low-fat cream—the results will be disappointing.
- For Parmigiano-Reggiano Cheese: Grana Padano is an acceptable substitute, though slightly less complex in flavor. Pecorino Romano is much sharper and saltier—use only about 1.5 cups if substituting. Avoid generic “Parmesan” from green cans; it’s largely cellulose.
- For Chicken Breasts: Turkey breast works equally well. You could also use thin-sliced pork tenderloin or even firm white fish, though the cooking time will change slightly. Avoid ground chicken or shredded chicken—this recipe benefits from the presentation of whole sliced pieces.
- For Butter: You must use real butter here—no substitutes. Butter is essential for the flavor and the proper emulsification of the sauce. Margarine or oil-based spreads will not produce acceptable results.
- For Fresh Garlic: If you absolutely must, use 1/2 teaspoon of garlic powder instead of the fresh clove. Fresh garlic is preferable because it provides brightness and subtle heat that powder cannot replicate.
- For Italian Seasoning: Make your own by combining 1/4 teaspoon dried oregano, 1/4 teaspoon dried basil, and 1/4 teaspoon dried marjoram. This gives you more control over the flavor profile.
Chicken Alfredo Parmesan Recipe
Ingredients
Method
- Fill a large pot with about 4-5 quarts of water and bring it to a rolling boil over high heat. This typically takes 8-10 minutes depending on your stove and pot size. Add a generous handful of kosher salt—your water should taste like the sea. This is your only opportunity to season the pasta itself. Once the water is at a full boil, add your fettuccine and give it an immediate stir to prevent sticking. Set a timer according to package directions—usually 9-11 minutes for al dente. We want the pasta to have a slight firmness when you bite it, not soft or mushy. About 2 minutes before the pasta finishes cooking, reserve 1/2 cup of the cooking water in a small bowl or measuring cup. This starchy water will become your secret weapon for adjusting the sauce consistency. Then drain the pasta thoroughly in a colander, but don't rinse it—the surface starch helps the sauce cling beautifully.

- While the pasta cooks, pat your chicken breasts dry with paper towels—moisture is the enemy of a good sear. If your breasts are particularly thick, you can gently pound them to even thickness (about 3/4 inch) between plastic wrap using a meat mallet. This ensures even cooking. In a small bowl, combine the Italian seasoning, kosher salt, and black pepper. Season both sides of the chicken generously and evenly. Let the seasoned chicken sit for about 2 minutes—this allows the salt to penetrate slightly. Heat the extra-virgin olive oil in a large nonstick skillet over medium-high heat. Wait until the oil shimmers and moves easily when you tilt the pan—this indicates it's around 375-400°F. The pan should be hot enough that the chicken sizzles immediately upon contact. Add the chicken breasts and resist the urge to move them. Leave them completely undisturbed for 5-7 minutes. During this time, a golden-brown crust will develop through the Maillard reaction—the same chemical process that creates delicious browning on a steak. You'll know it's ready when the chicken releases easily from the pan and has a deep golden color. Flip the chicken and immediately add the 1 tablespoon of butter. Swirl the pan gently so the melting butter coats the chicken. Cook for another 5-7 minutes. Check for doneness by inserting an instant-read thermometer into the thickest part—it should read exactly 165°F. If you don't have a thermometer, cut into the thickest part; the juices should run clear with no pink. Transfer the chicken to a clean cutting board and tent loosely with aluminum foil. It will continue cooking slightly from residual heat. Rest it for exactly 3 minutes—this allows the juices to redistribute throughout the meat, keeping it moist when you slice it.
- This is where the magic happens. In the same skillet where you cooked the chicken (don't wash it—those browned bits add incredible flavor), reduce the heat to medium-low. Add the butter cubes and cream simultaneously, whisking constantly. The butter should melt within about 1 minute as it disperses into the cream. Watch for the mixture to become smooth and combined before moving forward. If you add other ingredients before the butter is fully integrated, you risk a broken sauce. Once you have a smooth, creamy base, add the minced garlic, garlic powder, Italian seasoning, salt, and pepper. Whisk everything together thoroughly until you see no visible specks of garlic. The spices should be evenly distributed throughout the sauce. Increase the heat very slightly to medium-low to medium and let the sauce come to a gentle simmer. You're looking for tiny bubbles that break at the surface, not a rolling boil. Whisk constantly for 3-4 minutes. During this time, the sauce will thicken slightly as the cream reduces and concentrates its flavors. The constant whisking prevents sticking and ensures even cooking. After 3-4 minutes, remove the pan from heat completely. This is critical: adding cheese to a boiling sauce can cause it to break and become grainy. Add the freshly grated Parmigiano-Reggiano in two batches, whisking gently after each addition until fully melted. The residual heat will melt the cheese perfectly without breaking the emulsion. The sauce should be smooth, glossy, and luxuriously thick. If it's thicker than you'd like (sauce should coat the back of a spoon but still flow), add the reserved pasta water a few tablespoons at a time, whisking constantly, until you reach your desired consistency. Start conservatively—you can always add more, but you can't take it out.
- Return the sauce to the heat briefly—just enough to warm it if it's cooled while you were working—then immediately add the cooked fettuccine. Using tongs or two forks, toss the pasta gently but thoroughly so every strand becomes coated with the creamy sauce. This should take about 1-2 minutes of gentle tossing. The heat from the pasta will help the sauce adhere without creating clumping. If you're tossing and the sauce seems to be setting up too quickly, add another tablespoon of the reserved cooking water.

- Remove the foil from the chicken and cut it into approximately 1/2-inch-thick slices using a sharp knife. If you're slicing through to the cutting board, you're going too thick. These slices should be substantial enough to showcase the tender, juicy interior but thin enough to sit gracefully on top of the pasta. Divide the sauced pasta among four serving bowls. Arrange several slices of chicken on top of each portion. Garnish with fresh parsley if desired, a light grating of fresh Parmigiano-Reggiano, and a few cracks of black pepper. Serve immediately while everything is hot. The residual heat will keep the sauce glossy and the chicken warm.
Nutrition
Notes
Tried this recipe?
Let us know how it was!FAQs
Why is my Alfredo sauce grainy or broken?
This happens when the sauce becomes too hot, causing the proteins in the cream to break down and separate from the fat. If you notice graininess starting, immediately remove the pan from heat and whisk in 2-3 tablespoons of cold cream or milk. The cold liquid will lower the temperature and help re-emulsify the sauce. If that doesn’t work, whisk the entire sauce into a fresh pot with 1/4 cup of cold cream over very low heat. Temperature control is absolutely essential—never allow the sauce to boil once cream is added.
Can I make this recipe with rotisserie chicken instead of cooking my own?
Absolutely, yes. Using a quality rotisserie chicken from your grocery store is a legitimate time-saver. You’ll save about 20 minutes of cooking time. Shred or slice the meat and warm it gently in the finished sauce (do not boil). The flavor will be slightly different because store-bought rotisserie chickens are often brined or have added seasonings, but the dish will still be delicious. You may need to adjust the salt content of your sauce accordingly.
How do I prevent my pasta from sticking after cooking?
Drain your pasta thoroughly in a colander, then immediately add it to the warm sauce and toss. The sauce coating each strand prevents sticking. If you’re making the pasta ahead, toss it lightly with 1 tablespoon of olive oil and store it in an airtight container. Avoid rinsing the pasta in cold water—you want the surface starch to help the sauce cling.
What if my sauce is too thick?
Add the reserved pasta water a tablespoon at a time while whisking constantly. The starch in that water helps thin the sauce while maintaining proper consistency. Start with 1 tablespoon and check before adding more. You can always add more liquid, but you can’t remove it. If you’ve added pasta water and the sauce is still too thick, thin with cream instead—never water, which dilutes flavor.
How do I know when my chicken is perfectly cooked?
An instant-read meat thermometer is your best tool. Insert it into the thickest part of the breast (not touching bone if there is any), and cook until it reads exactly 165°F. Alternatively, cut into the thickest part—the meat should be white with no pink, and juices should run clear. Overcooking chicken beyond 170°F results in a dry, disappointing texture.
Can I use chicken thighs instead of breasts?
Chicken thighs are more forgiving and harder to overcook because they have more fat. However, they require longer cooking time—about 12-15 minutes total—and their richer flavor might compete with the delicate sauce. If you prefer thighs, use them, but understand that the final dish will taste noticeably different.
Is there a way to make this recipe lighter or lower in calories?
You could substitute half the cream with chicken broth (so 1 cup cream and 1 cup broth), though the sauce won’t be quite as luxuriously thick. Reduce the butter to 1/4 cup, which will require slightly longer sauce cooking time. Use half the cheese and add 1/4 teaspoon of additional salt and 1/4 teaspoon of white pepper for depth. These changes save approximately 150-200 calories per serving but change the character significantly.
More Recipes You’ll Love
- Baby Carrots In The Oven – A simple, elegant side that provides beautiful color contrast and mild sweetness alongside the rich sauce.
- Apple Cider Vinegar Coleslaw Recipe – The sharp, acidic brightness cuts through the cream perfectly and provides a crunchy textural contrast.
- Asian Beef Recipe – If you’re looking to switch up your proteins while keeping the technique similar, this showcases completely different flavor profiles.
- This Easy Chicken Dinner – Worth adding to your recipe collection.
- My Weeknight Chicken Recipe – Worth adding to your recipe collection.
Final Thoughts
There’s real magic in mastering a classic dish like Chicken Alfredo Parmesan. It’s the kind of recipe that builds confidence in your kitchen because when you understand the science—the emulsification of cream and butter, the proper searing temperature, the timing that keeps chicken juicy—you’re not just following instructions. You’re becoming the cook you’ve always wanted to be.
My grandmother never measured, but she understood these principles instinctively through decades of practice. Now, through this recipe, you have access to that same knowledge. Make it this week. Taste how the sauce coats each strand of pasta. Notice the exact moment your chicken releases from the pan. Feel the confidence that comes from knowing exactly what’s happening in your skillet.
This dish has earned its place in Italian-American tradition not through complexity, but through perfect simplicity executed with care. That’s the philosophy behind every recipe I develop—that restaurant quality comes not from exotic ingredients or difficult techniques, but from understanding fundamentals deeply and respecting each ingredient’s role.
I’d love to hear how yours turns