This post contains affiliate links. As an Amazon Associate I earn from qualifying purchases.
There’s something magical about ranch seasoning that transcends borders—I’ve served versions of this herb-forward flavor profile everywhere from backyard barbecues to casual family dinners. This crispy baked ranch chicken without breadcrumbs has become my go-to weeknight hero, and I’m thrilled to share why it deserves a permanent spot in your rotation. Pair it with our Crispy Oven Baked Parmesan Green Bean Fries for a complete meal, or serve alongside fresh sides that complement those savory, garlicky flavors.
When Comfort Meets Culinary Simplicity
I grew up watching my mother transform humble chicken thighs into dishes that made our kitchen smell like a restaurant kitchen—and my multicultural family gatherings meant we celebrated every cuisine imaginable. One afternoon, she simplified a classic ranch preparation by skipping the breadcrumb coating entirely, letting the skin crisp naturally while a savory herb mixture built layers of flavor. That day, I realized that sometimes the most elegant dishes come from removing ingredients, not adding them.
That lesson stuck with me through years of recipe development, and today I’m sharing this beloved version with you. It’s proof that we don’t need complicated techniques or long ingredient lists to create something truly spectacular.
What Is Baked Ranch Chicken Without Breadcrumbs?
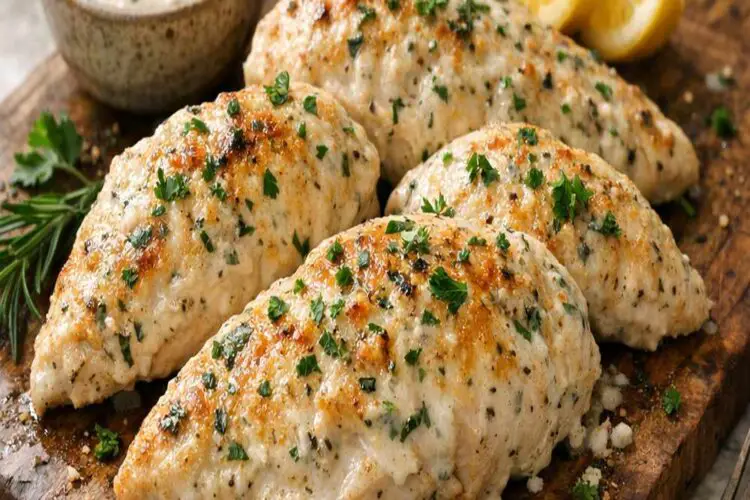
This is an elevated take on a beloved American classic—bone-in, skin-on chicken thighs baked until the skin turns golden and crackling, then brushed with a fragrant ranch herb mixture that penetrates the meat without any heavy coating. Unlike traditional fried ranch chicken or breadcrumb-crusted versions, we’re embracing the chicken’s natural ability to develop a gorgeous crust through dry-heat cooking.
The brilliance here is that we’re working with the Maillard reaction—that beautiful chemical transformation that happens when proteins and sugars meet high heat, creating complex flavors and color. By choosing thighs instead of breasts, we get meat that stays impossibly juicy even as the exterior crisps. The ranch seasoning acts as both a dry rub and a flavor paste, coating the meat in all those herbaceous notes we crave.
This recipe respects the ingredient list, letting each component do its job without pretense. No exotic techniques, no special equipment—just a hot oven, good timing, and understanding how heat works.
Why You’ll Love This Baked Ranch Chicken Without Breadcrumbs Recipe
- Genuinely Crispy Skin – We’re achieving that restaurant-quality crackle you’d get from frying, but through the dry-heat method of baking. The skin renders beautifully when you start at high temperature, leaving you with textural contrast that’s absolutely addictive.
- Juicy, Tender Meat Every Single Time – Chicken thighs contain more fat and connective tissue than breasts, meaning they forgive slight overcooking and stay moist. This is culinary insurance built right into your protein choice.
- No Mess, Minimal Cleanup – One sheet pan lined with foil means you’re spending more time eating and less time scrubbing. This is actual weeknight cooking, not a fantasy version.
- Naturally Gluten-Free – By eliminating breadcrumbs, we’ve created a naturally gluten-free option that doesn’t taste like a compromise. Everyone at the table benefits.
- Adaptable to Your Pantry – The ranch seasoning packet is forgiving, and the technique works with fresh herb combinations too, if you want to customize it.
- Ready in Under 45 Minutes – From oven preheating to plating, this isn’t a all-day project. It’s a real solution for busy nights when you still want something special.
- Makes Incredible Leftovers – Cold or reheated, this chicken is phenomenal the next day, making it perfect for meal prep or lunch boxes.
The Ingredients
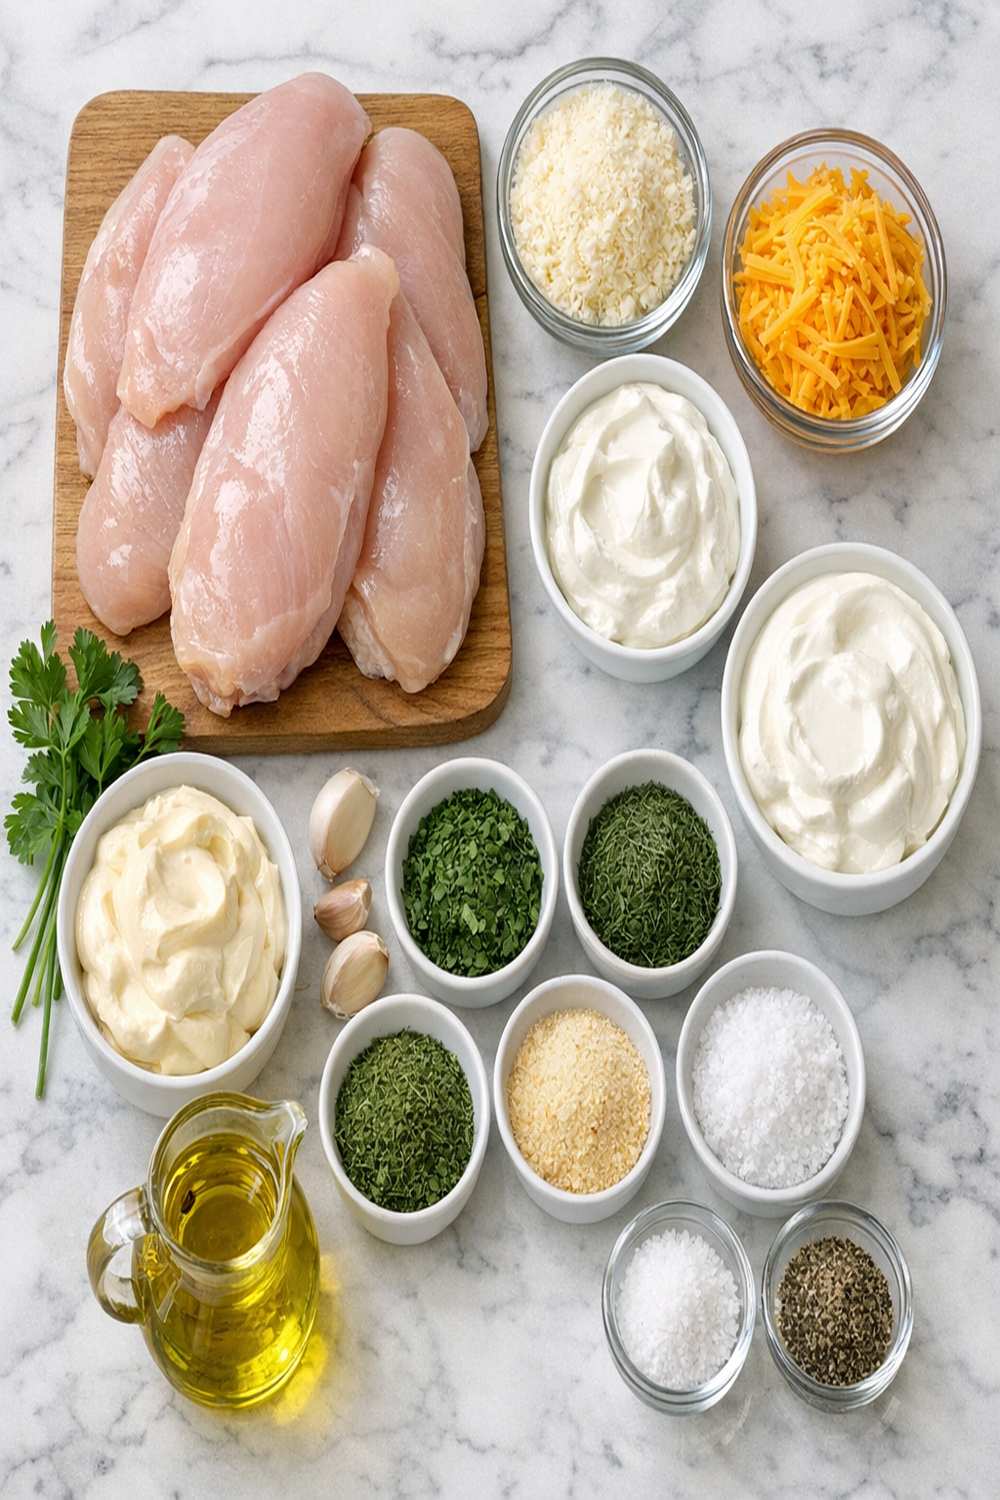
I’ve chosen each ingredient deliberately—nothing here is extraneous. This recipe serves four people generously, with likely leftovers for the brave souls who can resist eating it all in one sitting. The beauty of this ingredient list is that everything probably already lives in your kitchen.
- 2 tablespoons extra virgin olive oil (high-quality here matters for flavor)
- 1 tablespoon fresh lemon juice (brightens the herbaceous flavors beautifully)
- 6 bone-in, skin-on chicken thighs (the dark meat stays moist and flavorful under heat)
- 3 cloves fresh garlic (minced finely, not pressed, for better distribution)
- Fine sea salt for the initial seasoning layer (kosher salt works too)
- 1 packet (1 ounce) dry ranch salad dressing blend (this is your seasoning foundation)
- Freshly ground black pepper to taste (whole peppercorns ground fresh taste sharper)
How to Make Baked Ranch Chicken Without Breadcrumbs?
This process unfolds in two distinct phases: first, we establish that crispy skin foundation with dry heat. Then, we layer the herbaceous ranch mixture for depth and flavor complexity. I’m walking you through each step with the precision I’d use in my own kitchen, because your success matters to me.
Step 1: Prepare Your Oven and Pan
Preheat your oven to 400°F—this temperature is the sweet spot for rendering chicken skin without burning the seasoning mixture we’ll add later. While the oven climbs to temperature, line a large baking sheet with aluminum foil, shiny side facing up. The reflective surface helps heat distribute more evenly across the pan bottom.

Step 2: Position and Season Your Chicken
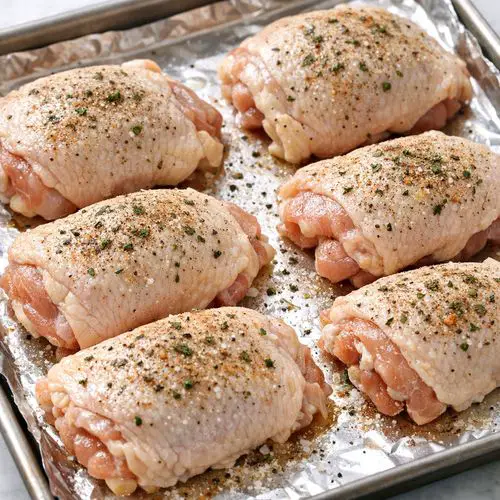
Arrange the six chicken thighs on your prepared baking sheet, skin-side up, with the meatiest portions facing skyward. Space them about an inch apart—this allows air to circulate around each piece, promoting even cooking and optimal crisping. Pat the skin completely dry with paper towels; any moisture on the surface will steam rather than crisp.
Now generously season the skin with fine sea salt and freshly ground black pepper. I mean really generous—don’t be shy here. This initial seasoning layer creates a flavorful crust and draws out any remaining surface moisture. The salt is working to dehydrate the skin slightly, which paradoxically helps it crisp more effectively.
Step 3: Build Your Herb Coating
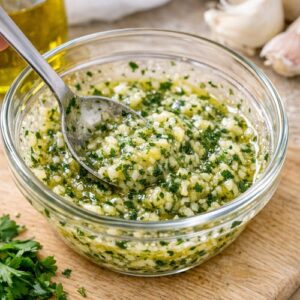
In a small mixing bowl, combine the dry ranch dressing blend with your minced fresh garlic and the extra virgin olive oil. Stir this together into a paste-like consistency—you’re creating a concentrated flavor mixture that will adhere to the chicken and infuse it as it bakes. The olive oil is your binding agent, helping the dried herbs cling to the meat.
Add the fresh lemon juice to this mixture, which serves two purposes: it thins the paste slightly so you can spread it more easily, and it adds brightness that balances the richness of both the olive oil and the herbal seasoning blend. The acidity also helps tenderize the meat through gentle enzymatic action.

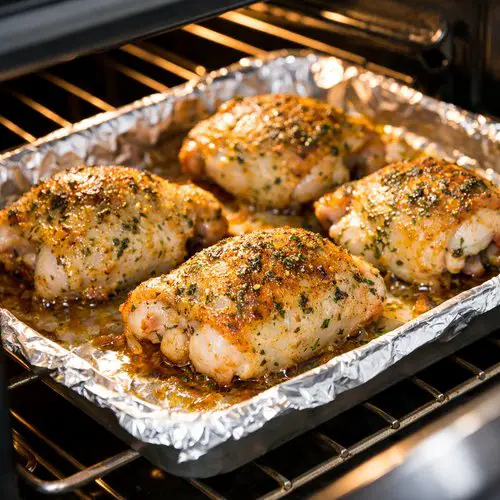
Step 4: Initial Bake for Skin Crisping
Slide your seasoned chicken into the preheated oven and let it bake for 25 minutes without any interruptions. This is crucial timing—you’re allowing the skin to begin rendering its fat and crisping without the herb mixture burning. During this phase, the internal fat in the skin is melting, creating a protective layer that will eventually crisps beautifully.
Resist the urge to check on it constantly. Every time you open the oven, you’re releasing heat and disrupting that critical cooking environment. Set a timer and trust the process.
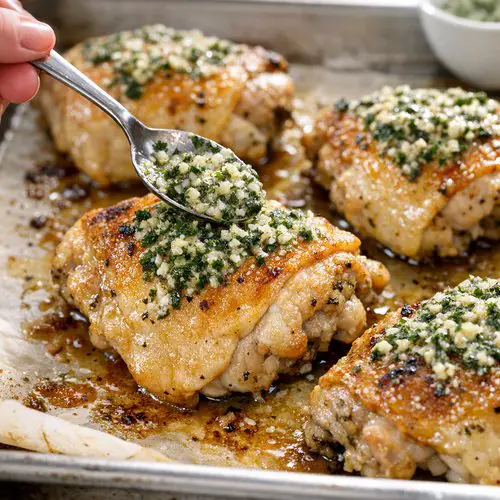
Step 5: Apply the Ranch Herb Mixture
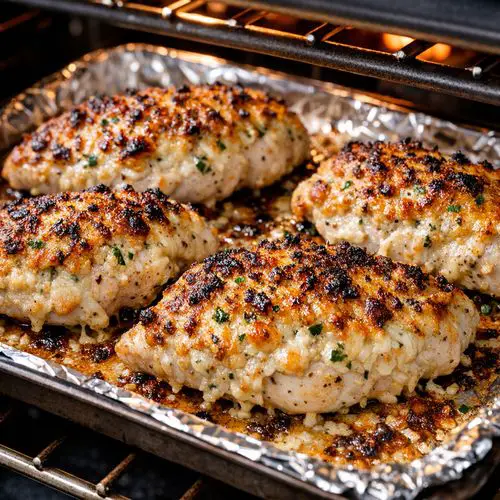
When your timer sounds at 25 minutes, carefully remove the baking sheet from the oven. The chicken skin should look golden and beginning to crisp at the edges. Using a basting brush or the back of a spoon, generously coat each chicken thigh with your prepared ranch herb mixture, making sure to cover all exposed skin.
This is where the magic deepens—the herb mixture will begin to adhere to the already-warming skin and seep into the meat, creating layers of savory ranch flavor. Don’t worry about being neat; this is food, not a gallery.
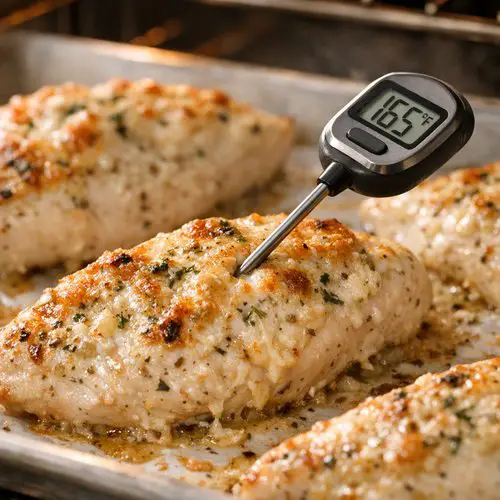
Step 6: Continue Baking to Temperature
Return the baking sheet to the oven and continue cooking until the internal temperature of the chicken reaches 165°F when measured in the thickest part of the largest thighs. Using an instant-read food thermometer, insert it into the meatiest portion of the chicken without touching bone—bone conducts heat differently and will give you an inaccurate reading.
Depending on the size of your thighs, this usually takes an additional 15 to 20 minutes. You’re looking for the skin to deepen in color to a beautiful golden-brown, with some darker spots where the herbs are caramelizing.
Step 7: Optional Broil for Extra Crunch
For those who want maximum crispiness, switch your oven to the broil setting for the final 5 minutes of cooking. Move your baking sheet to the upper rack, close to the heating element. Watch it vigilantly—this step can go from golden to burned in seconds. You’re looking for the skin to blister slightly and any exposed edges to caramelize.
The moment you see the skin transition from golden to amber and slightly darkened, remove it immediately. This technique is optional but creates that ultimate textural contrast that makes people ask for your recipe.
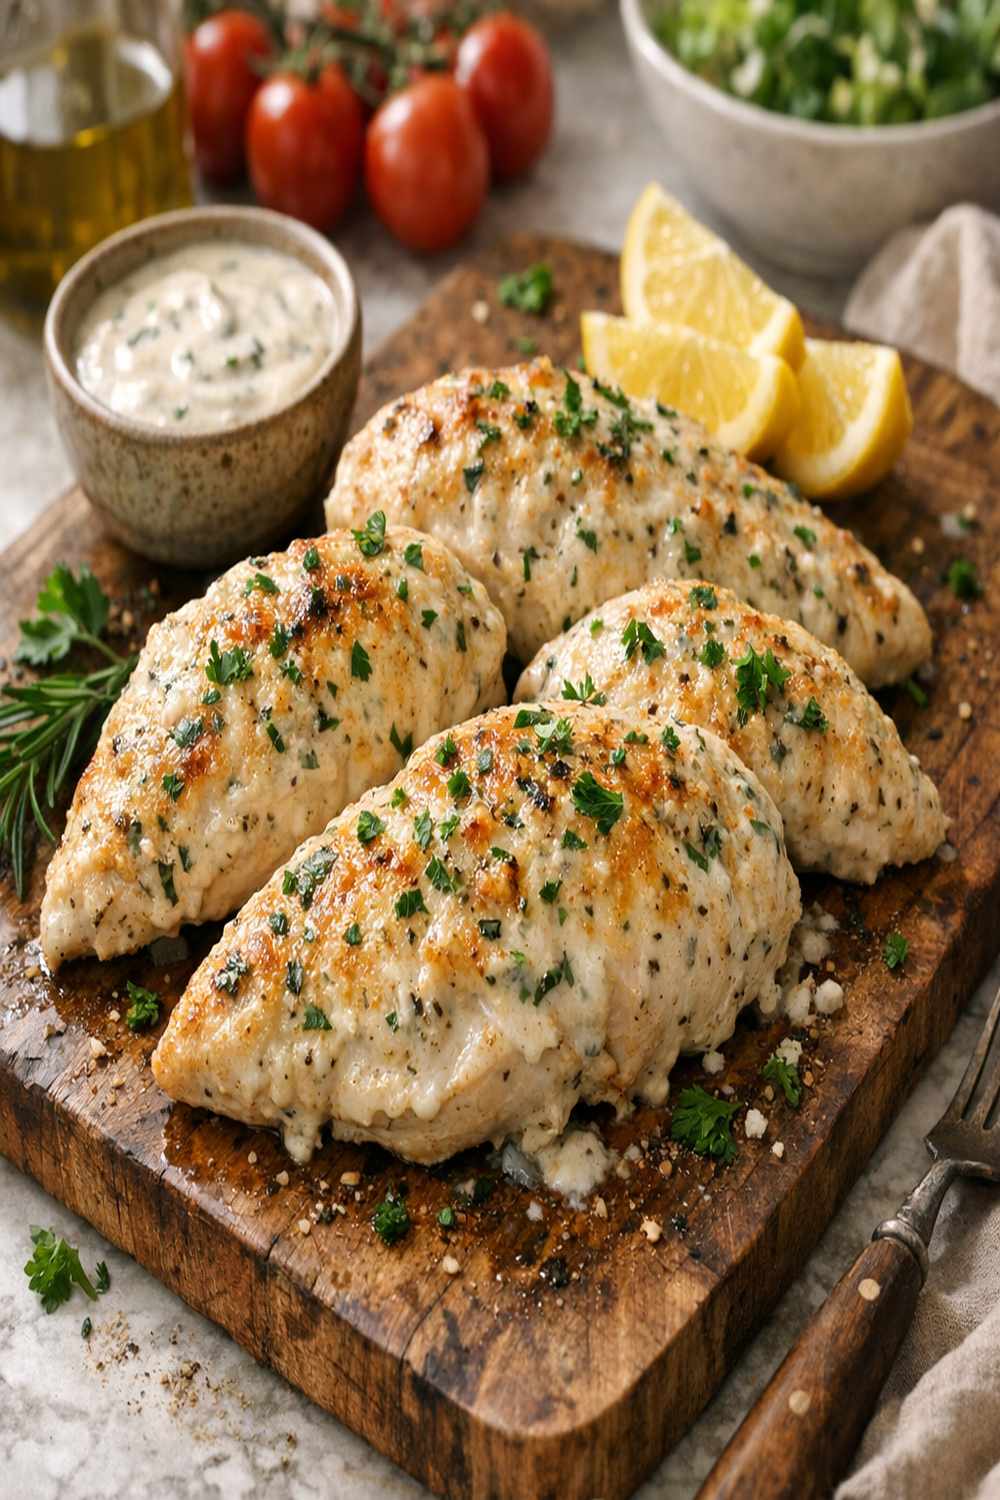
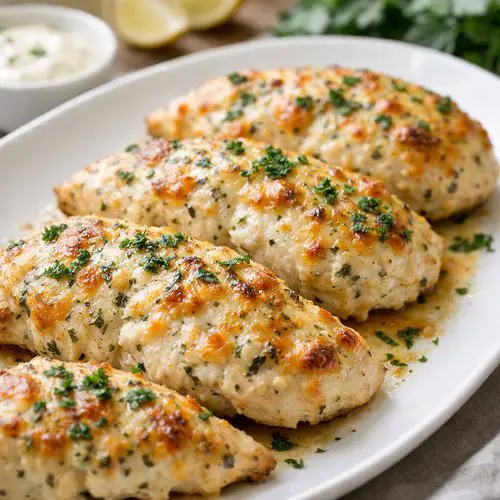
Step 8: Rest and Serve
Transfer your finished chicken to a serving platter and let it rest for 5 minutes before serving. This rest period allows the juices to redistribute throughout the meat, ensuring that every bite stays succulent. During rest, residual heat continues cooking the meat slightly while the exterior sets into that perfect crispness.
Expert’s Nutritional Tip
Chicken thighs contain more selenium, B vitamins, and zinc than white meat—minerals that support immune function and energy metabolism. The skin also provides conjugated linoleic acid (CLA), a compound with potential anti-inflammatory properties. Rather than removing the skin to reduce fat, enjoy it; the fat-soluble vitamins (A, D, K) in the skin need that fat for proper absorption in your body. The garlic in this recipe adds allicin, which research suggests may support cardiovascular health. This is genuinely nourishing food, not a guilty pleasure.
Tips and Tricks
- Pat Your Chicken Completely Dry – Moisture is the enemy of crispy skin. Use paper towels to blot the chicken thoroughly before seasoning, even if they seem dry already. I often pat, then let them air-dry uncovered in the refrigerator for 30 minutes before cooking for absolutely maximum crispness.
- Don’t Skip the Initial 25-Minute Solo Bake – This timing is intentional. You’re giving the skin a head start to begin rendering before the herb mixture is applied. The herbs can burn if the oven is too hot and the cooking time too long, but this phased approach prevents that.
- Use Fresh Garlic, Not Powder – The fresh garlic creates a paste consistency that adheres better than powdered garlic, and it develops better flavor complexity as it roasts. If you only have garlic powder, use one-third the amount and add a tablespoon of water to the herb mixture to create proper consistency.
- Invest in an Instant-Read Thermometer – This is my most important kitchen tool. It eliminates guesswork and prevents both undercooked and overcooked chicken. I recommend digital models with a quick-reading probe; they’re inexpensive and invaluable.
- Make Your Own Ranch Blend – If you prefer avoiding packets, combine one teaspoon of dried parsley, half a teaspoon of dried dill, half a teaspoon of garlic powder, half a teaspoon of onion powder, one-quarter teaspoon of dried chives, and salt and pepper to taste. This substitutes perfectly.
- Save Your Pan Drippings – The mixture at the bottom of your baking sheet is liquid gold. Drizzle it over the finished chicken, use it to dress a salad, or incorporate it into salad dressings for incredible depth.
Make-Ahead Guide: Meal Prep Perfection
Refrigerator Prep (Up to 24 Hours Ahead): Season your chicken with salt and pepper, then cover and refrigerate. This actually improves the chicken—salt begins breaking down proteins, promoting juiciness. The herb mixture can be prepared separately in a small container and refrigerated as well. Simply combine both when you’re ready to bake. Remove everything from the refrigerator 30 minutes before cooking to allow them to approach room temperature.
Freezer Storage (Up to 3 Months): Season the raw chicken and wrap it tightly in plastic wrap, then aluminum foil, before freezing. The herb mixture doesn’t freeze well due to its oil content, so prepare that fresh on cooking day. Thaw chicken in the refrigerator overnight before baking; adjust cooking time by adding 5-10 minutes if the chicken is still slightly cold in the center.
Pre-portioned Method: This recipe halves beautifully for smaller households. Use 3 thighs, halve all other ingredients, and cook in a smaller sheet pan. The timing remains identical since you’re not changing the thickness of the individual pieces.
Common Mistakes to Avoid
- Mistake One: Starting with Wet Chicken – This creates steam rather than that coveted crispy exterior. Pat your chicken completely dry and, if time allows, let it rest uncovered in the refrigerator for 30 minutes before seasoning. The air circulation in the fridge helps draw off surface moisture.
- Mistake Two: Overcrowding the Pan – Thighs need space to breathe. If they’re touching, steam traps between them and you’ll end up with soft, pale skin rather than golden crispness. Use two baking sheets if necessary.
- Mistake Three: Applying the Herb Mixture Too Early – Adding it at the start means the herbs will burn long before the chicken is cooked through. The 25-minute solo bake isn’t arbitrary; it’s protecting your flavor from burning while allowing the skin to crisp.
- Mistake Four: Skipping the Thermometer – Visual cues alone are unreliable. Thick thighs can look beautifully done on the outside while remaining raw near the bone. Undercooked chicken is a food safety issue; overcooked chicken is dry and disappointing. The thermometer solves both problems.
Seasonal Variations: How to Adapt Year-Round
Spring Version: Add one tablespoon of fresh tarragon or chervil to your herb mixture, and replace the lemon juice with fresh lime juice. This variation feels bright and forward-facing, perfect as the weather warms. Serve alongside fresh spring vegetables.
Summer Preparation: Incorporate one tablespoon of fresh basil and one tablespoon of fresh thyme into your herb mixture, reducing the packet dressing blend slightly to prevent overpowering the delicate fresh herbs. Serve with lighter sides—grilled vegetables, fresh salads, or cold grain bowls the next day.
Fall Celebration: Add one-quarter teaspoon of smoked paprika and one-eighth teaspoon of cayenne pepper to your herb mixture for subtle warmth and smoke. This variation pairs beautifully with roasted root vegetables and reflects the season’s deeper flavor profiles.
Winter Comfort: Incorporate one-quarter teaspoon of fresh thyme, one-quarter teaspoon of dried rosemary (use sparingly—it’s intense), and a touch of Dijon mustard to your herb mixture. This creates richer, more robust flavors that warm you from the inside.
Can I Store Baked Ranch Chicken Without Breadcrumbs?
Refrigerator Storage (3-4 Days): Transfer cooled chicken to an airtight container and refrigerate. The skin will lose some crispness—this is inevitable with moisture—but the flavor remains excellent. Reheat gently in a 350°F oven for 8-10 minutes, just until warmed through, to minimize moisture loss.
Freezer Storage (Up to 3 Months): Cool the chicken completely, then wrap individual pieces in plastic wrap before placing them in a freezer bag. Remove as much air as possible to prevent freezer burn. Thaw overnight in the refrigerator before reheating.
Reheating Method: For best results, reheat in a 350°F oven rather than the microwave. The dry heat helps restore some crispness to the skin, while microwaving creates steamed, soft texture. Reheat for 10-12 minutes until the internal temperature reaches 165°F again.
Leftover Applications: Shred the cooled chicken and use it in grain bowls, salads, sandwiches, or as a pizza topping. The herb flavor is complex enough that it enhances rather than overwhelms other ingredients.
Nutrition Information
Based on USDA data, per serving (one chicken thigh with herb coating, approximately 180 grams): 280 calories, 20g protein, 12g fat (primarily from the olive oil and chicken skin), and 0g carbohydrates. The dish is an excellent source of B vitamins, particularly niacin and B6, which support energy metabolism and nervous system function. It provides approximately 25% of your daily selenium requirement, important for thyroid function and antioxidant protection. The garlic contributes minimal calories but valuable micronutrients including manganese and vitamin C. This is genuinely nutrient-dense protein, not empty calories.
What Can I Serve With Baked Ranch Chicken Without Breadcrumbs?
This chicken is versatile enough to pair with nearly anything on your table, but certain accompaniments elevate the entire meal. The herbaceous ranch profile pairs beautifully with fresh, acidic, or crunchy sides that provide textural and flavor contrast to the crispy-skinned chicken.
- Fresh Green Salad with Lemon Vinaigrette – The acidity cuts through the richness of the chicken skin and creates balance. I love arugula, spinach, or mixed greens with a simple ratio of lemon juice to olive oil.
- Roasted Root Vegetables – Carrots, parsnips, beets, and Brussels sprouts roasted at the same temperature create a complete one-pan meal if you time them right. The natural sweetness complements the herbaceous chicken beautifully.
- Crispy Oven Baked Parmesan Green Bean Fries – This is genuinely my favorite pairing. The crispy green beans and parmesan echo the textural experience of the chicken skin while adding a vegetable component.
- Mashed Potatoes or Cauliflower Mash – Something creamy balances the crispness of the skin. Garlic mashed potatoes are particularly lovely, as the garlic echoes what’s in the chicken.
- Apple Cider Vinegar Coleslaw – This tangy, crunchy side provides brightness and cuts through richness magnificently. The vinegar’s acidity cleanses your palate between bites.
- Wild Rice Pilaf – The earthiness of wild rice and the texture of rice grains provide contrast to the soft meat inside the crispy chicken thighs.
- Fresh Corn or Summer Vegetables – During warm months, grilled corn, zucchini, or tomato salad feels lighter and more seasonal.
Substitutes
- Chicken Breasts Instead of Thighs – You can use this method with bone-in, skin-on breasts, though they’ll cook faster (approximately 5-10 minutes less total time) and may be less forgiving if slightly overcooked. Breasts are leaner, so they require more attention to avoid dryness. Check temperature at 20 minutes instead of 25 minutes into the initial bake.
- Fresh Herb Blend for Ranch Packet – Combine one tablespoon of fresh parsley, one teaspoon of fresh dill, one-half teaspoon of fresh chives, and one clove minced fresh garlic. This creates a superior flavor if you prefer avoiding seasoning packets, though it will have slightly different texture since you’re not getting all the powdered ingredients.
- Greek Yogurt Base Instead of Olive Oil – For a creamier herb paste, replace half the olive oil with Greek yogurt. This creates different texture and adds protein, though the exterior won’t crisp quite as dramatically. The cooking method remains identical.
- Buttermilk Marinade Variation – For extra tenderness, marinate the chicken in one cup of buttermilk with the ranch seasoning powder for 2-4 hours before baking. The lactic acid further tenderizes the meat. Pat dry completely before baking.
- Lemon-Herb Variation – Reduce the ranch packet to half an ounce and add one tablespoon of fresh lemon zest, one-half teaspoon of dried oregano, and one-half teaspoon of dried rosemary for an Italian-inspired variation that’s equally delicious.
- Turkey Thighs – This exact method works beautifully with bone-in, skin-on turkey thighs, though they’re much larger and require approximately 50-60 minutes total cooking time. Check temperature carefully since they’re thicker than chicken thighs.
Baked Ranch Chicken Without Breadcrumbs Recipe
Ingredients
Method
- Preheat your oven to 400°F—this temperature is the sweet spot for rendering chicken skin without burning the seasoning mixture we'll add later. While the oven climbs to temperature, line a large baking sheet with aluminum foil, shiny side facing up. The reflective surface helps heat distribute more evenly across the pan bottom.

- Arrange the six chicken thighs on your prepared baking sheet, skin-side up, with the meatiest portions facing skyward. Space them about an inch apart—this allows air to circulate around each piece, promoting even cooking and optimal crisping. Pat the skin completely dry with paper towels; any moisture on the surface will steam rather than crisp. Now generously season the skin with fine sea salt and freshly ground black pepper. I mean really generous—don't be shy here. This initial seasoning layer creates a flavorful crust and draws out any remaining surface moisture. The salt is working to dehydrate the skin slightly, which paradoxically helps it crisp more effectively.

- In a small mixing bowl, combine the dry ranch dressing blend with your minced fresh garlic and the extra virgin olive oil. Stir this together into a paste-like consistency—you're creating a concentrated flavor mixture that will adhere to the chicken and infuse it as it bakes. The olive oil is your binding agent, helping the dried herbs cling to the meat. Add the fresh lemon juice to this mixture, which serves two purposes: it thins the paste slightly so you can spread it more easily, and it adds brightness that balances the richness of both the olive oil and the herbal seasoning blend. The acidity also helps tenderize the meat through gentle enzymatic action.
- Slide your seasoned chicken into the preheated oven and let it bake for 25 minutes without any interruptions. This is crucial timing—you're allowing the skin to begin rendering its fat and crisping without the herb mixture burning. During this phase, the internal fat in the skin is melting, creating a protective layer that will eventually crisps beautifully. Resist the urge to check on it constantly. Every time you open the oven, you're releasing heat and disrupting that critical cooking environment. Set a timer and trust the process.

- When your timer sounds at 25 minutes, carefully remove the baking sheet from the oven. The chicken skin should look golden and beginning to crisp at the edges. Using a basting brush or the back of a spoon, generously coat each chicken thigh with your prepared ranch herb mixture, making sure to cover all exposed skin. This is where the magic deepens—the herb mixture will begin to adhere to the already-warming skin and seep into the meat, creating layers of savory ranch flavor. Don't worry about being neat; this is food, not a gallery.

- Return the baking sheet to the oven and continue cooking until the internal temperature of the chicken reaches 165°F when measured in the thickest part of the largest thighs. Using an instant-read food thermometer, insert it into the meatiest portion of the chicken without touching bone—bone conducts heat differently and will give you an inaccurate reading. Depending on the size of your thighs, this usually takes an additional 15 to 20 minutes. You're looking for the skin to deepen in color to a beautiful golden-brown, with some darker spots where the herbs are caramelizing.

- For those who want maximum crispiness, switch your oven to the broil setting for the final 5 minutes of cooking. Move your baking sheet to the upper rack, close to the heating element. Watch it vigilantly—this step can go from golden to burned in seconds. You're looking for the skin to blister slightly and any exposed edges to caramelize. The moment you see the skin transition from golden to amber and slightly darkened, remove it immediately. This technique is optional but creates that ultimate textural contrast that makes people ask for your recipe.

- Transfer your finished chicken to a serving platter and let it rest for 5 minutes before serving. This rest period allows the juices to redistribute throughout the meat, ensuring that every bite stays succulent. During rest, residual heat continues cooking the meat slightly while the exterior sets into that perfect crispness.

Nutrition
Notes
Tried this recipe?
Let us know how it was!FAQs
Can I Use Boneless, Skinless Chicken for This Recipe?
Technically yes, but I wouldn’t recommend it. The entire appeal of this recipe—the crispy skin and tender, juicy meat—comes from choosing bone-in, skin-on thighs. Boneless, skinless chicken would require different cooking temperatures and times, and you’d lose the textural contrast that makes this special. If you prefer boneless chicken, you might consider a different preparation method, like pan-searing or air-frying with a light coating.
What If My Oven Temperature Isn’t Accurate?
Invest in an inexpensive oven thermometer (they cost under fifteen dollars). Place it on your baking sheet during preheating and you’ll immediately know if your oven runs hot or cool. If yours runs 25°F hot, lower your setting to 375°F. If it runs cool, increase to 425°F. Your thermometer, not the recipe, is the source of truth.
Can I Make This in an Air Fryer?
Absolutely! Air fryers create incredible crispness because they circulate extremely hot air. Preheat your air fryer to 380°F, arrange chicken thighs skin-side up in a single layer, and cook for approximately 20 minutes. Apply the herb mixture and cook for another 5-8 minutes until the internal temperature reaches 165°F. Air fryer cooking times vary significantly by model, so use your thermometer to confirm doneness.
Why Is My Chicken Skin Not Crispy?
This typically indicates either: (1) Inadequately dried chicken—pat more vigorously before seasoning; (2) Overcrowding the pan—space creates air circulation necessary for crisping; (3) Oven temperature too low—verify with a thermometer; or (4) Aluminum foil not placed shiny-side up—this reflects heat toward the chicken. Any of these factors can prevent proper crisping.
Can I Prepare This Completely the Morning Of?
Yes. Season the chicken and refrigerate in the morning. Prepare the herb mixture just before baking (it can sit in the refrigerator for a few hours, but fresh ingredients are ideal). Remove everything from the refrigerator 30 minutes before cooking to allow them to approach room temperature, which ensures even cooking throughout. The recipe becomes easier since you’re not doing multiple tasks simultaneously when you’re hungry.
Is This Recipe Keto or Low-Carb Friendly?
Yes! With zero carbohydrates and substantial protein, this fits perfectly into ketogenic or low-carb eating patterns. The fat content is appropriate for those following fat-adapted diets. Pair it with non-starchy vegetables and healthy fats, and you have a complete keto meal.
Can I Double This Recipe for a Crowd?
Absolutely. Double the ingredients and use two baking sheets, arranging three thighs on each. Keep the oven temperature identical, but monitor both sheets—your oven may have hot spots, so you might need to rotate them halfway through cooking. The timing remains essentially the same since thickness is what determines cooking time, not quantity.
Tips for Hosting and Meal Prep Success
I’ve served this chicken at countless gatherings, and it’s proven itself a reliable performer every single time. For entertaining: prepare the herb mixture in the morning and store it in an airtight container. Season the chicken up to 12 hours ahead and refrigerate. When guests arrive, simply remove everything from the refrigerator 30 minutes before serving, then bake. The chicken will be finished and resting by the time you’re greeting your last guest.
For meal prep: bake a double batch on Sunday and portion into containers with your chosen sides. You’ll have lunch or dinner for three days without reheating. Cold leftover chicken is genuinely delicious—try it sliced over a grain salad with fresh vegetables and a lemon vinaigrette.
More Recipes You’ll Love
- Air Fry Chicken Nuggets No Breading – Perfect for when you want something crispy with zero breadcrumb coating.
- Air Fry Chicken Bites – Another elegant, coating-free chicken preparation using different cooking method.
- Bacon Cheddar Dip – An ideal appetizer to serve before this chicken main course.
- Apple Crisp Instant Pot – A dessert option that pairs beautifully as your meal conclusion.
- This Homemade Baked Recipe – Worth adding to your recipe collection.
- My Weeknight Chicken Recipe – Worth adding to your recipe collection.
There’s genuine joy in serving food that’s both impressive and achievable, food that respects your time while refusing to compromise on flavor. This baked ranch chicken without breadcrumbs is exactly that—proof that simplicity, when executed thoughtfully, creates something unforgettable. I hope you’ll make this soon and discover why it’s become such a beloved recipe in my kitchen and in so many others. Cook it for your family, serve it to friends, adapt it to your seasons, and make it your own. The beauty of recipes like this is that they’re flexible enough to evolve with your preferences while remaining reliable in their deliciousness.
Enjoy!