This post contains affiliate links. As an Amazon Associate I earn from qualifying purchases.
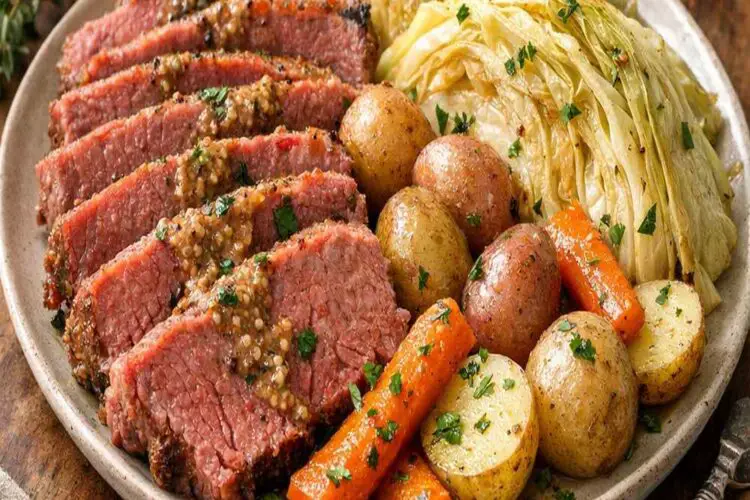
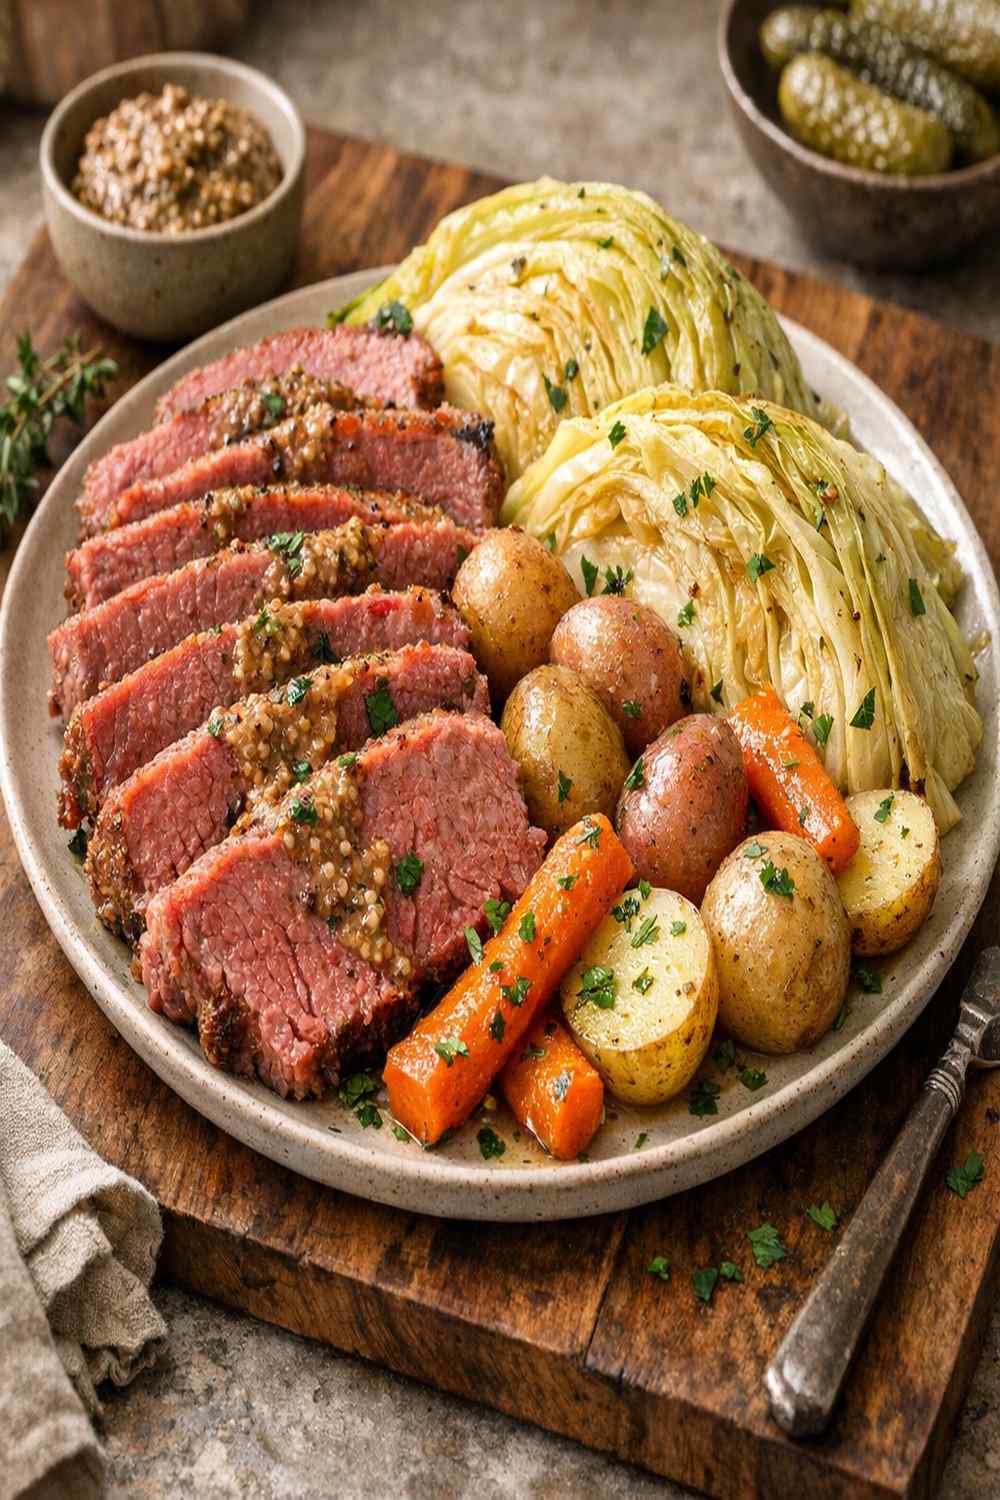
This baked corned beef and cabbage recipe doesn’t just taste incredible—it stops people in their tracks. The moment you pull this from the oven, caramelized vegetables glistening with pan juices and that gorgeous pink-hued meat sliced thin against the grain, you’ve already won the meal before anyone takes a bite. Here’s how to make a dish that looks as good as it tastes, complete with professional plating techniques that’ll have your guests thinking you trained in culinary school. Plus, I’ll show you how to pair it with complementary sides like our Apple Cider Vinegar Coleslaw Recipe for a truly stunning table spread.
The Most Beautiful Baked Corned Beef And Cabbage Recipe You’ll Ever Make (And It’s Easier Than It Looks)
I’ll never forget the St. Patrick’s Day when my Irish grandmother decided we’d stop boiling corned beef in a pot like everyone else and actually *roast* it instead. I was skeptical—traditional boiled versions are what I grew up with, that soft, grayish meat swimming in broth. But watching her pull that golden, caramelized masterpiece from the oven, the fat rendered to crispy perfection, the vegetables blushing with color and char—it completely changed how I approached this beloved classic.
That single shift from water-based cooking to dry-heat roasting transformed everything. The Maillard reaction created depth of flavor we’d never experienced before. The fat became an asset instead of something to trim away. The vegetables developed real texture instead of becoming mushy. And visually? It became a showstopper that made people gasp before they even tasted it.
The Visual Elements That Make This Dish Stunning
Understanding the visual architecture of this dish helps us make intentional choices at every step. We’re not just cooking—we’re creating a composition that’s as beautiful as it is delicious. The colors, textures, and heights all work together to tell a story of careful, skillful cooking.
- Deep mahogany and rose gold tones – The corned beef develops a rich, caramelized crust that’s almost burgundy in places, while the interior reveals that signature pink brining color. This visual drama comes from rendering the fat slowly and allowing the Maillard reaction to work its magic without burning.
- Contrast between tender and caramelized textures – The cabbage wedges develop crispy, charred edges while staying tender inside. The potatoes turn creamy at the core with crunchy golden exteriors. This textural complexity is what catches the eye and makes people want to taste it immediately.
- Height and composition through layering – By arranging vegetables at varying heights around the sliced meat, we create visual interest that draws the eye across the entire platter. Nothing sits flat; everything has dimension and purpose.
Choosing Ingredients for Maximum Visual Impact
Every ingredient on this plate serves a visual purpose alongside its flavor contribution. I’ve learned from my multicultural background that the most delicious meals are always the most colorful ones too—nature’s way of signaling nutritional diversity and ingredient quality. When selecting your components, look for vibrant color saturation and firm texture that promises beautiful caramelization.
- 4 tablespoons whole grain mustard (adds visual interest with dark flecks and color variation on the meat)
- 2 tablespoons fresh Italian parsley, finely chopped (bright green garnish that signals freshness)
- 4 cups water (for the braising liquid that creates steam and moisture)
- Sea salt and freshly ground black pepper (to taste, for final seasoning adjustment)
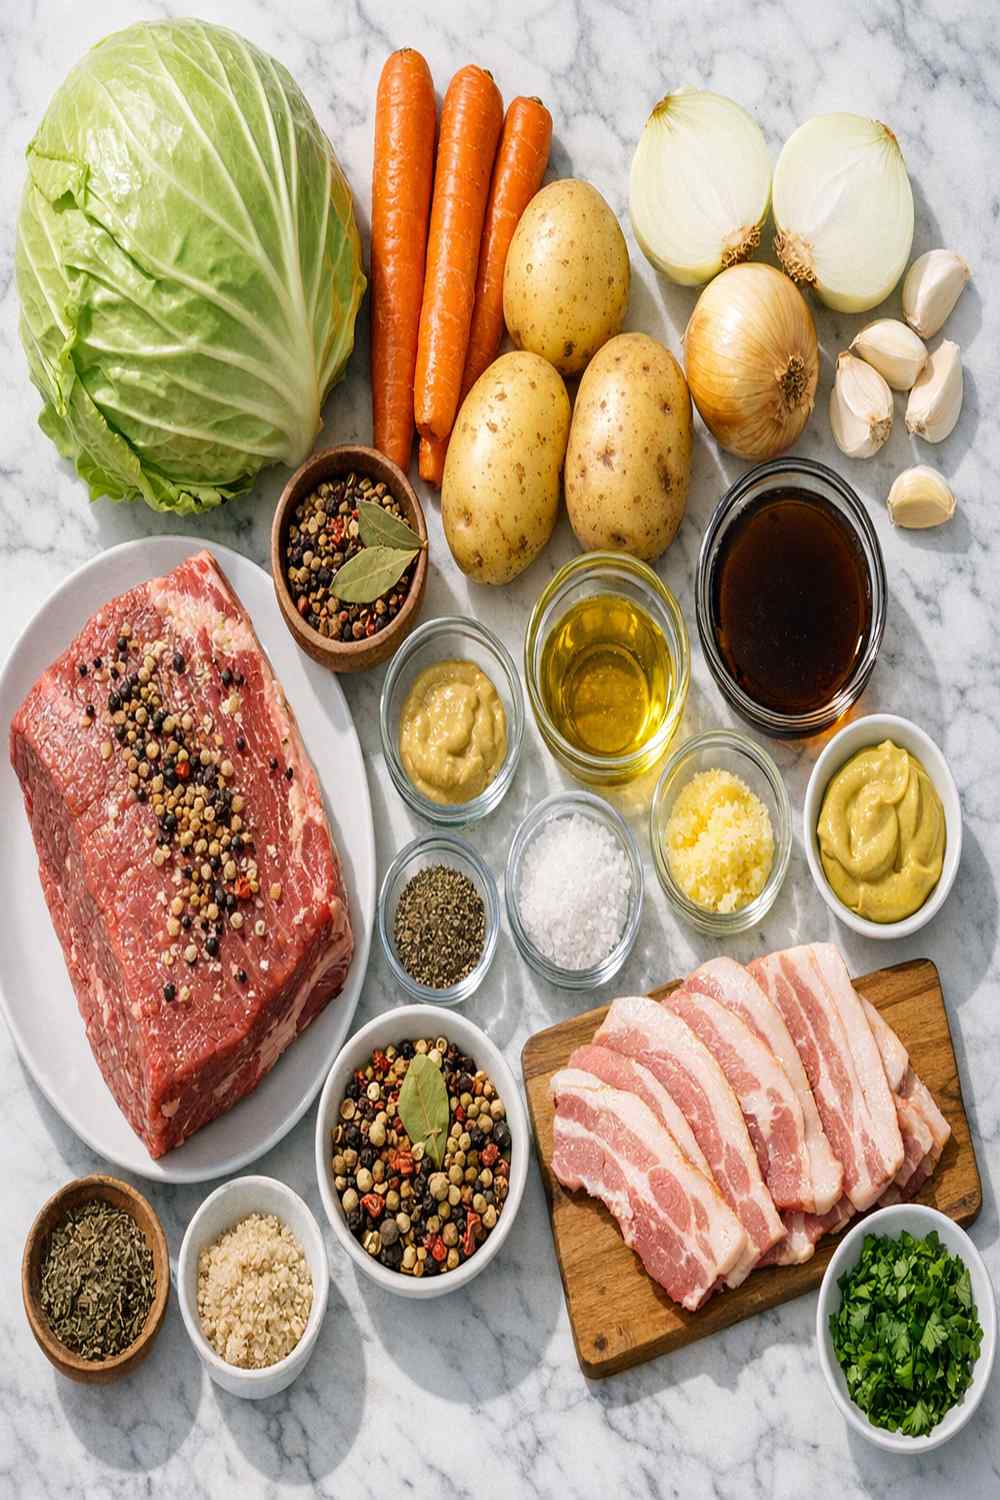
- 1 flat-cut corned beef brisket, 4 pounds (choose a piece with visible fat marbling and a deep pink color from the curing process)
- 1 head green cabbage, medium (choose one that’s dense and heavy for its size, with tight outer leaves)
- 1 cup beef broth, good quality (adds depth to pan juices for basting and serving)
- 2 tablespoons extra virgin olive oil (for the seasoning mixture and pan juices)
- 1½ pounds small gold potatoes, left whole or halved (the pale yellow color provides subtle warmth that complements the meat)
- 6 medium carrots, peeled (select ones with bright orange hue and firm texture that won’t become mushy)
- 1 packet spice seasoning (included with most corned beef cuts, essential for authentic brining flavor)
- 1 yellow onion, medium (provides golden notes both in color and caramelized flavor)
How to Make Picture-Perfect Baked Corned Beef And Cabbage Recipe
I want you to think of this process as creating edible art. Each step builds on the previous one, and understanding the *why* behind each technique helps you troubleshoot if needed and confidently adjust based on your specific oven and ingredients. This isn’t rigid—it’s a framework for success.
Step 1: Prepare Your Oven and Meat Properly
Start by preheating your oven to 325°F and positioning a rack in the middle of your oven cavity. This temperature is crucial because it allows the meat to cook gently enough to remain tender while still developing that gorgeous caramelized exterior. Too hot, and you’ll get a crust but lose the tenderness. Too cool, and you won’t get that visual impact we’re after.
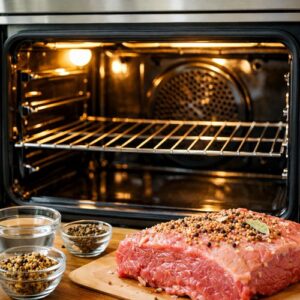
While your oven preheats, rinse your corned beef under cold running water for about 30 seconds, rotating it to wash away excess surface brine. This step is visual as well as culinary—it prevents an overly salty crust from forming. Pat it completely dry with paper towels; moisture is the enemy of browning. Place it fat-side up in the center of your roasting pan. The fat side up is intentional—we want that fat to render slowly down over the meat, creating moisture and flavor, while the exposed surface browns to mahogany perfection.

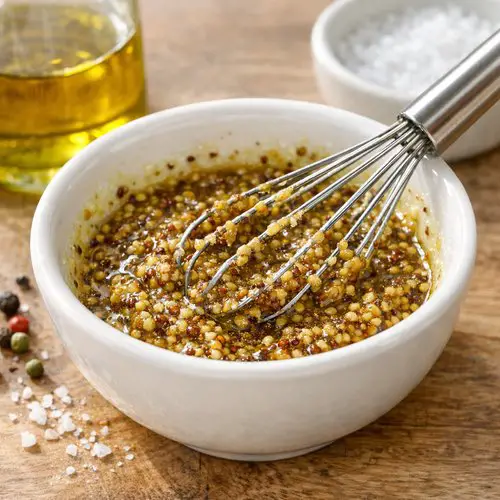
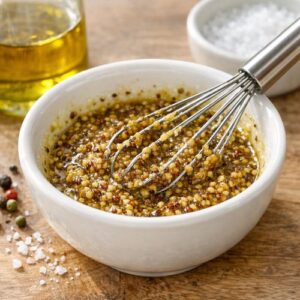
Step 2: Create Your Mustard Seasoning Rub
In a small bowl, whisk together 4 tablespoons whole grain mustard, 2 tablespoons extra virgin olive oil, a generous three-finger pinch of sea salt, and about 12 grinds of freshly ground black pepper. The mustard serves multiple purposes: it adds tangy flavor depth, its dark color creates visual drama on the meat surface, and those visible mustard seeds become part of the beautiful crust.
Rub this mixture generously all over the top and sides of the corned beef, but leave the bottom alone since it’ll be in contact with the pan. Focus especially on that fat cap—this is where you want the most generous application. The oil helps the mustard adhere and promotes browning. This step determines much of your final visual presentation, so take your time and ensure even coverage.
Step 3: Braise Low and Slow
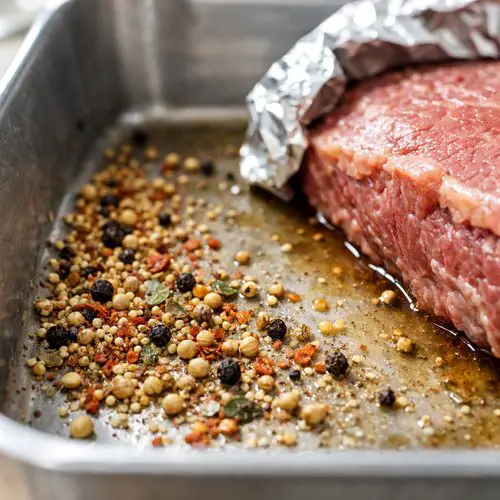
Sprinkle the entire contents of your spice seasoning packet directly into the bottom of the roasting pan, avoiding the meat itself. This distributes the seasoning into the liquid below, infusing everything with that classic corned beef brine flavor. Now carefully pour about 4 cups of water into the pan, aiming for the corners and edges rather than directly onto your mustard-coated meat—we want to keep that rub intact and in contact with the surface for optimal browning.
If you have good-quality beef broth, substitute 1 cup of it for 1 cup of water; this adds subtle richness to your final pan juices. Cover the pan tightly with aluminum foil, creating a seal that traps steam for gentle, moist cooking. Slide it into your preheated 325°F oven and set a timer for 2 hours. This long, slow braise is what transforms tough muscle fibers into tender, sliceable meat.
Step 4: Prepare Your Vegetables While the Meat Cooks
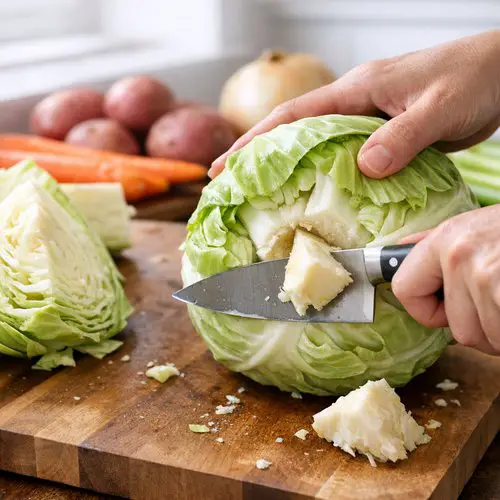
During the first hour or so of braising, prep your vegetables so they’re ready to go when needed. Using a sharp chef’s knife, remove the stem and core from your green cabbage, then cut it into 6 wedges of roughly equal size. Peel your 6 carrots and cut them diagonally into 2-inch chunks—the diagonal cut increases surface area for caramelization and creates more visually interesting pieces.
Peel your yellow onion and cut it into thick wedges, keeping the root end intact so each piece holds together. Rinse your 1½ pounds of small gold potatoes and halve them (or leave whole if they’re truly tiny). Arrange all prepped vegetables on a sheet pan or cutting board nearby, ready to add to the roasting pan when the timer sounds. Having everything prepped is a professional move that keeps your cooking flow smooth and prevents scrambling.
Step 5: Add Vegetables and Increase Heat
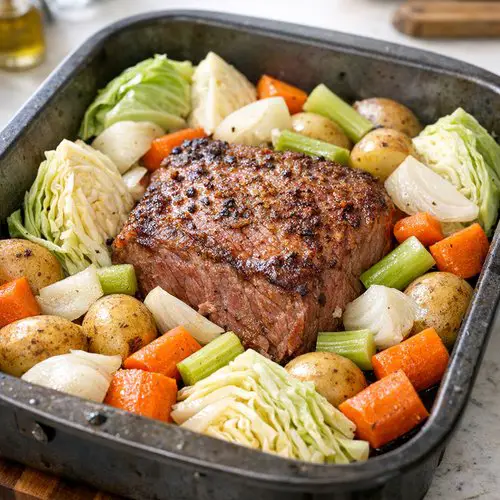
After 2 hours, carefully remove the hot roasting pan from the oven (use oven mitts—this is steaming hot). Increase your oven temperature to 350°F. The meat should be very tender now; you can test this by piercing it with a fork, which should meet little resistance.
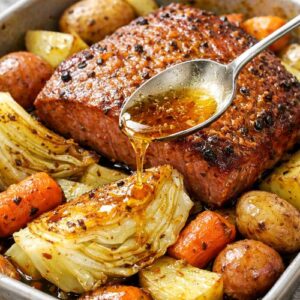
Now here’s where the visual magic begins: arrange your prepared vegetables around the corned beef in a logical pattern. Place cabbage wedges flat-side down on one side, carrots scattered in clusters, potatoes nestled into open spaces, and onion wedges distributed throughout. This intentional arrangement means your final platter will look composed rather than chaotic. Using a spoon or ladle, generously coat each vegetable with the hot pan juices—this is the basting step that helps them brown beautifully and absorb that savory liquid.
Cover the pan again with foil and return it to the oven, now at 350°F, for 30 minutes. This initial covered time allows the vegetables to soften slightly while the oven temperature increases.
Step 6: Uncover and Achieve Golden Caramelization
Remove the foil and spoon additional pan juices over all the vegetables once more. This is crucial—the repeated basting is what creates that glossy, caramelized finish that photographs beautifully. Return the uncovered pan to the oven and roast for 45 minutes to 1 hour, or until the potatoes are fork-tender and the cabbage edges are deeply golden with some charred spots.
I mention charred spots intentionally. That’s not burning—that’s caramelization. Those dark edges are where natural sugars have concentrated and browned, creating complex flavors and dramatic visual contrast. This is the difference between boiled corned beef and cabbage and this restaurant-quality version.
Around the 30-minute mark of this uncovered roasting, quickly open the oven and baste one more time if you notice the vegetables drying out. Different ovens vary in moisture levels, so adjust based on what you see.

Step 7: Rest, Slice, and Plate
When everything looks golden and tender, transfer your corned beef to a cutting board using tongs or two sturdy spatulas. Let it rest for 5 minutes—this allows the juices to redistribute throughout the meat, ensuring every slice stays moist rather than weeping liquid. During this rest, your vegetables stay warm in the oven if needed (cover loosely with foil to maintain warmth).
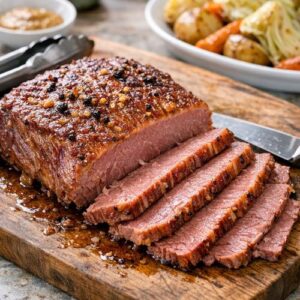
Using a sharp serrated knife, slice the corned beef thinly against the grain. Look at your meat—you’ll see muscle fibers running in a particular direction. Slicing perpendicular to those fibers breaks them apart, creating tender bites instead of chewy ones. This is a technique that shows immediately in the eating experience and visually in how neat your slices look.

The Plating Masterclass
Plating is where home cooking becomes restaurant-quality presentation. I’ve learned this philosophy from my years developing recipes globally—how food is presented affects how it’s perceived and enjoyed. The same delicious dish plated hastily versus thoughtfully creates entirely different dining experiences.
- Create height and movement with your meat – Don’t lay corned beef slices flat in a row. Instead, slightly overlap them and angle them upward, leaning them against a carrot bundle or stacking them in a casual lean. This creates vertical interest and makes the plate feel composed rather than static. The pink interior visible in each slice is your best visual asset—show it off.
- Position vegetables for color balance – Distribute orange carrots, pale yellow potatoes, and green cabbage around the plate so no single color dominates any one area. Place the largest vegetable pieces toward the back of the plate, smaller pieces forward, creating depth of field that draws the eye through the entire composition. Let some charred cabbage edges face outward—that’s your detail work showing.
- Apply sauce strategically with the spoon technique – Using the back of a large spoon, gently drag some of the concentrated pan juices across one section of the plate, creating a swoosh that anchors the meat and vegetables. Don’t drown the plate—these are accent strokes, not a pool. The pan juices should glisten, not flood.
Photography Tips for This Dish
This dish is visually stunning, which means it photographs beautifully if you understand a few technical points. I’ve shot countless food photos over my recipe development career, and the same principles apply whether you’re using a professional camera or your phone.
- Capture at golden hour or use window light – This dish’s warm tones—the pink meat, golden vegetables, mahogany crust—absolutely sing in warm, diffused natural light. Photograph within 2 hours of sunset if possible, or use soft window light from an overcast day. Harsh overhead lighting flattens the colors and hides the texture. If you must use flash, bounce it off a white surface to diffuse it.
- Shoot from a 45-degree angle first, then overhead – Start by positioning your camera at about 45 degrees to the plate, which shows the height and layering beautifully and displays that pink meat interior. Then move directly overhead for a composed, bird’s-eye view that shows how everything connects. You’ll find one angle feels more dynamic; that’s your hero shot.
- Include a sauce dish or horseradish on the side – A small ramekin of creamy horseradish sauce or pan juices in the background creates context and adds another visual element. Partially blur the background using depth of field (lower f-stop if possible) so it frames rather than competes with your main dish.
Seasonal Color Variations
While corned beef and cabbage traditionally marks St. Patrick’s Day and early spring, this dish adapts beautifully to seasonal aesthetics and ingredient availability. As someone who grew up moving between different climates and culinary traditions, I’ve learned that honoring seasonal produce not only tastes better but photographs more naturally.
Spring version: Add fresh asparagus spears and baby fingerling potatoes to your vegetable mix, and finish with fresh chives and dill instead of parsley. The green shades feel lighter and more seasonal.
Summer version: Substitute zucchini and yellow summer squash for some of the cabbage. Add fresh lemon zest to your garnish for brightness. The warmer vegetable colors feel summery despite this being a hearty dish.
Fall version: Add roasted root vegetables like parsnips and beets alongside your traditional vegetables. The deep purple-red of roasted beets creates stunning color contrast. Finish with crispy sage or thyme instead of parsley, and the presentation feels autumnal.
Winter version: Stick with your traditional presentation but add root vegetables like rutabaga or turnips. Root vegetables feel seasonally appropriate and their pale golden interiors add another color dimension.
Can I Store Baked Corned Beef And Cabbage Recipe?
Yes, and this recipe actually improves with a day of rest. Let me explain both short-term and longer-term storage so you can plan meal prep strategically.
Refrigeration (2-3 days): Cool the entire pan to room temperature, then cover with plastic wrap or transfer meat and vegetables to separate airtight containers. The meat and vegetables store beautifully. The pan juices congeal slightly as the fat cools—this is completely normal and actually wonderful because you can easily remove the solidified fat from the top if you prefer, or leave it for extra flavor. Reheat gently in a 325°F oven for about 15 minutes, covered, adding a splash of broth to revive the juices.
Freezing (up to 3 months): Slice your meat before freezing—it thaws and reheats much faster than a whole piece. Pack meat, vegetables, and pan juices in separate freezer containers, leaving ½-inch headspace. Frozen corned beef actually maintains its texture surprisingly well. Thaw overnight in the refrigerator and reheat as above.
Make-ahead strategy: You can fully prepare this dish the day before serving. Cool completely, refrigerate overnight in the pan, and reheat covered at 350°F for 20 minutes, then uncovered for 10 minutes to re-crisp the vegetable edges. The flavors actually meld beautifully overnight.
Expert’s Nutritional Tip: Understanding the Fat Story
I want to address something I discovered early in my recipe development journey while working with Irish culinary traditions. The fat in corned beef isn’t something to fear—it’s actually the vehicle for flavor and the key to tenderness. That fat cap we’re specifically roasting fat-side up? It renders slowly, basting the meat from above and creating moisture throughout the cooking process.
From a nutritional perspective, corned beef does contain saturated fat, but the spice curing process includes nitrates and other compounds with antimicrobial properties. USDA data shows that a 3-ounce serving of corned beef (about 85 grams) contains approximately 285 calories, 23 grams of protein, and 21 grams of fat. When balanced with the vegetables on this plate—carrots provide beta-carotene and fiber, potatoes offer potassium and resistant starch, and cabbage delivers glucosinolates and vitamin C—you’ve created a nutritionally diverse meal.
Common Mistakes to Avoid
Over my years developing recipes, I’ve learned that most mistakes come from small misunderstandings. Here are the specific pitfalls I’ve encountered that prevent people from achieving this dish at its best:
- Trimming too much fat before cooking – Home cooks often trim the fat thinking they’re being healthy, but this fat is essential for keeping the meat moist during the long braise. That’s why we specifically place it fat-side up. If you’re concerned about fat content, trim it after cooking instead, but I genuinely encourage you to leave it.
- Adding vegetables too early – If you add vegetables at the 2-hour mark without increasing oven temperature, they’ll steam to mushiness instead of caramelizing. The temperature increase to 350°F signals a shift from gentle braising to active browning. Trust this progression.
- Not fully drying the meat before searing – Moisture prevents browning. If your meat is damp, your rub won’t adhere and browning will be minimal. The difference between pale and mahogany-colored meat comes down to this single step.
- Slicing with the grain instead of against it – This completely changes the eating experience. Tough, chewy slices versus tender, melt-in-your-mouth pieces comes entirely from this slicing direction. Spend 5 seconds identifying which direction the muscle fibers run, then slice perpendicular to that.
What to Serve Alongside for a Complete Visual Spread
Creating a cohesive table presentation means selecting complementary dishes that enhance rather than compete with your stunning main. I’ve learned this from my global food background—every cuisine understands that sides should support the star dish, not overshadow it.
I specifically recommend our Apple Cider Vinegar Coleslaw Recipe as a fresh, tangy counterpoint to the rich roasted meat. The vinegar brightness cuts through richness beautifully, and the pale cabbage slaw provides textural contrast to your roasted cabbage wedges. Serve it in a separate bowl so diners can add as much as they like.
For additional sides, consider serving quality horseradish sauce (pale ivory, which photographs beautifully in a small ramekin) and warm crusty bread for soaking up pan juices. A simple dressed green salad with bright lemon vinaigrette adds more vegetable nutrition without competing with the main dish’s visual presence.
- Tangy coleslaw with fresh herbs – Provides acidic brightness that balances rich meat and a cool element that contrasts with the hot roasted vegetables
- Creamed horseradish in a small ceramic dish – Offers a visual accent in pale cream tones, plus its sharp heat is the traditional companion to corned beef
- Warm Irish soda bread or hearty rye – Serves a functional and visual role, with rustic crust tones that complement the whole presentation
Make-Ahead Guide for Entertaining
I developed this guide specifically for home cooks who want restaurant-quality results without last-minute stress. Here’s how to break this meal into manageable components:
Two days before: Purchase your corned beef and vegetables. Inspect them for quality and store properly. Make your horseradish sauce if serving. Plan your plating presentation by thinking about your serving platter or plates.
The morning of: Remove corned beef from the refrigerator 30 minutes before cooking to bring it to closer to room temperature (this ensures more even cooking). Prep all vegetables—wash, peel, and cut them. Store in sealed containers in the refrigerator. Make your mustard rub in a small bowl and cover.
Two hours before serving: Preheat your oven and begin the initial 2-hour braise with your corned beef. This timing ensures everything finishes roughly 15-20 minutes before serving, allowing for the 5-minute rest.
45 minutes before serving: Add vegetables and complete final roasting steps. During this time, you can set your table, chill wines, and prepare any last-minute plating garnishes.
This timeline means you’re only actively cooking during the hour before service, and most of that is passive oven time.
Nutrition Information
Based on USDA nutritional database analysis, this recipe yields approximately 6 servings. Per serving: approximately 485 calories, 42 grams protein, 18 grams fat (7 grams saturated), 38 grams carbohydrates, 7 grams fiber, and 1,240 mg sodium. The sodium comes primarily from the cured meat’s brining process.
The vibrant colors on this plate directly correspond to nutritional benefits: the deep pink meat signifies protein-rich iron, orange carrots provide beta-carotene and vitamin A, green cabbage delivers vitamin K and glucosinolates (compounds being studied for potential anti-inflammatory properties), and gold potatoes offer resistant starch that feeds beneficial gut bacteria. The visual diversity is nature’s way of signaling that you’re eating a nutritionally complete meal.
Baked Corned Beef And Cabbage Recipe
Ingredients
Method
- Start by preheating your oven to 325°F and positioning a rack in the middle of your oven cavity. This temperature is crucial because it allows the meat to cook gently enough to remain tender while still developing that gorgeous caramelized exterior. Too hot, and you'll get a crust but lose the tenderness. Too cool, and you won't get that visual impact we're after. While your oven preheats, rinse your corned beef under cold running water for about 30 seconds, rotating it to wash away excess surface brine. This step is visual as well as culinary—it prevents an overly salty crust from forming. Pat it completely dry with paper towels; moisture is the enemy of browning. Place it fat-side up in the center of your roasting pan. The fat side up is intentional—we want that fat to render slowly down over the meat, creating moisture and flavor, while the exposed surface browns to mahogany perfection.
- In a small bowl, whisk together 4 tablespoons whole grain mustard, 2 tablespoons extra virgin olive oil, a generous three-finger pinch of sea salt, and about 12 grinds of freshly ground black pepper. The mustard serves multiple purposes: it adds tangy flavor depth, its dark color creates visual drama on the meat surface, and those visible mustard seeds become part of the beautiful crust. Rub this mixture generously all over the top and sides of the corned beef, but leave the bottom alone since it'll be in contact with the pan. Focus especially on that fat cap—this is where you want the most generous application. The oil helps the mustard adhere and promotes browning. This step determines much of your final visual presentation, so take your time and ensure even coverage.
- Sprinkle the entire contents of your spice seasoning packet directly into the bottom of the roasting pan, avoiding the meat itself. This distributes the seasoning into the liquid below, infusing everything with that classic corned beef brine flavor. Now carefully pour about 4 cups of water into the pan, aiming for the corners and edges rather than directly onto your mustard-coated meat—we want to keep that rub intact and in contact with the surface for optimal browning. If you have good-quality beef broth, substitute 1 cup of it for 1 cup of water; this adds subtle richness to your final pan juices. Cover the pan tightly with aluminum foil, creating a seal that traps steam for gentle, moist cooking. Slide it into your preheated 325°F oven and set a timer for 2 hours. This long, slow braise is what transforms tough muscle fibers into tender, sliceable meat.

- During the first hour or so of braising, prep your vegetables so they're ready to go when needed. Using a sharp chef's knife, remove the stem and core from your green cabbage, then cut it into 6 wedges of roughly equal size. Peel your 6 carrots and cut them diagonally into 2-inch chunks—the diagonal cut increases surface area for caramelization and creates more visually interesting pieces. Peel your yellow onion and cut it into thick wedges, keeping the root end intact so each piece holds together. Rinse your 1½ pounds of small gold potatoes and halve them (or leave whole if they're truly tiny). Arrange all prepped vegetables on a sheet pan or cutting board nearby, ready to add to the roasting pan when the timer sounds. Having everything prepped is a professional move that keeps your cooking flow smooth and prevents scrambling.

- After 2 hours, carefully remove the hot roasting pan from the oven (use oven mitts—this is steaming hot). Increase your oven temperature to 350°F. The meat should be very tender now; you can test this by piercing it with a fork, which should meet little resistance. Now here's where the visual magic begins: arrange your prepared vegetables around the corned beef in a logical pattern. Place cabbage wedges flat-side down on one side, carrots scattered in clusters, potatoes nestled into open spaces, and onion wedges distributed throughout. This intentional arrangement means your final platter will look composed rather than chaotic. Using a spoon or ladle, generously coat each vegetable with the hot pan juices—this is the basting step that helps them brown beautifully and absorb that savory liquid. Cover the pan again with foil and return it to the oven, now at 350°F, for 30 minutes. This initial covered time allows the vegetables to soften slightly while the oven temperature increases.

- Remove the foil and spoon additional pan juices over all the vegetables once more. This is crucial—the repeated basting is what creates that glossy, caramelized finish that photographs beautifully. Return the uncovered pan to the oven and roast for 45 minutes to 1 hour, or until the potatoes are fork-tender and the cabbage edges are deeply golden with some charred spots. I mention charred spots intentionally. That's not burning—that's caramelization. Those dark edges are where natural sugars have concentrated and browned, creating complex flavors and dramatic visual contrast. This is the difference between boiled corned beef and cabbage and this restaurant-quality version. Around the 30-minute mark of this uncovered roasting, quickly open the oven and baste one more time if you notice the vegetables drying out. Different ovens vary in moisture levels, so adjust based on what you see.
- When everything looks golden and tender, transfer your corned beef to a cutting board using tongs or two sturdy spatulas. Let it rest for 5 minutes—this allows the juices to redistribute throughout the meat, ensuring every slice stays moist rather than weeping liquid. During this rest, your vegetables stay warm in the oven if needed (cover loosely with foil to maintain warmth). Using a sharp serrated knife, slice the corned beef thinly against the grain. Look at your meat—you'll see muscle fibers running in a particular direction. Slicing perpendicular to those fibers breaks them apart, creating tender bites instead of chewy ones. This is a technique that shows immediately in the eating experience and visually in how neat your slices look.
Nutrition
Notes
Tried this recipe?
Let us know how it was!FAQs
Why is my corned beef gray instead of pink?
That pink color comes from sodium nitrite in the curing process—it’s what makes cured meats pink rather than gray. If your meat is too gray, you likely purchased uncured brisket by mistake. Check the label for “corned beef” with the brining packet included. The gray color is fine nutritionally, but the flavor and visual impact will differ significantly.
Can I make this without the mustard rub?
Technically yes, but I’d encourage you to try it first. The mustard serves multiple purposes: it prevents the rub from sliding off during cooking, its dark color creates that mahogany crust we’re after, and it adds subtle tangy depth. If you genuinely dislike mustard flavor, use a thin layer of Dijon mustard instead of whole grain—the flavor mellows significantly during cooking and is barely detectable in the final dish.
How do I know when vegetables are done without overcooking them?
Pierce the thickest part of a potato with a fork; it should slide through with minimal resistance. Carrots should have slight give when you press them but still hold their shape. Cabbage should be fork-tender at the thickest part of the wedge. These vegetables finish at roughly the same time because you cut them to similar thicknesses, but check them starting at the 40-minute mark after uncovering. Every oven is different.
Why does the cabbage turn darker green instead of staying bright green?
During the long braise and roast, heat transforms chlorophyll molecules, causing that color shift. This is completely normal and doesn’t indicate overcooking. The cabbage should still have texture and not be mushy. This darker tone is actually more visually interesting than bright green would be, and it indicates deeper caramelization and more complex flavor.
What’s the best way to photograph this dish right after it comes from the oven?
Wait exactly 5 minutes. Right out of the oven, everything is steaming, which photographs as a blur in the background. After 5 minutes, the steam dissipates, the gloss on the meat and vegetables settles into a beautiful sheen rather than a wet appearance, and the colors appear more vibrant. Position your camera at a 45-degree angle to showcase height, and capture that moment when the plate is perfectly composed but still steaming subtly in the background.
More Visually Stunning Recipes
- Apple Crisp Instant Pot – A warm, golden dessert that photographs beautifully with that caramelized cinnamon-sugar crust
- Bacon Cheddar Dip – Perfect for entertaining with its creamy, melted appearance and rich brown bacon garnish
- my favorite salad – Fresh and bright with striking geometric patterns that create natural visual interest
There’s genuine magic in cooking a meal that nourishes both the body and the soul—when something looks so beautiful that people stop mid-conversation just to appreciate it, and then it tastes even better than it looks. That’s what this baked corned beef and cabbage recipe delivers. You’re not just cooking; you’re creating a memory through food.
My multicultural upbringing taught me that the most meaningful meals happen when we slow down, present our food with intention, and feed people something that shows we care about both the eating experience and the visual experience. This recipe does exactly that. It’s traditional enough to honor the culinary roots it comes from, but elevated enough to feel special and worthy of your effort.
More Recipes You Will Love
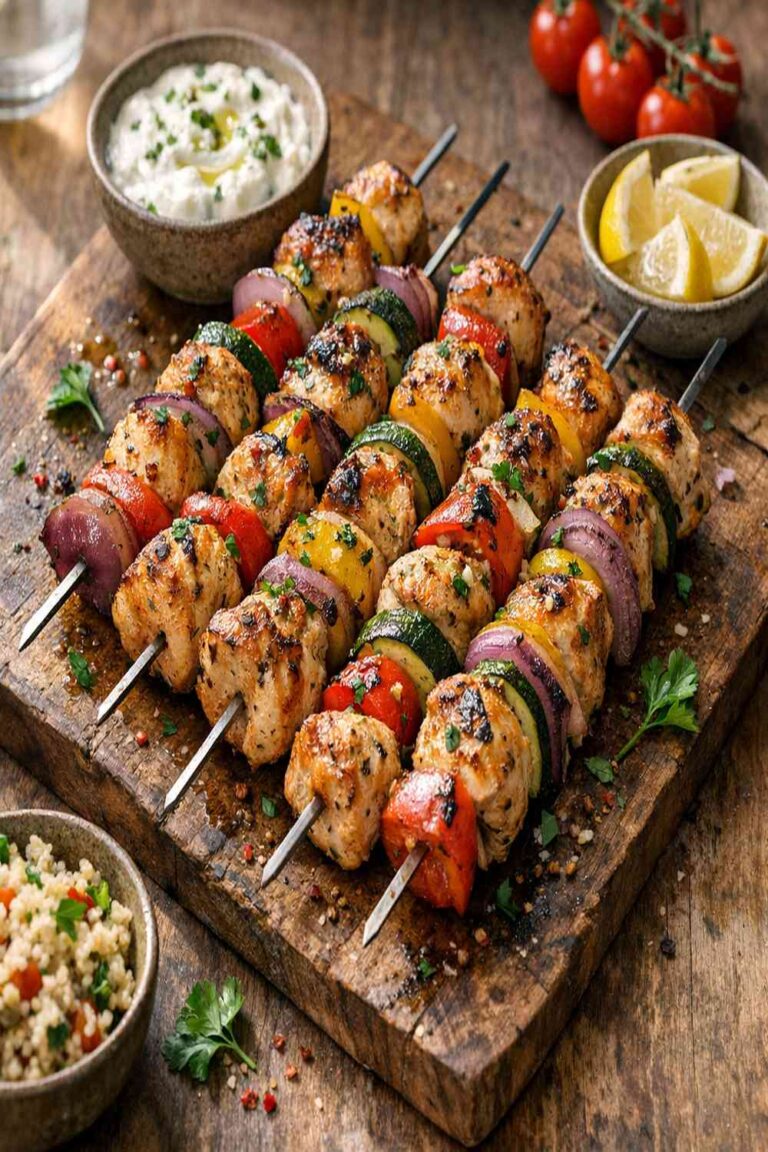
- This Easy Chicken Dinner – Worth adding to your recipe collection.
- My Weeknight Chicken Recipe – Worth adding to your recipe collection.
- This Flavorful Chicken Dish – Worth adding to your recipe collection.
Take your time with the plating. Notice the colors. Breathe in that aroma before serving. These moments of intentionality transform a meal into an experience. Enjoy!