Before we dive into the delicious world of homemade protein bars, let’s talk about what goes well with them. Picture this: you just whipped up a batch of protein-packed goodness, and you’re ready to enjoy them among friends or family. Savory smoothies, fresh fruits, crunchy vegetable sticks, or even a cup of steaming herbal tea can complement these bars perfectly.
- Smoothies: Add a scoop of protein powder and toss in some leafy greens. You’ll have a satisfying meal or snack alongside your bars.
- Fresh Fruits: Apples, bananas, or berries can round out your snack time with natural sweetness and vitamins.
- Vegetable Sticks: Pairing your bars with carrot or celery sticks dipped in hummus offers a crunchy contrast.
- Herbal Tea: A warm cup can enhance the overall enjoyment and provide a calming effect after a hefty workout.
Now, let’s get started on our main attraction: homemade protein bars.

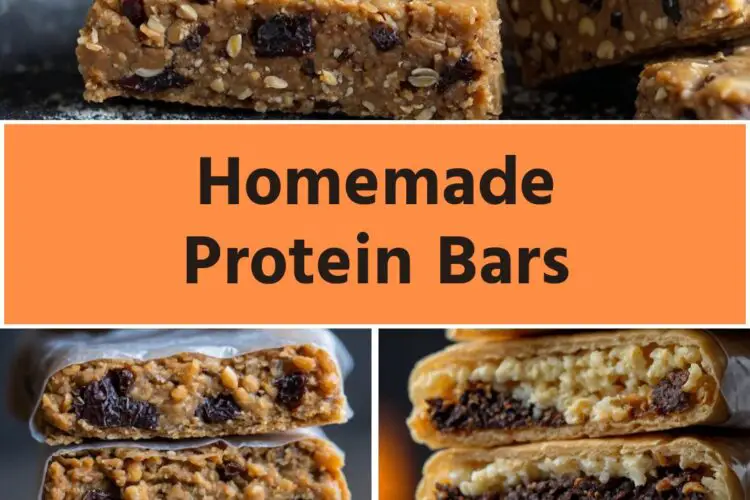
As someone who has spent countless hours in the kitchen experimenting with recipes, I can attest that homemade protein bars are a game changer. It’s satisfying to know exactly what’s in your food, especially when you’re seeking a delicious and nutritious snack.
In my health-conscious journey, I’ve learned just how beneficial it is to prepare my own snacks. I’ve encountered so many store-bought options loaded with additives and sugar that it often felt like a gamble choosing them. Homemade protein bars are simple, customizable, and can be ready in under an hour. They are perfect for busy days, post-workout nourishment, or even as a guilt-free treat.
So, what exactly is a homemade protein bar?
What Are Homemade Protein Bars?
Homemade protein bars are nutrient-dense snacks made with wholesome ingredients, primarily designed to be rich in protein. They can be tailored to your taste preferences and dietary needs, allowing you to control everything from sweetness to texture.
The basic idea is to combine different sources of protein, healthy fats, and natural sweeteners, constraining them into a bar format. They are perfect for a quick breakfast on the go, a pre- or post-workout snack, or a healthy dessert.
You will also like the following Snacks recipes!
- Copycat Lemon Meringue Pie Bites
- How to make Single Serving Freezer Apple Crisp
- Dunkin Donuts Apple Cider Donut
Why This Recipe Works?
This recipe is special for a few reasons:
- Customizable Ingredients: You choose what goes into these bars. Want a nut-free version? Go for sun butter. Prefer the taste of chocolate? Toss in extra chocolate chips.
- High Nutritional Value: Packed with quality protein and healthy fats, these bars will keep you full longer. Many of the ingredients are great sources of fiber and essential nutrients, making them a wholesome choice.
- Quick and Easy Preparation: Within minutes, you can combine your ingredients and set them to chill. No extensive cooking skills are needed, making this recipe perfect for everyone, including busy individuals.
- Cost-Effective: Buying pre-made protein bars can add up quickly. By making your own, you can save money while enjoying healthier options.
Ingredients You’ll Need To Make These Homemade Protein Bars
Here’s the shopping list to get you started:
- 2 cups creamy peanut butter (or swap with any preferred nut or seed butter)
- 1 ½ cups vanilla or chocolate-flavored protein powder (see notes)
- ½ cup finely ground coconut flour
- ½ cup pure maple syrup
- 2 tablespoons chia seeds (for added texture and nutrition)
- 2 cups semi-sweet chocolate chips (optional)
- 1 teaspoon pure vanilla extract (adds warmth and depth)
These ingredients are not only easy to find, but they also pack a nutritional punch, fueling your body without the extra sugars and chemicals found in many store-bought bars.

How To Make These Homemade Protein Bars?
Let’s get to the fun part: making these bars! Follow these straightforward steps:
Step 1: Prepare Your Baking Dish
Start by lining an 8×8 inch baking pan with parchment paper. This step ensures easy removal of the bars once they’re set.
Step 2: Mix the Ingredients
In a large mixing bowl, combine your creamy peanut butter, protein powder, coconut flour, maple syrup, and chia seeds.
Be sure to mix vigorously until all ingredients are evenly integrated. You want a thick, cohesive batter. The mixture will take some elbow grease but stick it out—it’s worth it. You can use a sturdy spatula or even your hands for this.
Step 3: Add Those Chocolate Chips
Fold in the semi-sweet chocolate chips (if you’re using them). This step is crucial for enhancing the richness of your bars. Make sure they are evenly distributed throughout the batter.
Step 4: Transfer to Pan
Once thoroughly mixed, transfer your concoction to the prepared baking dish. Use your spatula to spread the mixture evenly, pressing down firmly. The more compact the bars, the better they’ll hold together.
Step 5: Chill
Pop your filled pan into the refrigerator for at least 1 hour. This step helps the bars set properly, making them easier to cut.
Step 6: Slice and Enjoy
Once set, lift the bars from the pan using the parchment paper and slice them into desired portions. Enjoy as is, or package them for later!
Tips
To get the most out of your homemade protein bars, consider these pointers:
- Don’t Skip the Chilling Time: Give your bars sufficient time to set. Chilling is vital for structure, and no one wants crumbly bars!
- Experiment with Flavors: Feel free to add spices like cinnamon or nutmeg for warmth. Different extracts (like almond or peppermint) can also give your bars a unique twist.
- Store Properly: Store your bars in an airtight container in the fridge. This helps maintain their freshness.
- Choose Quality Ingredients: Use high-quality protein powder and nut butters for the best taste and nutritional values.
- Be Mindful of Portion Sizes: Depending on your goals, portion sizes can vary. Adjust according to how you plan to use them—whether you want them to be a snack or a meal replacement.
Nutrition Information
Making your own protein bars allows you to keep track of what you’re consuming. Based on the ingredients listed, one typical bar contains:
- Calories: Approximately 200-250
- Protein: 10-15 grams
- Fat: 10-15 grams (predominantly from healthy nut butter)
- Carbohydrates: 25-30 grams
Remember, this is a rough estimate since ingredient variations can change the final numbers.

How to Store the Leftovers?
If you find yourself with leftovers (which you probably won’t because they’re delicious!), store them in an airtight container in the fridge. They’ll keep well for about a week. If you need them to last longer, feel free to freeze them. Just place them in a freezer-safe container with parchment paper between layers to prevent sticking. Thaw in the fridge overnight when you want to enjoy them again.
What Are Some Recommended Side Dishes for Homemade Protein Bars?
If you’re enjoying these bars as part of a meal, consider pairing them with:
- Greek Yogurt: The creaminess balances the dense bars nicely. Greek yogurt is also another protein source, making it perfect for breakfast!
- Fresh Berries: Sweet and juicy berries provide a refreshing contrast. Their natural sugars complement the bars and add fiber.
- Trail Mix: A small serving alongside provides crunch and healthy fats, adding texture to your snack.
- Nut Milk: Almond or oat milk can be a delightful drink to wash down your bars while also adding a creaminess that enhances the experience.
If the Items Are Not Available in Your Pantry, What Are Some Substitute Options for the Ingredients?
No worries! Here are some substitutes for the ingredients if you find yourself short on supplies:
- Nut Butter: Don’t have peanut butter? Almond butter, cashew butter, or tahini can be great alternatives.
- Protein Powder: If you’re out of protein powder, try using ground oats or even pureed silken tofu for a different flavor profile.
- Coconut Flour: You can substitute regular flour, but it’s essential to consider that this may alter the texture. Using almond flour is also a good alternative.
- Maple Syrup: Honey, agave syrup, or even brown sugar mixed with a little water can serve.
Homemade Protein Bars
Ingredients
Equipment
Method
- Start by lining an 8×8 inch baking pan with parchment paper. This step ensures easy removal of the bars once they’re set.
- In a large mixing bowl, combine your creamy peanut butter, protein powder, coconut flour, maple syrup, and chia seeds.
- Be sure to mix vigorously until all ingredients are evenly integrated. You want a thick, cohesive batter. The mixture will take some elbow grease but stick it out—it’s worth it. You can use a sturdy spatula or even your hands for this.
- Fold in the semi-sweet chocolate chips (if you’re using them). This step is crucial for enhancing the richness of your bars. Make sure they are evenly distributed throughout the batter.
- Once thoroughly mixed, transfer your concoction to the prepared baking dish. Use your spatula to spread the mixture evenly, pressing down firmly. The more compact the bars, the better they’ll hold together.
- Pop your filled pan into the refrigerator for at least 1 hour. This step helps the bars set properly, making them easier to cut.
- Once set, lift the bars from the pan using the parchment paper and slice them into desired portions. Enjoy as is, or package them for later!
Nutrition
Notes
- Don’t Skip the Chilling Time: Give your bars sufficient time to set. Chilling is vital for structure, and no one wants crumbly bars!
- Experiment with Flavors: Feel free to add spices like cinnamon or nutmeg for warmth. Different extracts (like almond or peppermint) can also give your bars a unique twist.
- Store Properly: Store your bars in an airtight container in the fridge. This helps maintain their freshness.
- Choose Quality Ingredients: Use high-quality protein powder and nut butters for the best taste and nutritional values.
- Be Mindful of Portion Sizes: Depending on your goals, portion sizes can vary. Adjust according to how you plan to use them—whether you want them to be a snack or a meal replacement.
Tried this recipe?
Let us know how it was!Frequently Asked Questions
1. Can these protein bars be made vegan?
Absolutely! Just use plant-based protein powder and swap peanut butter for a vegan-friendly alternative, like almond or sunflower seed butter. Opt for maple syrup over honey to keep them vegan.
2. How many bars does this recipe yield?
Depending on how big you cut them, this recipe can yield about 16-20 bars. Adjust the size according to your needs!
3. Can I use these bars as a meal replacement?
Yes, these bars provide a good balance of protein, carbs, and fats, making them suitable as a meal replacement on busy days.
4. How can I customize the texture?
Want crunch? Toss in some chopped nuts or seeds. Prefer soft? Skip the chia seeds. Playing around with ingredient ratios will yield different textures.
5. What’s the best way to transport these bars?
Wrap individual bars in plastic wrap or place them in a resealable bag. This way, you have a handy snack ready when you are out and about.
Conclusion
In this ever-busy life, having quick, nutritious snacks can be a game changer. Homemade protein bars not only satisfy your cravings but also support your health goals. With a few ingredients and simple steps, you can whip up delicious bars tailored just for you. Remember, each batch can become a delicious adventure.
So why not gather those ingredients and give this recipe a go? Your taste buds and body will thank you later!
