This post contains affiliate links. As an Amazon Associate I earn from qualifying purchases.
These adorable little spheres of cake and frosting are the perfect handheld treat for celebrations, bake sales, or simply because you deserve something sweet. We love serving them alongside a refreshing Apple Cider Iced Tea for an elegant afternoon gathering, or pairing them with warm beverages during cozy seasons. They’re the kind of recipe that looks like you spent hours in the kitchen when really, we’re working with straightforward techniques and a touch of kitchen magic.
When a Family Meal Inspired a Global Obsession
I’ll never forget my grandmother’s kitchen during holiday gatherings—it was pure controlled chaos. She’d have three desserts going at once, flour dusting her apron, and the most infectious laugh whenever something went hilariously wrong. One year, she attempted these little cake pops for the first time, and they became the thing everyone asked about.
What struck me wasn’t just how delicious they were, but how they brought people together. A room full of relatives—some speaking Spanish, others English, many switching between both—all stopped mid-conversation to grab one. That’s when I realized these aren’t just cake pops. They’re edible connection.
Years later, as I developed recipes across continents and cultures, I kept coming back to this formula. It’s foolproof, it’s elegant, and it proves that sometimes the simplest recipes create the most memorable moments.
What is Cake Pops With Almond Bark Recipe?
Cake pops are bite-sized confections made from crumbled cake mixed with frosting, rolled into spheres, then coated in a sweet chocolate or vanilla shell. The almond bark coating—a confectionery product made from vegetable oil and cocoa or vanilla—is the modern baker’s secret weapon because it sets faster and smoother than traditional chocolate, creating that signature crisp exterior with a tender crumb interior.
This recipe originated in North American baking culture but has roots in the European tradition of petit fours and hand-formed confections. What makes our version special is its accessibility. We’re using a streamlined approach that doesn’t require fancy equipment or culinary school training, just good technique and a bit of patience.
The magic happens when we combine three simple elements: cake as our foundation, frosting as our binding agent, and almond bark as our glossy finale. Together, they create textural contrast and flavor depth that belies their humble ingredients.
Why You’ll Love This Cake Pops With Almond Bark Recipe
- Incredibly hands-on and therapeutic – Rolling these spheres becomes meditative. You’re literally shaping joy, one ball at a time, with zero stress or pressure for perfection.
- Uses pantry staples you already have – No specialty ingredients beyond almond bark, which you can find at any grocery store. This recipe celebrates simplicity without sacrificing sophistication.
- Makes enough for sharing generously – A single batch yields 36-48 pieces, perfect for gifting, parties, or slowly enjoying over the course of a week when stored properly.
- Customizable to your flavor preferences – Vanilla almond bark, chocolate almond bark, or even white chocolate—swap, combine, and create flavor profiles that match your mood.
- Freezer-friendly for ultimate convenience – Make them weeks ahead and pull them from the freezer whenever you need an elegant dessert. They thaw quickly and taste even better when slightly chilled.
- Teaches fundamental baking skills – This recipe teaches texture development, proper mixing techniques, temperature control during melting, and professional finishing skills that apply to dozens of other recipes.
The Ingredients
Here’s what we need to create these little masterpieces. I’ve organized ingredients by their function in the recipe, because understanding why we use each component makes you a more confident baker. Most of these items are staples in any well-stocked kitchen, which is exactly why we love this recipe.
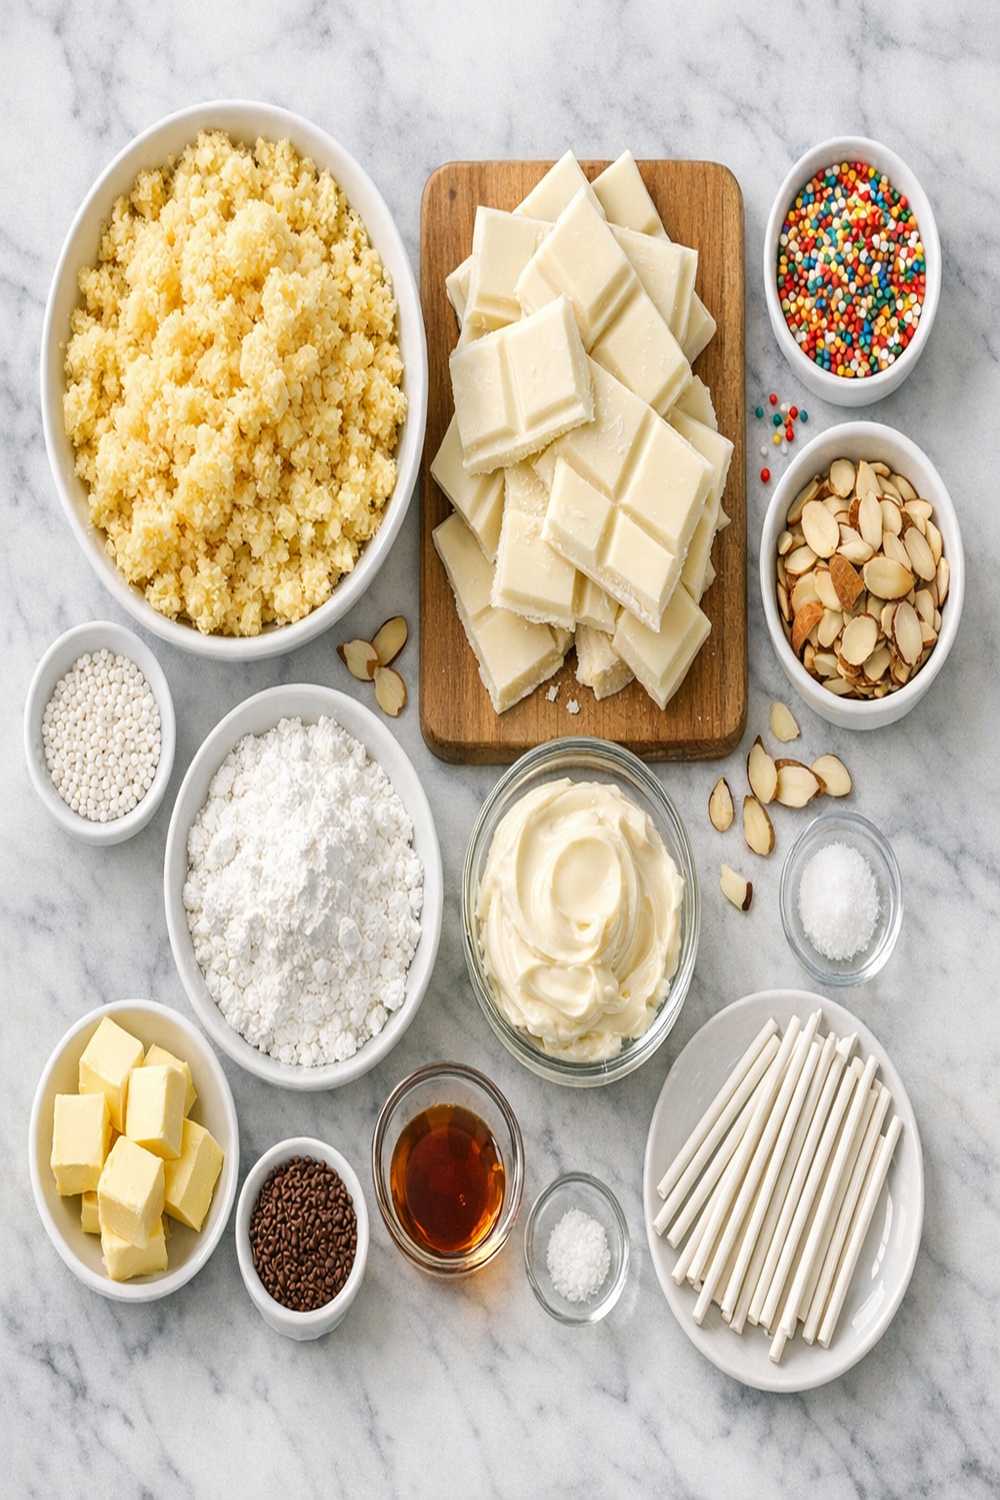
For the Cake Base
- 3 large eggs (room temperature, separated from cold eggs by at least 30 minutes on counter)
- 1 box vanilla cake mix (or your favorite flavored variety)
- 1 cup water (filtered or room temperature)
- ⅓ cup neutral oil (vegetable or canola oil works perfectly)
For the Frosting Layer
- 1½ containers ready-made frosting (16 ounces total, any flavor that complements your cake)
- 2 tablespoons heavy cream or whole milk (optional, for better mixing consistency)
For the Coating and Finishing
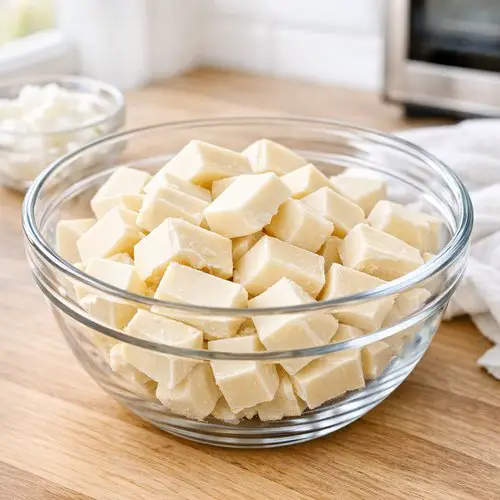
- 18-20 ounces almond bark in vanilla or chocolate (approximately 1½ to 2 packages depending on brand)
- Parchment paper (for setting your finished pops)
- Optional decorations: sprinkles, edible glitter, crushed nuts, or mini candies (for festive presentations)
- 1 teaspoon coconut oil (helps thin almond bark without compromising texture or taste)
Yield: Makes 36-48 cake pops, depending on size consistency
How to Make Cake Pops With Almond Bark Recipe?
We’re going to move through this recipe methodically, building layers of flavor and texture as we go. I’ll walk you through each phase with the specific details I’ve learned through years of developing and testing this recipe in kitchens across different climates and altitudes. Pay attention to the sensory cues—they matter more than strict timing.
Step 1: Prepare and Bake Your Cake Layer
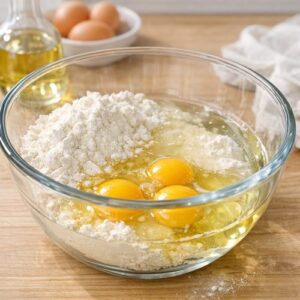
Preheat your oven to 350°F (175°C). In a large mixing bowl, combine the vanilla cake mix, one cup of water, the ⅓ cup neutral oil, and your three eggs. Using an electric mixer on medium speed, blend these ingredients for about two minutes until the batter is smooth and relatively lump-free. You’ll hear the mixer working, and the batter should flow like thick pancake batter—if it seems too thick, you can add an extra tablespoon of water.
Pour the batter into a 13×9-inch baking pan that you’ve lightly coated with cooking spray or lined with parchment paper. Smooth the top with a spatula and slide it into your preheated oven. Bake for 28-32 minutes, until a toothpick inserted in the center comes out clean or with just a few moist crumbs clinging to it. The cake should spring back slightly when you press the surface gently.
Remove from the oven and place on a wire cooling rack. This step is crucial: allow the cake to cool for 15-20 minutes at room temperature. We want it cool enough to handle comfortably but still slightly warm, which makes crumbling infinitely easier. A completely cold cake becomes dense and harder to break apart evenly.

Step 2: Crumble the Cake Into Texture Heaven
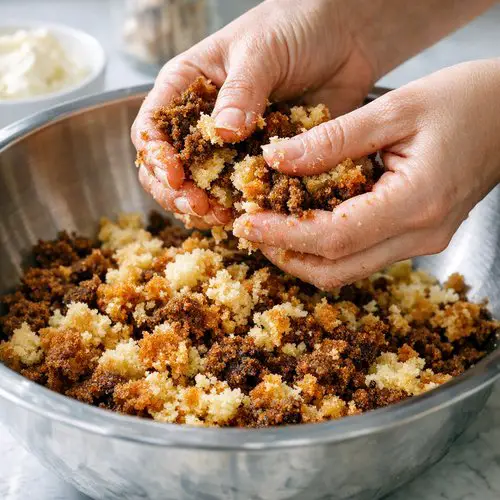
Once your cake has cooled slightly, it’s time for the satisfying part—crumbling! Break the entire cake into your largest mixing bowl using your hands. Don’t worry about being delicate here. We want irregular pieces ranging from pea-sized to small walnut-sized chunks. This irregular texture actually creates better cake pops because smaller pieces distribute the frosting more evenly throughout, preventing dense pockets.
Get your hands in there and work through the cake systematically, breaking it down as you go. This process typically takes 3-5 minutes. You should end up with what looks like coarse breadcrumbs mixed with some slightly larger fragments. There should be no cake clumps larger than a walnut, and ideally many pieces smaller than a pea.
This is where your hands become your most valuable tool. The warmth of your palms actually helps break down the cake structure more efficiently than any spoon ever could.
Step 3: Combine Cake and Frosting Into a Cohesive Mixture
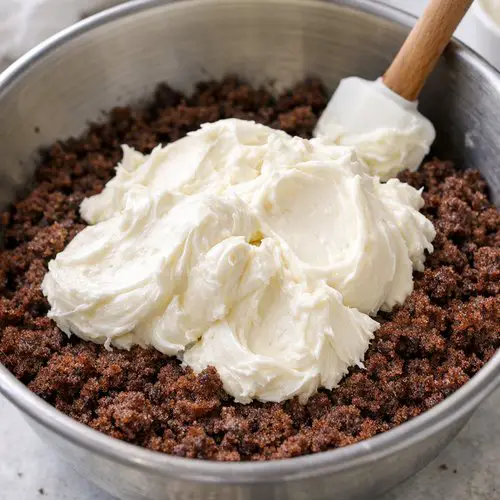
Scoop all 1½ containers of frosting directly into your bowl of crumbled cake. If your frosting is cold straight from the refrigerator, it can be difficult to mix. A pro tip from my years developing recipes: let the frosting sit at room temperature for 10 minutes before this step, or add two tablespoons of heavy cream or whole milk to improve workability.
Using a sturdy wooden spoon or sturdy silicone spatula, fold and mix the frosting into the cake crumbs. This isn’t a quick process—plan on 3-5 minutes of consistent mixing. You’ll notice the mixture gradually becoming more cohesive as the frosting coats the cake pieces and the warmth helps meld everything together. The finished mixture should resemble dense cookie dough, holding together when you squeeze it but not so wet that it sticks excessively to your hands.
As you’re mixing, you might notice streaks of lighter frosting still visible—this is actually fine if you have good distribution throughout. Over-mixing can create a dense, gluey texture, so stop once everything is incorporated but before it becomes completely uniform in color.
Step 4: Roll Your Cake Mixture Into Perfect Spheres
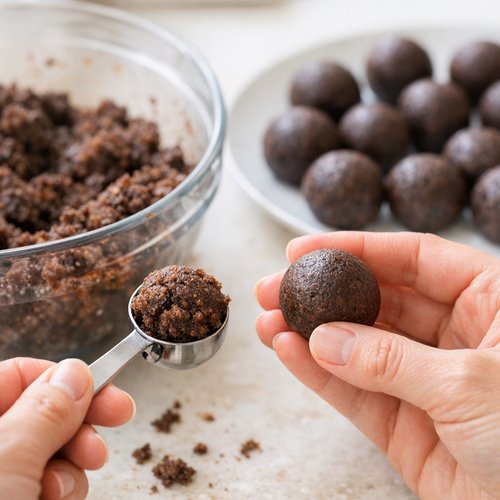
Now comes the meditative part. Using a tablespoon measuring spoon (not a tablespoon from your silverware drawer, but an actual measuring spoon), scoop portions of your cake mixture. Drop each portion onto parchment paper, spacing them about two inches apart. Once you’ve scooped roughly half your mixture, start rolling them into balls.
Working with damp or lightly oiled hands (not dripping wet, just barely dampened), gently roll each portion between your palms in a circular motion. Apply consistent gentle pressure for about 8-10 seconds per ball. The warmth of your hands and the friction will help the mixture consolidate into a smooth sphere. Your finished balls should be roughly the size of a large marble or small walnut—about ¾ inch to 1 inch in diameter.
If your hands start sticking, briefly dampen them again. If the balls start cracking or falling apart, your cake-to-frosting ratio might be off—add another tablespoon or two of frosting to the remaining mixture. This batch should yield 36-48 balls, depending on how large you roll them. Arrange finished balls on parchment-lined baking sheets, spacing them about an inch apart.
Here’s a technique I learned from professional pastry chefs: once all your balls are rolled, chill them in the refrigerator for at least 30 minutes, or in the freezer for 15 minutes. This firms them up considerably, making the dipping process infinitely easier. Cold cake pops won’t crack or crumble when they hit the warm almond bark coating.
Step 5: Melt Your Almond Bark to Perfect Consistency
Break your almond bark into roughly one-inch chunks (this helps it melt more evenly) and place about 18-20 ounces in a heat-safe bowl suitable for melting. You can use a double boiler setup, a microwave, or even a slow cooker on low heat. I prefer the microwave method for control: heat the almond bark in 30-second intervals at 50% power, stirring between each interval.
Why 50% power instead of full power? Lower heat prevents the almond bark from seizing or becoming grainy. Total melting time is typically 2-3 minutes. The almond bark should be completely smooth and pourable but not hot—around 110-120°F (43-49°C) is ideal. If you don’t have a thermometer, test with your finger; it should feel warm but not uncomfortably hot.
This is the critical step where many home bakers encounter problems. If your almond bark seems too thick, add one teaspoon of coconut oil at a time, stirring well. Coconut oil thins the mixture without compromising flavor or the set of your coating. Avoid using vegetable oil or water, which can cause seizing.
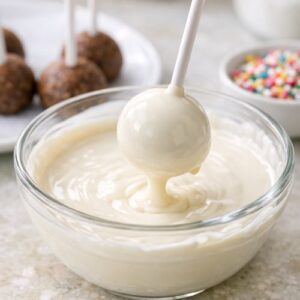
Step 6: Dip Your Chilled Cake Pops Into Almond Bark
Remove your chilled cake pops from the refrigerator. Working with 3-4 at a time (keeping the rest cold), gently place a pop into your melted almond bark. Using a dipping fork, spoon, or even a slotted spoon, submerge the ball completely for just 1-2 seconds—any longer and the cake mixture can start absorbing the coating and become soggy.
Lift the coated pop straight up, let excess almond bark drip back into the bowl for about 3 seconds, then gently transfer it to a parchment-lined baking sheet or cooling rack. The coating should form a smooth, thin layer over your cake ball. If you’re concerned about your dipping technique (and many people are!), you can instead spoon almond bark over each ball, coating it manually—it takes longer but produces equally delicious results.
Work steadily but without rushing. The entire dipping process for a full batch takes 10-15 minutes. If your almond bark begins to thicken as it cools, reheat it in 15-second microwave bursts at 50% power. Allow your freshly dipped pops to set at room temperature for at least 20 minutes, or place them in the refrigerator for 10-15 minutes for faster setting.
If you’d like to add decorative elements (sprinkles, edible glitter, crushed candies), apply them while the almond bark coating is still wet, within the first 30 seconds after dipping.

Step 7: Final Setting and Storage Preparation
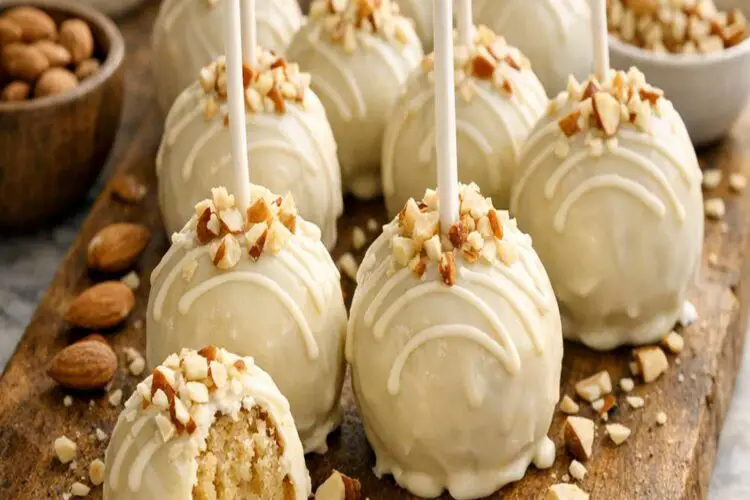
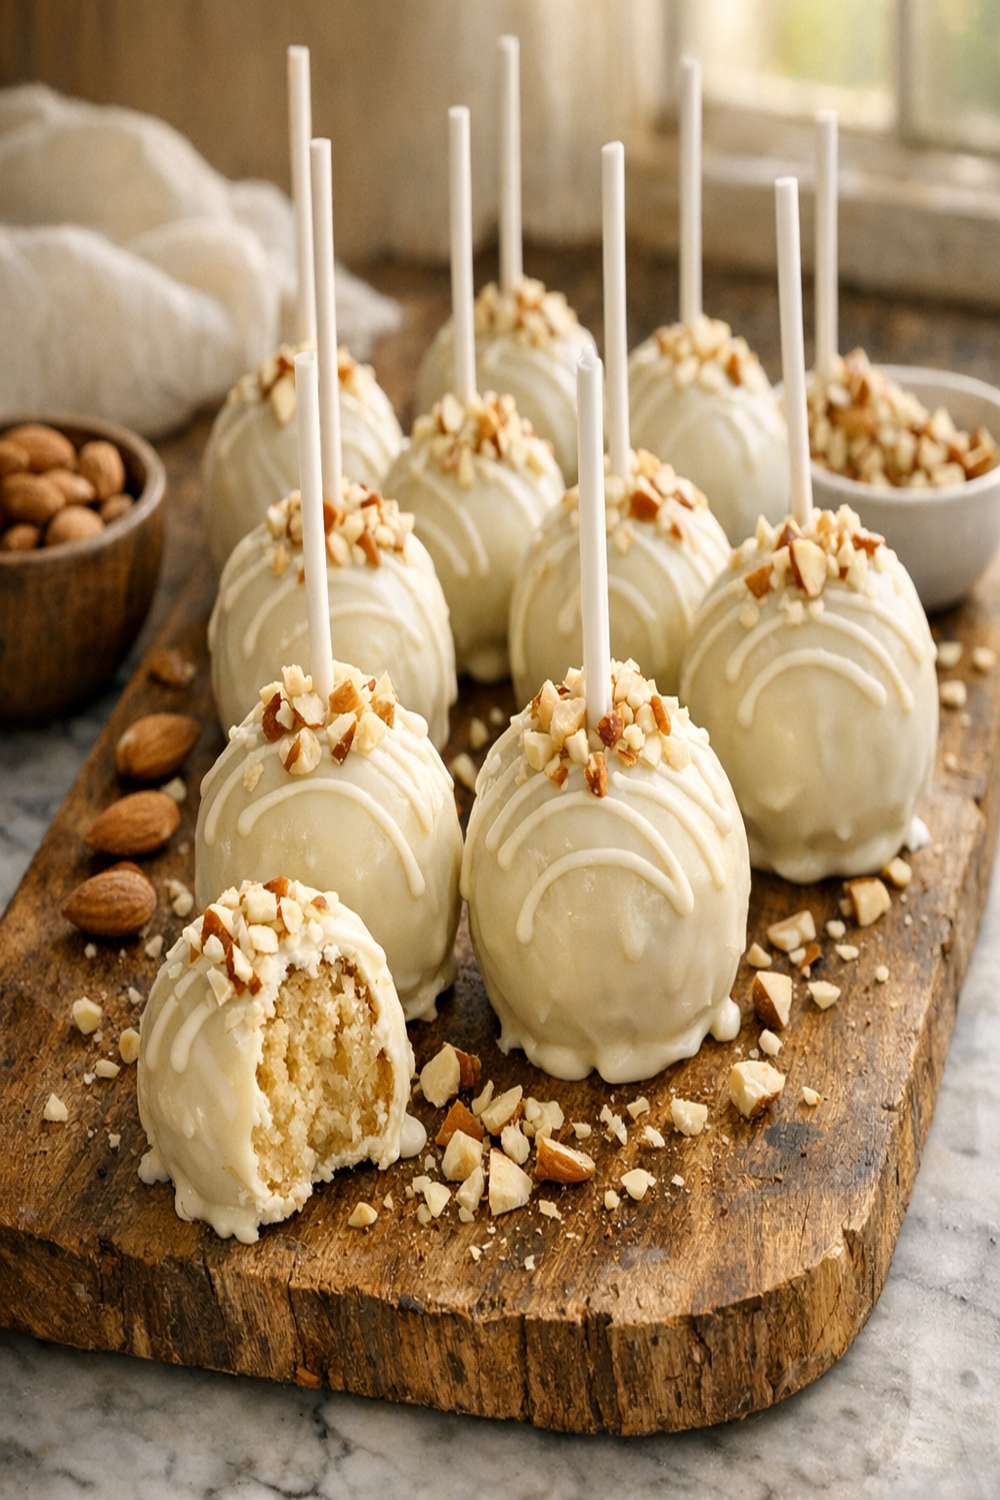
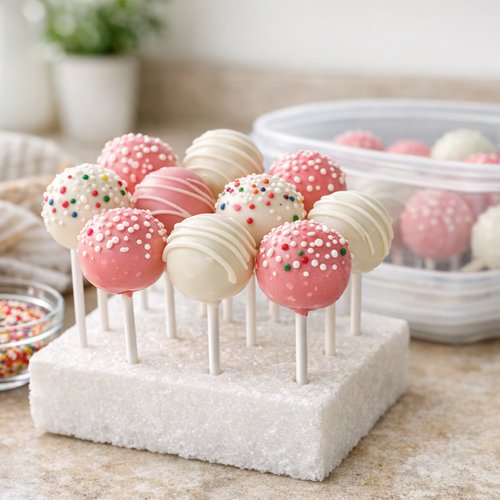
Once all your cake pops are coated and the almond bark has fully set to the touch (it should feel firm but not rock hard), they’re ready for storage. Admire your work—you’ve just created something that looks absolutely bakery-quality. The smooth, glossy finish and perfectly spherical shape are genuine accomplishments.
Store your finished cake pops in an airtight container in the refrigerator for up to one week, or in the freezer for up to one month. We actually prefer serving them slightly chilled, straight from the refrigerator, as they have a wonderful texture that way.
Tips and Tricks
- Temperature control is everything – This is the single most important factor in cake pop success. Cold cake pops plus warm (but not hot) almond bark equals a smooth coating. Room temperature cake pops will crack and absorb too much coating, creating a thick, uneven finish.
- Use the right frosting consistency – Room-temperature frosting mixes into cake more evenly than cold frosting. If your frosting is still cold or extra thick, a tablespoon or two of heavy cream or milk works wonders without changing the flavor profile.
- Don’t skip the hand-rolling step – Electric mixers or food processors might seem efficient, but they overwork the mixture, creating dense, gluey cake pops. Hand-rolling, despite being more time-consuming, produces superior texture and structure.
- Invest in a good silicone dipping spoon – While you can use regular spoons or forks, a silicone dipping spoon with a slotted bottom (specifically designed for this task) makes the dipping process incredibly easier. They’re inexpensive and worth the investment if you make these regularly.
- Level your baking pan – This matters more than you’d think. If your baking pan sits on an uneven oven rack, one side of the cake might bake faster, creating uneven crumble texture. Check your oven racks for levelness using a simple level tool.
- Keep almond bark moving – Almond bark that sits stationary begins to thicken quickly. Stir it occasionally as you work, and don’t let it cool below 105°F or it becomes too thick for smooth dipping.
- Create an assembly line – Set up your dipping station strategically: chilled pops on the left, almond bark in the center, and parchment-lined sheet on the right. This rhythm makes the process faster and more enjoyable.
Expert’s Nutritional Tip
Each cake pop contains roughly 80-120 calories, depending on size and frosting type. While these are decidedly indulgent treats, a single cake pop can satisfy a sweet craving without the caloric commitment of a full slice of cake. From a practical standpoint, the frosting-to-cake ratio in these pops actually delivers slightly more satiety than traditional cake because the textural variety (dense cake center, creamy frosting, crisp almond bark shell) creates a more memorable eating experience, which some research suggests can lead to better satisfaction control.
If you’re concerned about sugar content, you can substitute one-third of the almond bark coating with dark chocolate or unsweetened chocolate mixed in, which provides antioxidants while reducing the overall sweetness. The bitter notes of dark chocolate also balance beautifully against the sweet cake and frosting interior.
Make-Ahead Guide
Up to 1 week before serving: Complete the entire recipe through the final almond bark coating and setting. Store in an airtight container in the refrigerator. They’re actually more flavorful after sitting for a day or two as the flavors meld together.
Up to 1 month before serving: Transfer fully coated cake pops to a freezer-safe container, separating layers with parchment paper. Freeze until serving. Remove from freezer 10-15 minutes before eating if you prefer them soft, or serve them frozen for an interesting textural experience.
3-4 days before serving: Complete all steps through cake crumbling and frosting mixing. Store the cake-frosting mixture in an airtight container in the refrigerator. When ready to finish, the mixture will be very cold and firm; you can either let it sit at room temperature for 10 minutes or work quickly with slightly damp hands for easier rolling.
1-2 days before serving: Roll all your cake pops and chill them on baking sheets in the freezer overnight. Complete the dipping and final coating the morning of serving or the day before. This two-step approach reduces pressure on the day of entertaining.
Common Mistakes to Avoid
- Overmixing the cake-frosting combination – When you blend too vigorously for too long, you’re breaking down the cake’s crumb structure beyond recognition. The result is a dense, gluey cake pop that feels heavy on the palate. Mix just until combined, then stop. Imperfect mixing is actually preferable.
- Dipping warm cake pops into almond bark – If your pops aren’t chilled, the warmth causes them to absorb coating and potentially crack. Worse, the contrast between temperatures can cause the almond bark to seize. Always—always—chill your pops before dipping. This single step determines success or failure more than any other factor.
- Using almond bark that’s too hot or too thick – If your coating temperature exceeds 130°F, you risk melting the frosting inside and creating a greasy mess. If your bark is too thick, you get a chunky coating that doesn’t set smoothly. Aim for 110-120°F with coconut oil thinning if needed.
- Rolling inconsistent sizes – Cake pops that vary significantly in size look unprofessional and cook unevenly during the “setting” phase. Using a measuring spoon consistently helps create uniformity. If you’re making these for gifting, uniformity actually matters more than you’d expect.
Seasonal Variations
Spring: Tint your almond bark pale pink or pastel yellow using oil-based food coloring. Swap vanilla frosting for strawberry or lemon. Dust fresh pops with edible glitter for an ethereal springtime aesthetic.
Summer: Use lemon or coconut cake mix with vanilla frosting. Dip in white chocolate almond bark and immediately top with crushed freeze-dried strawberries or raspberries before the coating sets. Serve chilled.
Fall: Select spiced cake mix or add ½ teaspoon pumpkin pie spice to vanilla cake mix before baking. Pair with cream cheese frosting and cinnamon-tinted almond bark. Toast chopped pecans or walnuts and press onto wet coating for crunch and earthiness.
Winter: Use chocolate cake mix with dark chocolate frosting, then coat in white almond bark for striking contrast. Add peppermint extract (¼ teaspoon) to your melted almond bark for festive flair, or top with crushed candy canes before setting.
Can I Store Cake Pops With Almond Bark Recipe?
Yes, and we actually recommend it! These treats store beautifully in multiple ways, making them ideal for make-ahead entertaining or strategic snacking throughout the week.
Room temperature storage: Your cake pops will remain at their best for 2-3 days in an airtight container away from heat sources. The almond bark coating protects the interior from drying out, making them quite shelf-stable compared to traditional cakes.
Refrigerator storage: This is our preferred method. Store in an airtight container for up to one week. The cold actually enhances the texture—the frosting becomes firmer and the cake denser, creating a more satisfying mouthfeel. They thaw quickly if you want them at room temperature, typically within 5-10 minutes.
Freezer storage: Freeze in an airtight container with parchment paper separating layers for up to one month. Properly frozen, they maintain their quality remarkably well. Thaw in the refrigerator overnight for the best texture, or eat them straight from the freezer for an entirely different (and honestly, quite delightful) experience.
Important note: Don’t store these in the refrigerator or freezer directly next to highly aromatic foods like garlic or onions. The almond bark coating is porous enough to absorb odors over time. A simple airtight container prevents this issue entirely.
Nutrition Information
Based on USDA standards for similar cake and confectionery products, per serving (one cake pop, approximately 24g): Calories: 95-110 | Total Fat: 4-5g | Saturated Fat: 2-3g | Cholesterol: 8-12mg | Sodium: 110-130mg | Total Carbohydrates: 13-14g | Dietary Fiber: 0g | Sugars: 11-12g | Protein: 0.8-1g
These values assume average-sized pops yielding 40-45 pieces per batch. Nutrition varies based on specific brands of cake mix and frosting used. For dietary or allergy purposes, always cross-reference your specific ingredient brands with their nutritional labels, as variations exist between manufacturers.
From a macronutrient perspective, these are carbohydrate-forward treats with minimal protein content. They’re best enjoyed as an occasional indulgence rather than a daily staple, but one cake pop as a portion-controlled dessert is entirely reasonable for most dietary approaches.
What Can I Serve With Cake Pops With Almond Bark Recipe?
These little delights shine as standalone treats, but pairing them thoughtfully with complementary foods and beverages elevates the entire experience. Think about temperature, flavor, and texture contrasts when planning your service.
- Hot beverages for contrast – Coffee, hot chocolate, or tea creates beautiful temperature contrast with chilled or room-temperature cake pops. The warmth amplifies the sweetness of the almond bark coating while the cake’s texture becomes more tender against the warmth.
- Fresh fruit and soft cheeses – A simple serving board featuring these pops alongside fresh berries, cubed melon, aged cheddar, and soft brie creates an elegant dessert spread. The tartness of fruit balances cake pop sweetness beautifully.
- Iced tea or lemonade – Refreshing cold beverages, particularly our Apple Cider Iced Tea, provide palate-cleansing acidity that prevents the sweetness from becoming cloying. The spiced notes in apple cider iced tea pair surprisingly well with vanilla almond bark pops.
- Yogurt parfaits – Crumble a cake pop into layers of Greek yogurt and granola for a deconstructed dessert parfait. The creamy yogurt and crunchy granola play beautifully against the soft cake interior.
- Salted nuts and dark chocolate – Create a simple snack board pairing these pops with roasted almonds, candied pecans, and dark chocolate squares. The salty elements create sophisticated flavor complexity.
- Sparkling water or prosecco – For sophisticated entertaining, serve chilled cake pops alongside sparkling beverages. The bubbles and slight acidity cleanse the palate between bites, encouraging you to savor multiple pops mindfully.
Substitutes
- Homemade cake instead of boxed mix – You can absolutely use any homemade vanilla or flavored cake recipe. Bake in a 13×9-inch pan and follow the same cooling and crumbling instructions. Homemade cake actually creates slightly lighter cake pops with more delicate crumb structure.
- Whipped frosting instead of canned – Make a simple buttercream from two sticks softened butter, three cups powdered sugar, one teaspoon vanilla, and a pinch of salt. Whipped frosting actually distributes more evenly than canned and creates slightly less dense pops, though it requires a bit more hands-on mixing time.
- Melting chocolate instead of almond bark – Tempered dark or milk chocolate creates a crispier shell than almond bark. Melt chocolate to 88-90°F and maintain that temperature carefully. The texture will be slightly crunchier and the flavor more intense, though the learning curve is steeper for beginners.
- White chocolate coating – Use quality white chocolate instead of almond bark for a different flavor profile. Be warned: white chocolate is trickier to work with because it seizes more easily. Use lower heat and add a tiny amount of coconut oil to prevent seizing. The result is worth the care.
- Crush cookie crumbles into frosting – For extra flavor dimension, fold ½ cup of crushed sandwich cookies, graham crackers, or digestive biscuits into your cake-frosting mixture before rolling. This adds delightful textural surprise and flavor complexity.
- Cream cheese frosting – Substitute cream cheese frosting for traditional frosting to create tangy, sophisticated pops that work beautifully with chocolate almond bark coating. The tanginess provides complexity to the sweet exterior.
Cake Pops With Almond Bark Recipe
Ingredients
Method
- Preheat your oven to 350°F (175°C). In a large mixing bowl, combine the vanilla cake mix, one cup of water, the ⅓ cup neutral oil, and your three eggs. Using an electric mixer on medium speed, blend these ingredients for about two minutes until the batter is smooth and relatively lump-free. You'll hear the mixer working, and the batter should flow like thick pancake batter—if it seems too thick, you can add an extra tablespoon of water. Pour the batter into a 13x9-inch baking pan that you've lightly coated with cooking spray or lined with parchment paper. Smooth the top with a spatula and slide it into your preheated oven. Bake for 28-32 minutes, until a toothpick inserted in the center comes out clean or with just a few moist crumbs clinging to it. The cake should spring back slightly when you press the surface gently. Remove from the oven and place on a wire cooling rack. This step is crucial: allow the cake to cool for 15-20 minutes at room temperature. We want it cool enough to handle comfortably but still slightly warm, which makes crumbling infinitely easier. A completely cold cake becomes dense and harder to break apart evenly.
- Once your cake has cooled slightly, it's time for the satisfying part—crumbling! Break the entire cake into your largest mixing bowl using your hands. Don't worry about being delicate here. We want irregular pieces ranging from pea-sized to small walnut-sized chunks. This irregular texture actually creates better cake pops because smaller pieces distribute the frosting more evenly throughout, preventing dense pockets. Get your hands in there and work through the cake systematically, breaking it down as you go. This process typically takes 3-5 minutes. You should end up with what looks like coarse breadcrumbs mixed with some slightly larger fragments. There should be no cake clumps larger than a walnut, and ideally many pieces smaller than a pea. This is where your hands become your most valuable tool. The warmth of your palms actually helps break down the cake structure more efficiently than any spoon ever could.

- Scoop all 1½ containers of frosting directly into your bowl of crumbled cake. If your frosting is cold straight from the refrigerator, it can be difficult to mix. A pro tip from my years developing recipes: let the frosting sit at room temperature for 10 minutes before this step, or add two tablespoons of heavy cream or whole milk to improve workability. Using a sturdy wooden spoon or sturdy silicone spatula, fold and mix the frosting into the cake crumbs. This isn't a quick process—plan on 3-5 minutes of consistent mixing. You'll notice the mixture gradually becoming more cohesive as the frosting coats the cake pieces and the warmth helps meld everything together. The finished mixture should resemble dense cookie dough, holding together when you squeeze it but not so wet that it sticks excessively to your hands. As you're mixing, you might notice streaks of lighter frosting still visible—this is actually fine if you have good distribution throughout. Over-mixing can create a dense, gluey texture, so stop once everything is incorporated but before it becomes completely uniform in color.

- Now comes the meditative part. Using a tablespoon measuring spoon (not a tablespoon from your silverware drawer, but an actual measuring spoon), scoop portions of your cake mixture. Drop each portion onto parchment paper, spacing them about two inches apart. Once you've scooped roughly half your mixture, start rolling them into balls. Working with damp or lightly oiled hands (not dripping wet, just barely dampened), gently roll each portion between your palms in a circular motion. Apply consistent gentle pressure for about 8-10 seconds per ball. The warmth of your hands and the friction will help the mixture consolidate into a smooth sphere. Your finished balls should be roughly the size of a large marble or small walnut—about ¾ inch to 1 inch in diameter. If your hands start sticking, briefly dampen them again. If the balls start cracking or falling apart, your cake-to-frosting ratio might be off—add another tablespoon or two of frosting to the remaining mixture. This batch should yield 36-48 balls, depending on how large you roll them. Arrange finished balls on parchment-lined baking sheets, spacing them about an inch apart. Here's a technique I learned from professional pastry chefs: once all your balls are rolled, chill them in the refrigerator for at least 30 minutes, or in the freezer for 15 minutes. This firms them up considerably, making the dipping process infinitely easier. Cold cake pops won't crack or crumble when they hit the warm almond bark coating.

- Break your almond bark into roughly one-inch chunks (this helps it melt more evenly) and place about 18-20 ounces in a heat-safe bowl suitable for melting. You can use a double boiler setup, a microwave, or even a slow cooker on low heat. I prefer the microwave method for control: heat the almond bark in 30-second intervals at 50% power, stirring between each interval. Why 50% power instead of full power? Lower heat prevents the almond bark from seizing or becoming grainy. Total melting time is typically 2-3 minutes. The almond bark should be completely smooth and pourable but not hot—around 110-120°F (43-49°C) is ideal. If you don't have a thermometer, test with your finger; it should feel warm but not uncomfortably hot. This is the critical step where many home bakers encounter problems. If your almond bark seems too thick, add one teaspoon of coconut oil at a time, stirring well. Coconut oil thins the mixture without compromising flavor or the set of your coating. Avoid using vegetable oil or water, which can cause seizing.

- Remove your chilled cake pops from the refrigerator. Working with 3-4 at a time (keeping the rest cold), gently place a pop into your melted almond bark. Using a dipping fork, spoon, or even a slotted spoon, submerge the ball completely for just 1-2 seconds—any longer and the cake mixture can start absorbing the coating and become soggy. Lift the coated pop straight up, let excess almond bark drip back into the bowl for about 3 seconds, then gently transfer it to a parchment-lined baking sheet or cooling rack. The coating should form a smooth, thin layer over your cake ball. If you're concerned about your dipping technique (and many people are!), you can instead spoon almond bark over each ball, coating it manually—it takes longer but produces equally delicious results. Work steadily but without rushing. The entire dipping process for a full batch takes 10-15 minutes. If your almond bark begins to thicken as it cools, reheat it in 15-second microwave bursts at 50% power. Allow your freshly dipped pops to set at room temperature for at least 20 minutes, or place them in the refrigerator for 10-15 minutes for faster setting. If you'd like to add decorative elements (sprinkles, edible glitter, crushed candies), apply them while the almond bark coating is still wet, within the first 30 seconds after dipping.
- Once all your cake pops are coated and the almond bark has fully set to the touch (it should feel firm but not rock hard), they're ready for storage. Admire your work—you've just created something that looks absolutely bakery-quality. The smooth, glossy finish and perfectly spherical shape are genuine accomplishments. Store your finished cake pops in an airtight container in the refrigerator for up to one week, or in the freezer for up to one month. We actually prefer serving them slightly chilled, straight from the refrigerator, as they have a wonderful texture that way.

Nutrition
Notes
Tried this recipe?
Let us know how it was!FAQs
Can I make cake pops without a cake pop maker stick or stand?
Absolutely! While those specialty tools are convenient, they’re not necessary. Simply place your coated cake pops on parchment paper to set, or arrange them on a cooling rack with parchment beneath to catch drips. You lose the whimsical presentation of pops on sticks, but the flavor and texture are identical. If you do want sticks for presentation, wooden skewers work perfectly—insert them about halfway into the pop after the almond bark coating has fully set.
Why did my almond bark get thick and grainy during melting?
This is called “seizing,” and it happens when moisture or too-high heat encounters the almond bark. Solutions: avoid adding water or milk directly to the bark (use coconut oil instead for thinning), always use lower heat (50% power in microwave), and stir frequently. If seizure occurs, try whisking in a tiny amount of coconut oil (½ teaspoon at a time) and continue whisking gently. Sometimes you can rescue it; sometimes you need to start fresh.
My cake pops are falling apart during dipping—what went wrong?
The most common culprits: your pops weren’t cold enough, your almond bark was too hot, or your cake-frosting mixture didn’t have enough frosting relative to cake. For the future: chill pops for at least 30 minutes (preferably an hour), keep almond bark at 110-120°F, and if your mixture seems crumbly during rolling, add one more tablespoon of frosting. Always test one pop with a gentle dip before committing your entire batch.
Can I use homemade frosting made fresh, not canned?
Yes, but bring it to room temperature first and ensure it’s not too soft. If your homemade buttercream is too warm or whipped, it won’t hold the cake balls together properly. Let fresh frosting sit at room temperature for 20 minutes before mixing with cake. If it seems too soft when mixed with cake, chill the entire mixture for 15 minutes before rolling.
How can I make my cake pops more flavorful—do I need special ingredients?
Not at all! The easiest flavor boost: select a flavored cake mix (almond, lemon, chocolate, spice) and a frosting flavor that complements it. You can also add extracts directly to your almond bark coating—¼ teaspoon peppermint extract, almond extract, or coconut extract transforms the flavor profile without changing texture. Finally, use premium frosting brands if your budget allows; they noticeably improve the final flavor.
More Recipes You’ll Love
- Apple Cider Donut Holes Baked – Tender, spiced donut holes with similar handheld appeal and crispy exterior texture that cake pop lovers adore
- Apple Crisp Instant Pot – A warm, comforting dessert that pairs beautifully with chilled cake pops for elegant entertaining contrasts