
This post contains affiliate links. As an Amazon Associate I earn from qualifying purchases.
This cheesy enchilada soup brings together the warming spices of Mexican cuisine with the soul-satisfying creaminess we all crave on chilly evenings. Pair it with fresh BLT wraps with secret sauce for a complete meal, or serve alongside crispy air fryer croutons for added texture and crunch. We’re diving into one of my favorite recipes that bridges cultures and simplifies restaurant-quality flavors for your home kitchen.
How My Abuela’s Kitchen Inspired This One-Pot Wonder
Growing up between my mother’s Italian kitchen and my grandmother’s Mexican home, I learned that the most memorable meals don’t require complicated techniques—they require intention and quality ingredients layered with care. I remember my abuela standing at her stove, stirring a pot of simmering enchilada sauce, and she’d always say, “Anna, good food whispers, it doesn’t shout.”
Years later, when I wanted to create a soup that honored both her enchilada tradition and the creamy comfort food I craved, this recipe was born. It’s become my go-to weeknight dinner because it comes together in under 30 minutes, feeds a crowd, and tastes like pure nostalgia in every spoonful. Today, I’m thrilled to share it with you.

What is Cheesy Enchilada Soup?
Cheesy enchilada soup is a modern adaptation of traditional Mexican enchiladas, reimagined as a silky, one-pot soup that captures all those beloved flavors in liquid form. Rather than rolling tortillas and baking them individually, we’re combining the signature enchilada sauce—a blend of dried chiles, spices, and richness—with tender shredded chicken, creamy cheese, and beans.
What makes this soup special is the balance between heat and creaminess. The enchilada sauce provides depth and subtle spice, while the cream cheese creates a luxurious base that doesn’t feel heavy. Unlike traditional enchiladas that require assembly and baking time, this version delivers restaurant-quality results in one pot on your stovetop.
This soup is deeply rooted in Mexican comfort food traditions, but it’s been adapted to suit the busy American home cook. It’s nostalgic yet practical, globally inspired yet universally approachable—everything I stand for as a recipe developer.
Why You’ll Love This Cheesy Enchilada Soup
- Ready in under 30 minutes – From prep to table, this is a genuine weeknight solution that doesn’t sacrifice flavor or satisfaction for speed
- One-pot simplicity – Minimal cleanup means more time enjoying your meal and less time scrubbing dishes (a win in my book)
- Naturally feeds a crowd – Whether you’re cooking for two or eight, this recipe scales beautifully and impresses without fuss
- Creamy without feeling heavy – The cream cheese melts into a silky base, creating richness without that overstuffed feeling
- Packed with protein and vegetables – Real chicken, beans, and fresh vegetables make this nutritionally balanced and genuinely satisfying
- Endlessly customizable – Add your favorite toppings, adjust spice levels, or swap proteins to match your family’s preferences
- Makes excellent leftovers – This soup actually tastes better the next day as flavors meld and deepen
The Ingredients
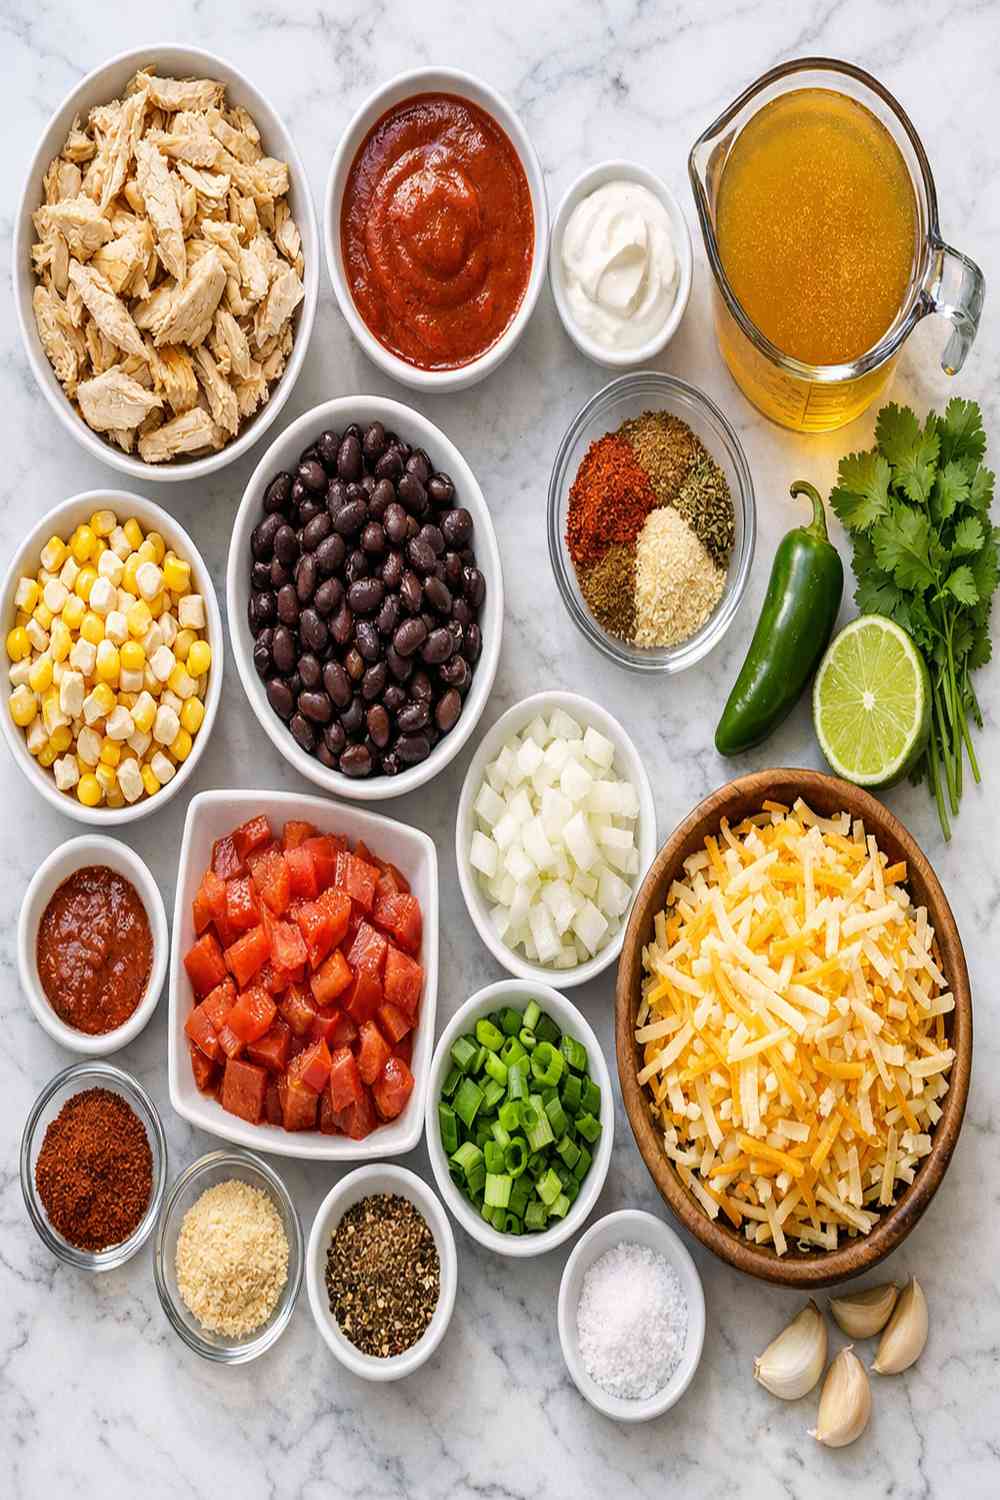
Before we begin, let me share a professional note: the quality of your enchilada sauce makes or breaks this recipe. I recommend using a mid-range enchilada sauce (not the ultra-budget options, which can taste tinny) rather than homemade when you’re short on time. Your base ingredients are your foundation, so choose them thoughtfully. This recipe yields approximately 6 generous servings.
- ½ teaspoon ground cumin (bloomed briefly in heat for maximum flavor extraction)
- 10 ounces enchilada sauce (one standard can, red or green based on preference)
- 1 cup cooked black beans (drained and rinsed if using canned)
- 8 ounces cream cheese (room temperature for smooth melting, cut into 1-inch cubes)
- 1 poblano pepper (seeded, membranes removed, and chopped into bite-sized chunks)
- 1 tablespoon extra virgin olive oil (for sautéing, adds subtle fruity depth)
- 1 cup low-sodium chicken broth (allows you to control salt throughout cooking)
- 14 ounces canned diced tomatoes (fire-roasted variety adds wonderful depth)
- 1 cup shredded mozzarella cheese (whole milk mozzarella melts more smoothly)
- 2 cups shredded cooked chicken breast (rotisserie works beautifully here)
- 3 green onions (white and light green parts separated, for layered flavor)
- 1 cup frozen corn kernels (no need to thaw, keeps soup texture light)
- 1 large yellow onion (peeled, halved, and diced into ½-inch pieces)
How to Make Cheesy Enchilada Soup
This recipe follows a time-tested cooking progression: we build flavor through aromatics, create our creamy base, then layer in remaining ingredients while maintaining perfect temperature control. The key to success is never allowing the soup to boil vigorously once cream cheese enters the picture. Walk through these steps with me, and we’ll create something magnificent together.
Step 1: Build Your Aromatic Foundation
Heat your olive oil in a large Dutch oven or heavy-bottomed soup pot over medium heat for approximately one minute until it shimmers and smells subtly fruity. This isn’t a racing moment—we’re gently warming the oil to distribute heat evenly across your cooking vessel.
Add your diced onion and chopped poblano pepper, stirring occasionally with a wooden spoon. You’re looking for the onion to transition from opaque to translucent with slightly softened edges, approximately 5-6 minutes. This is your window of doneness—the vegetables should be tender but not browned. You’ll notice the kitchen beginning to smell herbaceous and warm, which signals properly cooked aromatics.
This foundational step is non-negotiable in my kitchen. Rushing through it means missing out on the caramelization that develops natural sweetness and complexity. Professional cooks call this the “flavor foundation,” and for good reason.

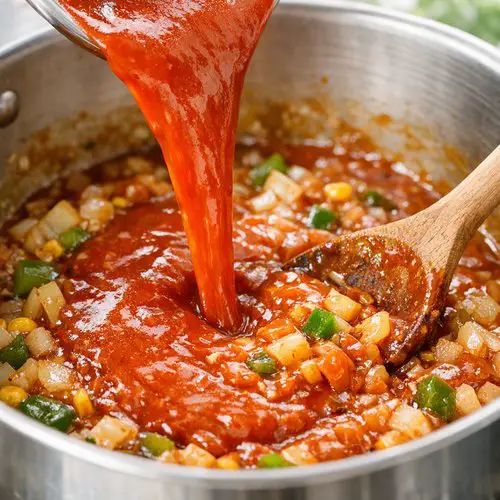
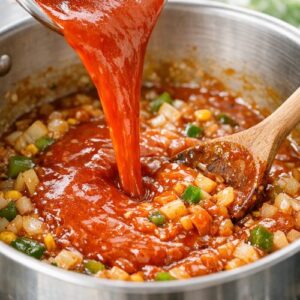
Step 2: Create Your Creamy Base
Pour your enchilada sauce directly into the pot with the softened vegetables. Stir everything together gently, ensuring the sauce coats all the vegetables. Now comes the critical moment: add your room-temperature cream cheese cubes.
Using a wooden spoon, break apart the cream cheese into smaller pieces as it begins to melt—don’t just let it sit there. This active stirring, done over 3-4 minutes, ensures smooth integration without lumps. You’re essentially creating an emulsion here, blending the fat from the cream cheese with the liquid from the sauce.
The cream cheese should be completely melted and the mixture should look unified and silky, with no visible white chunks remaining. If you’re seeing resistance, reduce heat to medium-low. The color should deepen slightly—this is the enchilada sauce doing its job, infusing the cream cheese with authentic flavor.
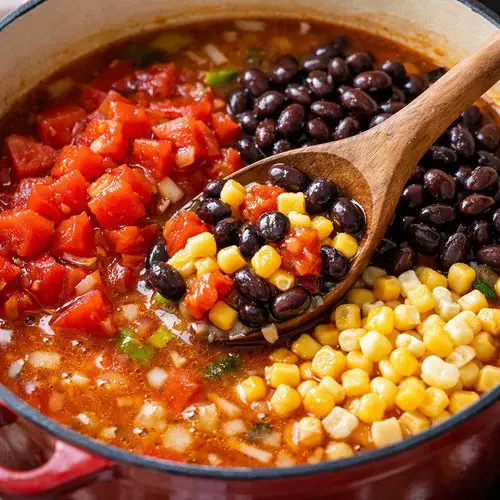
Step 3: Add Your Vegetables and Beans
Now add your canned diced tomatoes (including their juice for extra flavor and body), your rinsed black beans, and your frozen corn kernels. Stir everything together thoroughly, ensuring each vegetable and bean is coated in that gorgeous creamy enchilada base. The frozen corn will begin thawing immediately from the residual heat—this is perfectly fine and actually keeps the corn from becoming mushy.
At this point, let the mixture heat through for approximately 2-3 minutes with occasional stirring. You’ll notice steam rising gently and the bottom of the pot occasionally releasing little wisps of aroma. This gentle heating allows flavors to begin melding without shocking the cream cheese base.
The reason I use perfect black beans (whether homemade or canned) is because they provide substantial protein and earthiness that balances the richness of the cheese. Their mild flavor doesn’t compete with the enchilada sauce—instead, they amplify it.
Step 4: Add Protein and Final Liquid
Add your shredded chicken breast and low-sodium chicken broth to the pot, stirring gently to combine. Here’s where your culinary judgment enters the picture: the consistency of your finished soup depends on personal preference. Some prefer it thick and hearty, like a stew; others like it more brothier and sippable.
With the amounts listed, you’ll land somewhere in the middle—beautifully balanced between substance and fluidity. If your mixture seems too thick, add chicken broth in ¼-cup increments until you reach your desired consistency. Cook for 10-12 minutes over medium heat, stirring occasionally, never allowing the soup to reach a rolling boil.
Here’s my professional tip: maintain what I call a “lazy simmer”—tiny bubbles forming at the edges and occasional wisps of steam, but nothing vigorous. This temperature range keeps the cream cheese emulsion stable and prevents it from separating or becoming grainy. Too much heat and you’ll taste that curdling sensation; too little and flavors won’t fully develop.

Step 5: Final Seasoning and Temperature Check
Taste your soup carefully. Because enchilada sauce already contains salt, and we’re using low-sodium broth, most people find the seasoning exactly right. However, if you want additional depth, this is where ½ teaspoon of ground cumin creates magic. Stir it in and let it bloom in the heat for about one minute—you’ll actually smell the cumin’s essential oils activating.
At this point, your soup should be steaming gently and registering around 180-190°F if you have a thermometer handy. It shouldn’t be bubbling aggressively. If everything looks beautiful and smells incredible, we’re ready for the final step.

Step 6: Serve with Toppings
Remove your pot from heat. Immediately ladle the soup into serving bowls. While the soup is still steaming, top each bowl with a generous handful of shredded mozzarella cheese and a sprinkle of sliced green onion tops (I reserve just the lightest green portions for the prettiest presentation).
The residual heat from the soup will slightly soften the mozzarella, creating those beautiful melted streaks throughout. This final touch adds both visual appeal and an additional layer of cheesy richness that makes people go back for seconds.
Let each serving rest for about one minute before eating—this allows the cheese to settle slightly and prevents burning your mouth on superheated soup. Serve immediately while flavors are at peak vibrancy.

Expert’s Nutritional Tip
As someone who spent years studying how different cooking methods affect nutrient preservation, I want to highlight something important about this recipe: by avoiding long boiling times and adding raw green onions at the end, we’re preserving the sulfur compounds in the alliums that have been studied for their anti-inflammatory properties.
Additionally, the black beans in this soup provide both soluble and insoluble fiber—approximately 3.5 grams per serving according to USDA data. This fiber content is what gives this soup its exceptional satiating power. You feel fuller longer, not because of empty calories, but because your body is actually nourished. That’s the difference between comfort food and nourishing comfort food.
Make-Ahead Guide
One of my favorite aspects of this recipe is its flexibility for busy lives. Here’s exactly how I prepare it when I’m planning ahead:
Two Days Before: Cook your chicken if not using rotisserie. Season it simply with salt and pepper, bake at 375°F until the internal temperature reaches 165°F (approximately 18-20 minutes for breasts). Once cooled, shred and store in an airtight container with one tablespoon of chicken broth to keep it from drying out.
One Day Before: Prepare all your vegetables—dice the onion, seed and chop the poblano, and place everything in separate containers. This takes approximately 10 minutes and saves tremendous time on cooking day.
On Cooking Day: Follow the recipe exactly as written. Do not make the full soup ahead of time and refrigerate, as the cream cheese base can separate during storage. However, the cooked soup keeps beautifully for 3-4 days in the refrigerator in airtight containers.
Reheating Instructions: Gently reheat on the stovetop over medium-low heat, stirring frequently and adding extra chicken broth (1-2 tablespoons at a time) if the soup has thickened significantly. Never use high heat for reheating—this can cause the cream cheese to separate and become grainy.
Common Mistakes to Avoid
After developing recipes professionally for over a decade, I’ve seen people stumble on these exact points repeatedly. Let’s prevent that in your kitchen:
- Using cold cream cheese straight from the refrigerator – It won’t blend smoothly and you’ll end up with lumpy soup. Remove it 15 minutes before cooking and cut it into cubes. This single step improves results dramatically.
- Boiling the soup too vigorously after adding cream cheese – This is the number one way to curdle your beautiful soup. Medium heat with gentle movement is all you need. Think “whisper,” not “shout.”
- Skipping the aromatics step – I’ve seen home cooks try to speed this up by dumping everything in raw. Those five minutes of vegetable cooking create flavor depth that tastes like hours of simmering. Don’t skip it.
- Using pre-shredded mozzarella for the topping – Commercial pre-shredded cheese contains anti-caking agents that prevent it from melting smoothly. Buy a block and shred it yourself—it makes a visible difference in melt quality and appearance.
Tips and Tricks
- Temperature is your best friend – Investing in an inexpensive instant-read thermometer takes the guesswork out of cooking. You’re aiming for 180-190°F as your target, never higher once cream cheese enters the picture.
- Customize your heat level – Prefer more spice? Add a pinch of cayenne or diced jalapeños with the aromatics. Like it milder? Use mild enchilada sauce. Your kitchen, your rules.
- Make it vegetarian effortlessly – Simply omit the chicken and add an extra cup of beans or diced zucchini. The soup remains equally satisfying and packed with protein from the legumes.
- Create a stunning visual presentation – After adding cheese and green onions, drizzle with a tiny bit of crema or sour cream and sprinkle with fresh cilantro. This elevates a weeknight dinner to special-occasion status instantly.
- Double the recipe confidently – This soup scales beautifully. Double everything, use a larger pot, and increase the cooking time by just 2-3 minutes. Perfect for meal prep or feeding a gathering.
Can I Store Cheesy Enchilada Soup?
Absolutely, and I’m thrilled you’re thinking ahead. This soup stores remarkably well because the cream cheese base actually helps preserve the other ingredients and maintain texture.
Refrigerator Storage: Transfer cooled soup to airtight containers and refrigerate for up to 4 days. The flavors actually deepen and improve on day two and three as all the ingredients continue melding together. This is one of those rare recipes where leftovers genuinely taste better than the original.
Freezer Storage: This is where I need to be honest with you—cream cheese-based soups don’t freeze flawlessly. The cream cheese can separate slightly upon thawing, creating a grainier texture. However, you can certainly freeze it if you’re willing to accept minor texture changes. Freeze in airtight containers or freezer bags for up to 3 months, leaving some headspace for expansion. Thaw overnight in the refrigerator, then reheat gently on the stovetop with added broth.
Make-Ahead Alternative: Instead of freezing the finished soup, freeze your ingredients separately. Cooked shredded chicken freezes beautifully for up to 3 months. Black beans and corn also freeze well individually. Then assemble your soup fresh whenever you need it—this gives you restaurant-quality results without any compromise.
Nutrition Information
Per serving (based on six servings): approximately 320 calories, 18 grams protein, 22 grams fat, 16 grams carbohydrates, and 3.5 grams dietary fiber. This data is calculated using USDA nutrient databases and standard nutritional analysis software.
The beauty of this soup nutritionally is the balance. You’re getting substantial protein from the chicken and beans, healthy fats from the cheese and olive oil, and complex carbohydrates from the beans and vegetables. The fiber content means this soup won’t cause blood sugar spikes—you’ll feel satiated for hours, not hungry an hour later.
Sodium content comes primarily from the enchilada sauce and broth. If you’re watching sodium intake, look for no-salt-added enchilada sauce and use organic low-sodium broth—this reduces sodium to approximately 680-720mg per serving, well within most dietary guidelines.
What Can I Serve With Cheesy Enchilada Soup?
This soup is magnificent on its own, but pairing it with complementary dishes elevates the entire meal. Consider these options from my family’s table:
- Crispy tortilla strips – Bake corn tortilla strips brushed with olive oil at 375°F until golden and crunchy. They add textural contrast and are essentially free—everyone has tortillas in their pantry.
- Fresh cilantro-lime rice – A simple grain base that soaks up the soup beautifully while adding brightness through lime juice and fresh herbs
- Charred lime wedges – Squeeze fresh lime juice into your bowl just before eating. The acid cuts through the richness and adds vibrancy
- Warm cornbread – Something about buttery cornbread alongside this soup feels like a warm hug. Serve with honey butter for dipping
- Simple green salad with cumin vinaigrette – The greens provide fresh contrast to the creamy richness of the soup. Dress the salad lightly and eat simultaneously
- Creamy avocado slices – Layer ripe avocado on the side or directly in the bowl. The creaminess complements the soup without overwhelming it
- Roasted vegetables – Charred Brussels sprouts or roasted cauliflower add smokiness and earthiness that balances the soup’s richness
If you’re looking for protein-forward sides, try Alice Springs chicken sauce as an accompanying protein, or serve alongside bacon cheddar dip as an appetizer for a more substantial feast.
Substitutes
- Poblano pepper swap – Use a regular bell pepper (any color) if poblanos aren’t available. You’ll lose the subtle smoky heat, but gain bright vegetable flavor. Jalapeños work too if you prefer more spice.
- Cream cheese alternative – Heavy cream mixed with a bit of flour creates a similar silky base, though you’ll lose some cheese flavor. Use ¾ cup heavy cream whisked with 1 tablespoon all-purpose flour.
- Black beans replacement – Pinto beans, kidney beans, or chickpeas work beautifully. Keep the same amount and follow the recipe identically. Each adds slightly different earthiness.
- Mozzarella cheese topping – Mexican blend cheese, Oaxaca cheese, or even sharp cheddar work wonderfully. Avoid pre-shredded versions when possible for better melting.
- Chicken substitute – Shredded turkey breast works perfectly. For vegetarians, add an extra cup of diced zucchini or mushrooms, both of which provide similar texture and umami depth.
- Enchilada sauce variation – Green enchilada sauce (verde) creates a completely different but equally delicious soup. The flavor profile becomes brighter and herbaceous rather than earthy.
- Broth options – Vegetable broth works fine, though chicken broth adds subtle richness. For deeper flavor, use bone broth if you have it available.
Seasonal Variations
One of my favorite aspects of cooking is adapting recipes to what’s available seasonally. Here’s how I shift this soup throughout the year:
Spring: Add fresh English peas instead of some of the frozen corn. Use fresh green onions abundantly, and consider adding fresh asparagus pieces. Spring herbs like fresh tarragon add unexpected brightness.
Summer: Incorporate fresh corn kernels (cut from the cob) instead of frozen. Add diced zucchini and summer squash in addition to the poblano. Finish with fresh basil for a late-summer celebration.
Fall: Add roasted sweet potato cubes for earthiness and natural sweetness. Consider using fire-roasted red peppers instead of poblanos. Add a pinch of smoked paprika for seasonal depth.
Winter: This is the season for the soup exactly as written—hearty and warming. Consider adding diced roasted butternut squash or even small bits of chorizo for winter richness. Serve in larger bowls because people tend to want more of this warming soup when temperatures drop.
Cheesy Enchilada Soup Recipe
Ingredients
Method
- Heat your olive oil in a large Dutch oven or heavy-bottomed soup pot over medium heat for approximately one minute until it shimmers and smells subtly fruity. This isn't a racing moment—we're gently warming the oil to distribute heat evenly across your cooking vessel. Add your diced onion and chopped poblano pepper, stirring occasionally with a wooden spoon. You're looking for the onion to transition from opaque to translucent with slightly softened edges, approximately 5-6 minutes. This is your window of doneness—the vegetables should be tender but not browned. You'll notice the kitchen beginning to smell herbaceous and warm, which signals properly cooked aromatics. This foundational step is non-negotiable in my kitchen. Rushing through it means missing out on the caramelization that develops natural sweetness and complexity. Professional cooks call this the "flavor foundation," and for good reason.

- Pour your enchilada sauce directly into the pot with the softened vegetables. Stir everything together gently, ensuring the sauce coats all the vegetables. Now comes the critical moment: add your room-temperature cream cheese cubes. Using a wooden spoon, break apart the cream cheese into smaller pieces as it begins to melt—don't just let it sit there. This active stirring, done over 3-4 minutes, ensures smooth integration without lumps. You're essentially creating an emulsion here, blending the fat from the cream cheese with the liquid from the sauce. The cream cheese should be completely melted and the mixture should look unified and silky, with no visible white chunks remaining. If you're seeing resistance, reduce heat to medium-low. The color should deepen slightly—this is the enchilada sauce doing its job, infusing the cream cheese with authentic flavor.
- Now add your canned diced tomatoes (including their juice for extra flavor and body), your rinsed black beans, and your frozen corn kernels. Stir everything together thoroughly, ensuring each vegetable and bean is coated in that gorgeous creamy enchilada base. The frozen corn will begin thawing immediately from the residual heat—this is perfectly fine and actually keeps the corn from becoming mushy. At this point, let the mixture heat through for approximately 2-3 minutes with occasional stirring. You'll notice steam rising gently and the bottom of the pot occasionally releasing little wisps of aroma. This gentle heating allows flavors to begin melding without shocking the cream cheese base. The reason I use perfect black beans (whether homemade or canned) is because they provide substantial protein and earthiness that balances the richness of the cheese. Their mild flavor doesn't compete with the enchilada sauce—instead, they amplify it.

- Add your shredded chicken breast and low-sodium chicken broth to the pot, stirring gently to combine. Here's where your culinary judgment enters the picture: the consistency of your finished soup depends on personal preference. Some prefer it thick and hearty, like a stew; others like it more brothier and sippable. With the amounts listed, you'll land somewhere in the middle—beautifully balanced between substance and fluidity. If your mixture seems too thick, add chicken broth in ¼-cup increments until you reach your desired consistency. Cook for 10-12 minutes over medium heat, stirring occasionally, never allowing the soup to reach a rolling boil. Here's my professional tip: maintain what I call a "lazy simmer"—tiny bubbles forming at the edges and occasional wisps of steam, but nothing vigorous. This temperature range keeps the cream cheese emulsion stable and prevents it from separating or becoming grainy. Too much heat and you'll taste that curdling sensation; too little and flavors won't fully develop.

- Taste your soup carefully. Because enchilada sauce already contains salt, and we're using low-sodium broth, most people find the seasoning exactly right. However, if you want additional depth, this is where ½ teaspoon of ground cumin creates magic. Stir it in and let it bloom in the heat for about one minute—you'll actually smell the cumin's essential oils activating. At this point, your soup should be steaming gently and registering around 180-190°F if you have a thermometer handy. It shouldn't be bubbling aggressively. If everything looks beautiful and smells incredible, we're ready for the final step.

- Remove your pot from heat. Immediately ladle the soup into serving bowls. While the soup is still steaming, top each bowl with a generous handful of shredded mozzarella cheese and a sprinkle of sliced green onion tops (I reserve just the lightest green portions for the prettiest presentation). The residual heat from the soup will slightly soften the mozzarella, creating those beautiful melted streaks throughout. This final touch adds both visual appeal and an additional layer of cheesy richness that makes people go back for seconds. Let each serving rest for about one minute before eating—this allows the cheese to settle slightly and prevents burning your mouth on superheated soup. Serve immediately while flavors are at peak vibrancy.

Nutrition
Notes
Tried this recipe?
Let us know how it was!FAQs
Can I use fresh enchilada sauce instead of canned?
Absolutely! In fact, if you have time to make fresh enchilada sauce, the soup becomes even more special. Use approximately 1 cup of homemade enchilada sauce (you may need slightly less broth to compensate). The flavor will be more nuanced, though both versions are delicious. When I’m making this for important guests, I do make fresh sauce—it feels more intentional somehow.
My soup separated and became grainy—what happened?
This almost always means the cooking temperature got too high after the cream cheese was added. The milk solids in cream cheese break apart when exposed to temperatures above 190°F for extended periods. If this happens, pour the soup through a fine-mesh strainer into a bowl, then whisk the solids with a fork while slowly drizzling the liquid back in. You’ll recombine it, though texture might not be perfectly smooth. Next time, keep that heat lower—it’s the difference between success and heartbreak.
How spicy is this soup?
The spice level depends entirely on your enchilada sauce choice. Most mid-range enchilada sauces are quite mild—somewhere between zero and one pepper on the spice scale. If you prefer more heat, add jalapeños or cayenne during the aromatics step. The poblano pepper adds subtle flavor but minimal heat. Start mild and adjust—you can always add more spice, but you can’t take it out.
Can I make this soup in a slow cooker?
You can, but I don’t recommend it for this specific recipe. The cream cheese can separate over the long cooking time, even on low heat. Instead, try this: do the first step (cooking aromatics) in a skillet on the stovetop, then transfer everything to your slow cooker. Cook on low for 4-5 hours, then add cream cheese in the final 30 minutes, stirring well. It won’t be identical to the stovetop version, but it’s workable if slow cooking fits your lifestyle better.
Is there a way to make this soup lower in fat?
Yes! Use reduced-fat cream cheese (it melts fine despite what you might think) and replace mozzarella topping with a lighter cheese like Oaxaca or even fresh queso fresco. You can also reduce the amount of cream cheese to 6 ounces and increase broth to 1¼ cups. The soup will be lighter and less rich, but still delicious. The reason I don’t recommend this as the standard recipe is because the richness is truly part of the appeal, but I understand dietary preferences vary.
More Recipes You’ll Love
- Alfredo Parmesan Chicken – Another creamy, satisfying dish that shares this soup’s luxurious mouthfeel and sophisticated flavor profile
- Perfect Black Beans – A standalone side that pairs beautifully with this soup or any Mexican-inspired meal
- Alfredo Cream Cheese – Explores that same silky cream cheese magic in a different context for pasta lovers
- Asian Beef and Vegetables – A global shift from Mexican cuisine, but similar one-pot simplicity and flavor intensity
Your Moment to Shine
This cheesy enchilada soup represents everything I believe about cooking: it doesn’t require professional equipment or advanced techniques, yet it produces results that feel special and intentional. It honors global traditions while remaining accessible and approachable. It feeds your family with nourishment alongside comfort.
I encourage you to make this soup this week. Gather your ingredients with purpose, move through each step with presence, and notice how the kitchen fills with warmth and aroma. Taste as you go, adjust to your preferences, and most importantly, enjoy the moment with the people you’re feeding.
This is how food becomes memory. This is how cooking becomes love. Enjoy!