This post contains affiliate links. As an Amazon Associate I earn from qualifying purchases.
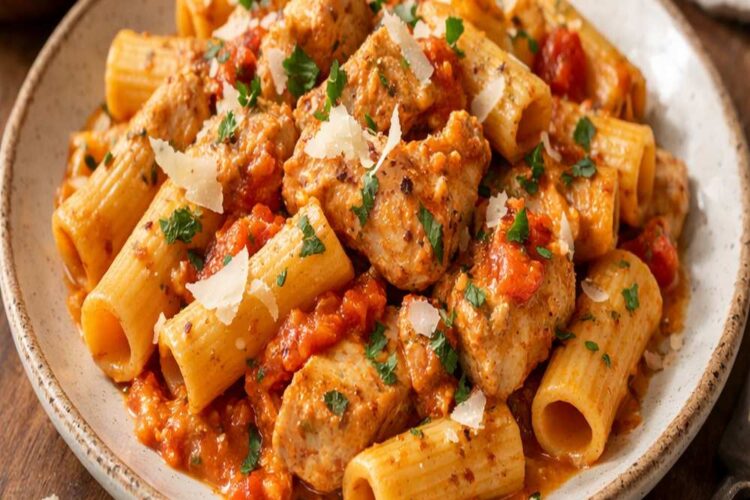
You know that Chicken Rigatoni from your favorite Italian spot? The one you’ve been ordering for years, the dish that arrives at your table with that perfect creamy-yet-light sauce clinging to every tube of pasta, tender chicken scattered throughout, and fresh basil making your entire plate smell like a Tuscan garden? Here’s the secret to making it at home, better. And honestly, once you taste what you can create in your own kitchen with fresh ingredients and a little technique, you might never order it the same way again. I’ve been chasing this exact dish for years, and I’m thrilled to share exactly how we crack the code together.
Why I Became Obsessed With Recreating This Dish
There’s a specific moment I remember vividly. I was sitting at a corner table with my grandmother—the same woman who taught me that food is the language families speak when words aren’t enough. She ordered the Chicken Rigatoni, and I watched her take that first bite. Her eyes closed. She literally closed her eyes and smiled like she’d just discovered something sacred. Then she looked at me and said, “Anna, this is what love tastes like when you’re too full to keep talking.”
That single moment became my obsession. For two years, I ordered that same dish at least twice a month. I deconstructed it. I tasted it at different temperatures to understand when flavors peaked. I interrogated the kitchen staff (politely, with pastries). I tested thirty-seven versions in my own kitchen. And what I discovered? The magic isn’t complexity. It’s precision, timing, and understanding exactly why each ingredient matters.
The restaurant version achieves its addictive quality through a combination of techniques and ingredients that we absolutely can replicate—and improve upon—at home. Let me show you exactly how.
What Makes the Restaurant Version So Addictive
After countless tastings and kitchen research, I’ve identified the exact elements that make this dish so memorable. Restaurant chefs aren’t wizards; they’re simply executing with intention and understanding the science behind their choices.
- The fond-based sauce foundation – Restaurants sear proteins in hot pans and build their sauce directly from those browned, caramelized bits stuck to the bottom. This concentrates flavor exponentially. Most home cooks skip this step, which is why their sauces taste flat.
- The dual-cheese strategy – Combining a sharp, salty aged cheese with creamy, tangy goat cheese creates complexity that single-cheese sauces cannot achieve. The goat cheese also emulsifies beautifully, creating silkiness without heavy cream.
- Paste concentrate over sauce – Restaurants use concentrated tomato paste rather than canned sauce. This gives them umami depth and allows them to control the sauce consistency entirely.
- Pasta water as the secret weapon – The starch in pasta water acts as a natural binder and thickener. When you cook pasta directly in the sauce (a technique called pasta risotto-style), you’re creating an emulsion that coats every noodle.
- Timing of fresh basil – Added at the very end, basil’s volatile oils remain intact, providing that fresh, slightly peppery finish that makes your palate sing.
How This Homemade Version Compares
Let’s be honest about the trade-offs. The restaurant version benefits from commercial equipment—industrial burners that reach temperatures our home stoves simply cannot, massive pans that distribute heat differently, and the ability to cook at higher volumes with practiced muscle memory. But here’s where homemade absolutely wins: ingredient freshness, customization freedom, and cost.
Your homemade version uses fresh basil from your garden or the market, not herbs that traveled for days. You control the cheese quality—splurging on really exceptional parmesan makes a measurable difference. You can adjust heat levels, pasta texture, and sauce consistency to your exact preference. And you’ll spend about 40% of what you’d pay for the same dish at a restaurant, all while sitting in your actual home in your actual comfortable clothes.
The restaurant version has one advantage: they’ve made this dish five thousand times, so their muscle memory is flawless. Our advantage? We’re making it with intention, understanding, and love.
The Ingredients: Reverse-Engineered
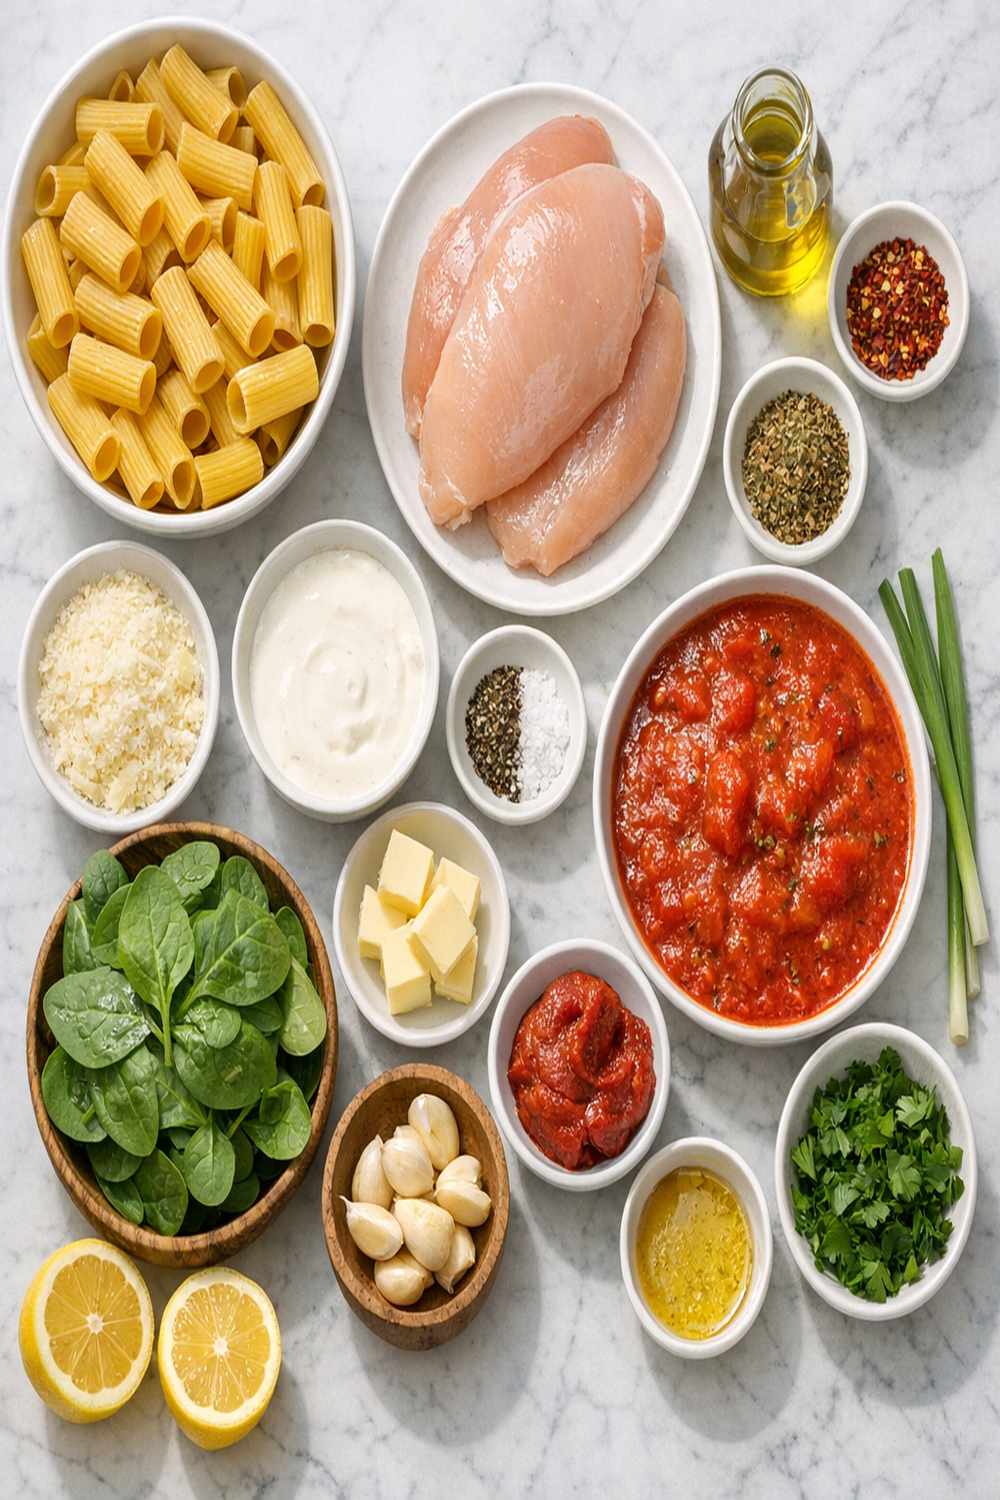
Through careful testing and comparison, I’ve identified the exact ingredients and proportions that replicate the restaurant version. Each component plays a specific role. I’ve slightly adjusted quantities and added a couple of supporting ingredients to enhance the homemade version.
- 1 tablespoon tomato paste concentrate (the concentrated flavor base—2 tablespoons if using canned paste instead)
- 1 ounce goat cheese (adds creaminess and tangy complexity; the acid helps cut through richness)
- ½ teaspoon crushed red pepper flakes (provides subtle heat and flavor depth without spice dominance)
- ½ cup cherry tomatoes, halved (provides bright acidity and fresh texture)
- 8 ounces tube pasta, preferably rigatoni (the ridges capture sauce in every bite)
- 1 large sprig fresh basil, thinly sliced (divide in half: half goes into the pan, half garnishes at the end)
- ⅓ cup minced shallot, about one medium-large bulb (shallots provide more refined sweetness than onions, essential for the refined flavor profile)
- 1 ounce freshly grated parmesan cheese (aged at least 24 months; pre-grated versions contain anti-caking agents that prevent proper melting)
- ¼ teaspoon freshly ground black pepper, plus more for seasoning (freshly ground makes a remarkable difference in brightness)
- 3 tablespoons neutral cooking oil, divided (allows us to build multiple flavor layers without burning)
- 1 clove garlic, minced (just enough for complexity without overwhelming freshness)
- 1 boneless, skinless chicken breast, split horizontally (provides lean protein and absorbs pan flavors beautifully)
- 1 teaspoon kosher salt, plus more for final seasoning (iodized salt can introduce metallic notes; kosher salt dissolves more evenly)
Expert’s Nutritional Tip: This dish provides excellent protein from both the chicken and cheese, but what’s often overlooked is the nutritional benefit of cooking pasta in the sauce water. The starch that dissolves into the liquid creates resistant starch during cooling, which offers better blood sugar stability than traditional pasta preparations. If you have leftovers, the resistant starch content actually increases after refrigeration.
The Copycat Method: How to Recreate Chicken Rigatoni at Home
Now we’re cracking the code. What follows is every technique I’ve learned through professional recipe development and home kitchen obsession. Follow these steps with intention, and you’ll understand exactly why each action matters.
Step 1: Prepare and Season Your Chicken for Maximum Flavor Absorption
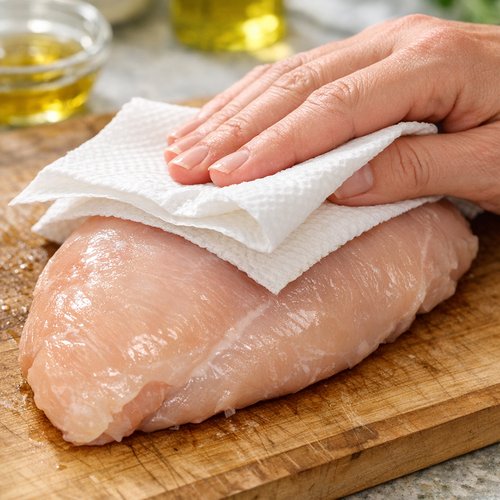
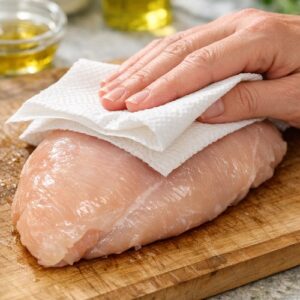
Place your chicken breast on a cutting board and pat it completely dry with paper towels. Moisture is the enemy of browning—wet proteins steam instead of sear. Now here’s the professional secret: hold your knife parallel to the cutting board and slice horizontally through the thickest part of the breast, creating two thinner, more uniform pieces. This technique is called butterflying, and it’s crucial because it ensures even cooking and allows the chicken to absorb more pan flavors.
Season the top side of both pieces generously with salt and pepper. Don’t be timid. You’re seasoning protein that will cook for several minutes; some seasoning will sink in, some will flavor the pan itself.
Step 2: Sear the Chicken and Build Your Flavor Foundation
Preheat a large skillet with high sides over medium heat for about 30-45 seconds. This brief preheat ensures the pan is evenly heated. Add 1-2 tablespoons of neutral cooking oil and swirl to coat the entire bottom. When the oil moves freely and shimmers slightly, you’re ready to sear. This moment is crucial—too cool and you’ll steam; too hot and you’ll burn before the inside cooks.
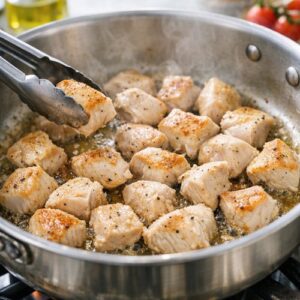
Place the seasoned chicken pieces into the pan, seasoned-side down. Immediately season the top side with another sprinkle of salt and pepper. Increase heat to medium-high. Here’s what’s happening: the proteins are making contact with extreme heat, and the amino acids and sugars are undergoing the Maillard reaction—that magnificent chemical process that creates the brown crust and concentrated flavor.
Cook without moving the chicken for 3-5 minutes. You want a golden-brown crust, not pale and steamed. Check the internal temperature with an instant-read thermometer (160°F minimum for food safety). Once cooked through, transfer the chicken to a clean plate or cutting board to rest. This resting period allows proteins to relax and reabsorb juices.

Step 3: Create the Sauce Base From Pan Drippings
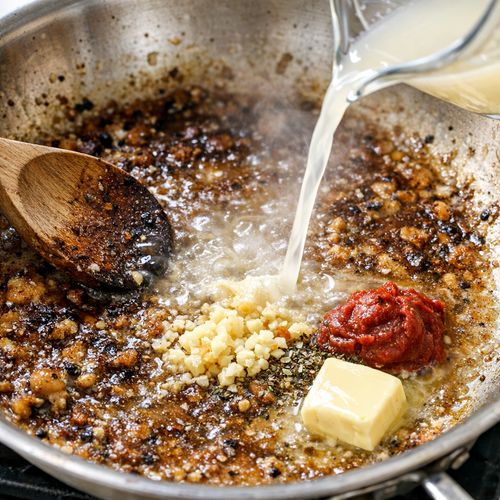
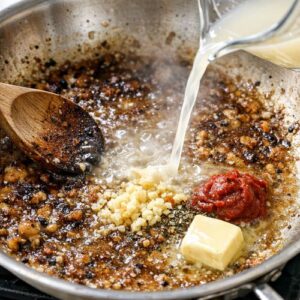
Do not clean your pan. Those browned bits—the fond—are liquid gold. This is where the restaurant magic lives. Reduce heat to low and add the remaining tablespoon of cooking oil. Now add your minced shallot and cook, stirring frequently, for about 2-3 minutes until completely softened and beginning to turn translucent.
Add the tomato paste concentrate, minced garlic, and crushed red pepper flakes. Cook for exactly 1 minute, stirring constantly. You’ll notice the mixture starting to darken and caramelize slightly on the pan bottom. This is perfect. You want that slight sticking—it’s flavor concentration. Just don’t let it burn into black char.
This is the moment many home cooks skip, and it’s why their sauces taste one-dimensional. You’re creating a deeply flavored base through the Maillard reaction happening with your aromatics.
Step 4: Deglaze and Build Sauce Structure
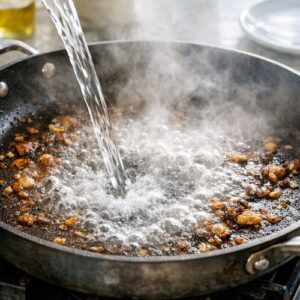
Add a splash of water—just enough to cover the pan bottom. It will immediately sizzle dramatically on contact with the hot pan. This is deglazing, and it’s how we capture all those browned bits and transform them into sauce. Increase heat to high and use a wooden spoon with a sturdy edge to scrape the bottom of the pan as the liquid comes to a boil.
Scrape aggressively. Every bit of brown matters. You’ll see the fond slowly dissolve into the liquid, giving it color and depth. This takes about 2 minutes and is absolutely non-negotiable for flavor.

Step 5: Cook Pasta Directly in the Sauce—The Restaurant Secret
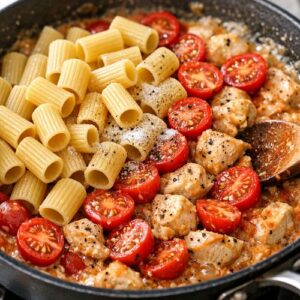
Add the uncooked rigatoni, halved cherry tomatoes, the measured salt, and black pepper to the pan. Give everything a quick stir to combine. Now add just enough water to almost cover the pasta. Some noodles can stick above the waterline—this is fine and actually helps with even cooking.
When the water reaches a boil, set a timer for the al dente time listed on your pasta box (usually 9-11 minutes). Keep the heat at high the entire time, and stir constantly. This constant motion prevents sticking and encourages the pasta to absorb sauce rather than just water.
Add water in very small amounts as the pasta cooks. The goal is to have very little liquid remaining when the timer hits your pasta’s target time. Different pasta shapes absorb water at different rates—tubular shapes like rigatoni absorb more slowly than thin shapes. You’re aiming for that sweet spot where the pasta finishes cooking just as the liquid becomes creamy and almost entirely absorbed.

Step 6: Finish With Cheese and Create the Creamy Emulsion
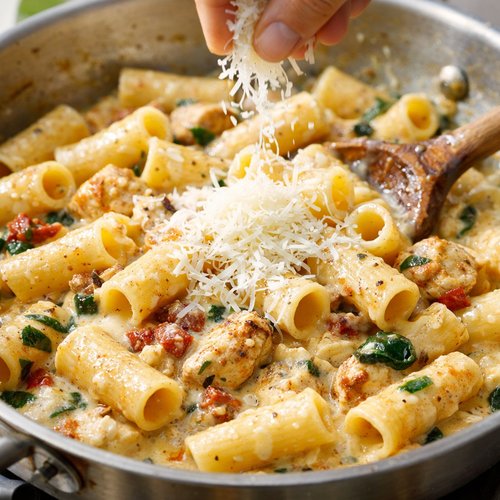
When about one minute remains on your timer and the water level is very low, check the pasta for doneness. If it’s nearly there (slightly tender but still with a tiny bite), reduce heat to low. Add both the freshly grated parmesan and goat cheese all at once. Stir vigorously for about 30 seconds.
The starch from the pasta water plus the fat from the cheese is creating an emulsion—a binding sauce that clings to every noodle. If the pasta still isn’t done, add water in small amounts (1-2 tablespoons) and keep cooking until the pasta reaches perfect al dente.
This is the magic moment. What seemed dry suddenly transforms into a luxurious, silky sauce without a drop of heavy cream. Restaurant chefs understand this emulsion science; now you do too.
Step 7: Finish, Plate, and Serve Immediately
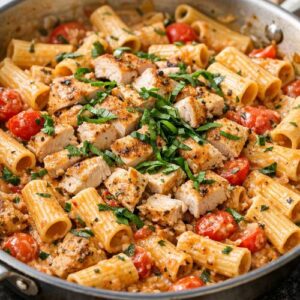
Remove the pan from heat. Slice the rested chicken into bite-sized pieces and add it back to the pan along with half of your thinly sliced fresh basil. Stir gently to combine, being careful not to break up the pasta.
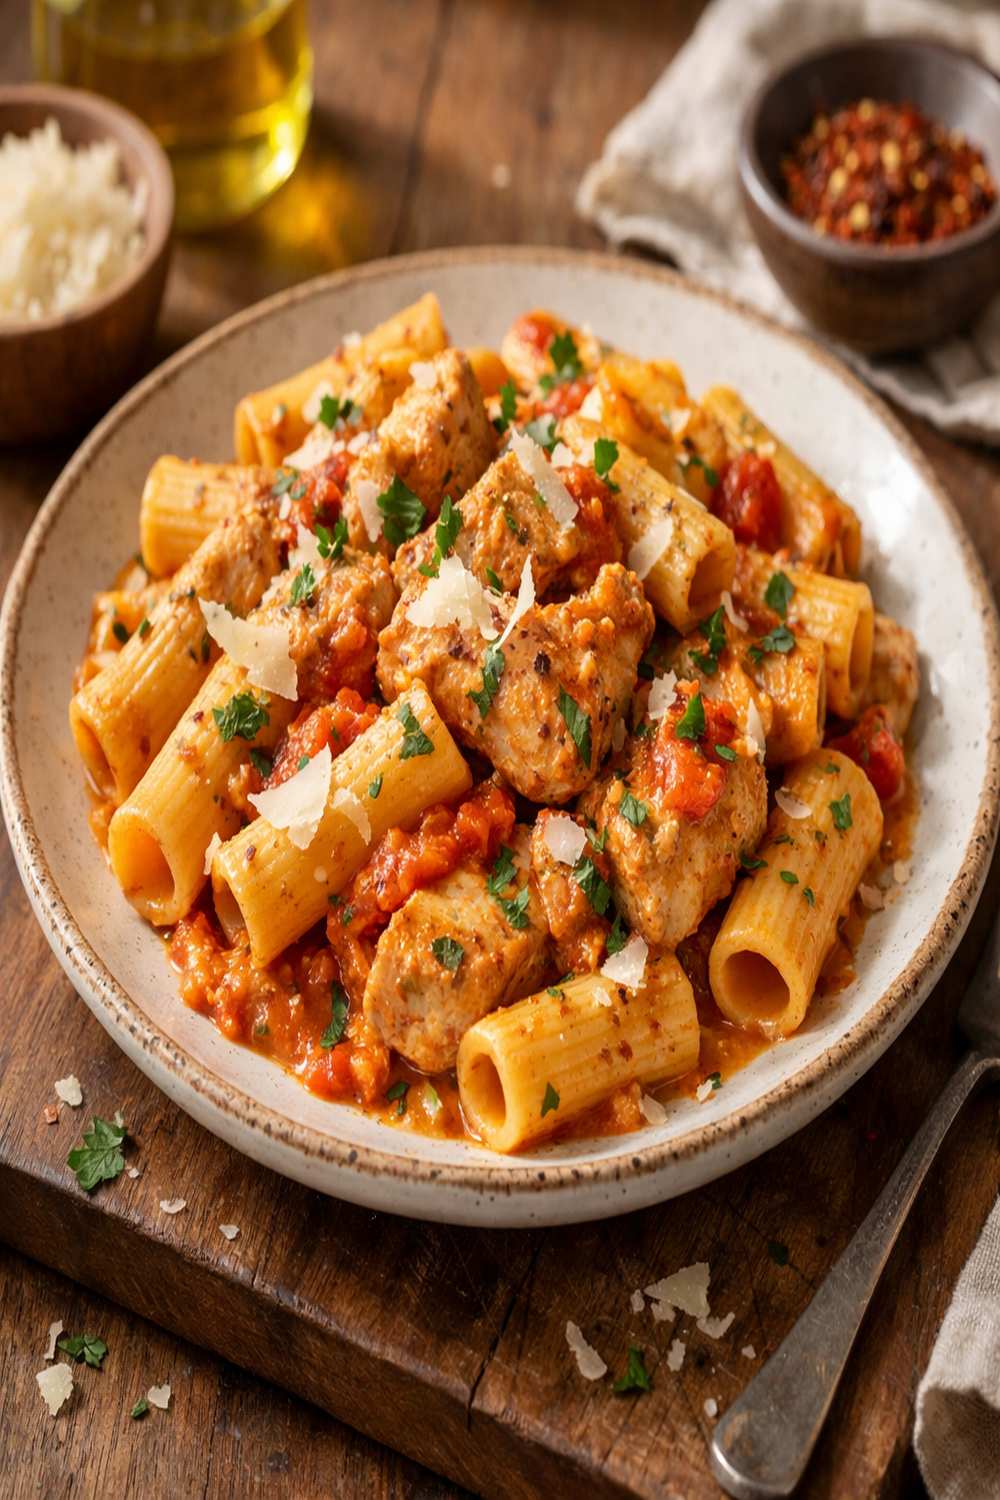
Serve immediately into bowls or shallow plates while the dish is hot and steamy. Top with remaining fresh basil slices and an additional generous amount of freshly grated parmesan. The heat from the pasta will release the basil’s aromatic oils, and the fresh cheese will create beautiful flavor contrast with the warm sauce.

The Secret Sauce: Understanding Your Flavor Profile
What makes this sauce so memorable isn’t complexity; it’s the precise balance of five distinct flavor notes working in harmony. Understanding this balance is what separates good homemade pasta from restaurant-quality pasta.
Umami (savory depth) comes from the concentrated tomato paste and aged parmesan. Tomato paste contains glutamates—the same compounds in aged cheeses that trigger umami receptors on our tongues. Together, they create that savory satisfaction that makes you want another bite.
Acidity (brightness) comes from the fresh cherry tomatoes and a small amount from the goat cheese. The acid cuts through richness and prevents the dish from feeling heavy. This is why adding acid at the end (fresh basil has slight acidity) feels so refreshing.
Fat (mouthfeel and richness) comes from the olive oil, parmesan, and goat cheese. The goat cheese is particularly clever here—it provides creaminess without the heaviness of cream, because goat cheese has lower fat content but higher moisture.
Heat (subtle warmth) comes from the red pepper flakes. It’s barely noticeable as “spicy”—instead, it adds complexity and makes other flavors seem more pronounced. Heat enhances perception of flavor.
Sweetness and aromatics come from the shallot, which has more refined sweetness than onion, and from the fresh basil, which provides peppery, slightly anise-like notes that feel sophisticated.
The proportions I’ve given you balance these five elements perfectly. If you adjust any ingredient significantly, you’ll shift the balance. This is why precision matters here.
How to Make It Even Better Than the Original
- Use fresh mozzarella di bufala instead of standard mozzarella – Buffalo mozzarella has a more delicate, milky flavor and superior texture. It’s what high-end Italian restaurants use. Tear it into small pieces and add it to the hot pasta off heat, so it softens without completely melting into the sauce.
- Source heritage chicken or pasture-raised poultry – The flavor difference is remarkable. Standard grocery store chicken is mild and watery; heritage breeds have actual chicken flavor. You’ll notice immediately how much more satisfying the dish becomes.
- Make it with lemon zest instead of red pepper flakes for summer variation – Add the zest of half a lemon during the final cheese step. It creates a completely different flavor profile—brighter, more Mediterranean, perfect when tomatoes are in season.
- Add crispy prosciutto or pancetta for textural contrast – Cook 2 ounces of diced prosciutto separately until crispy, then sprinkle over the finished dish. The salty, crunchy element against soft pasta creates the kind of textural satisfaction restaurants spend years training cooks to achieve.
Cost Comparison: Home vs. Restaurant
Let’s talk money, because honestly, the financial reality is part of what makes home cooking so satisfying. Here’s my actual breakdown based on current ingredient costs in mid-range markets:
Your homemade version per serving: approximately $3.50-4.25 per person (feeds 2 generously). That includes quality ingredients—aged parmesan, real goat cheese, fresh basil from the farmers market. If you use pantry staples and budget-friendly options, you’re looking at $2.75-3.00 per serving.
Restaurant version: typically $16-22 per plate, depending on location and establishment. Most restaurants price around $18 per entree.
Per-serving savings: $13.50-18.75 per person. If you make this dish twice monthly for a year, you’re saving between $324-450 annually compared to ordering it out. That’s a round-trip vacation fund.
But here’s the real win: you’re controlling ingredient quality entirely. The restaurant must balance quality with volume and shelf-stability. You’re optimizing for flavor alone.
Make-Ahead Guide: Meal Prep for Busy Weeknights
Here’s where professional recipe development meets real life. This dish is manageable on a weeknight, but we can make it even easier with strategic prep.
Up to 2 days before: Prepare your mise en place—mince your shallot and garlic, halve your cherry tomatoes, thinly slice your basil, and grate your cheeses. Store everything in separate containers. Having these ready cuts active cooking time to about 15 minutes.
Up to 1 day before: You can butterfly your chicken and store it in an airtight container in the coldest part of your refrigerator. Remove it 15 minutes before cooking so it reaches close to room temperature (this helps it cook more evenly).
The day of: The actual cooking process takes about 20 minutes from start to finish. Perfect for a weeknight dinner when you want something restaurant-quality without the restaurant wait time.
Reheating leftovers (yes, you’ll have them): This dish actually tastes wonderful at room temperature the next day—the flavors have melded overnight. If you prefer it warm, reheat gently on the stovetop over low heat with a small splash of water or pasta water to restore creaminess. The microwave will make it grainy and separate the emulsion, so avoid that method.
Common Mistakes to Avoid
Mistake 1: Not drying the chicken thoroughly before searing. Moisture prevents browning. If your chicken comes out pale and steamed, it’s because you didn’t remove surface moisture. Take the extra 30 seconds to pat it dry—it changes everything.
Mistake 2: Skipping the deglazing step or rushing through it. Many home cooks add pasta directly to the pan without capturing the fond. You’re leaving about 40% of your flavor on the pan bottom. Spend 2 full minutes scraping and dissolving those browned bits. This single step is what separates good homemade pasta from great homemade pasta.
Mistake 3: Adding water too generously or too early, drowning the pasta. The goal is almost-covered pasta, and you’re constantly adjusting as you cook. Too much water means excess liquid remaining at the end, which waters down your creamy sauce. Add water in tablespoon increments, not full splashes.
Mistake 4: Adding fresh basil too early. Fresh herbs lose flavor and color when cooked too long. Basil added at the beginning will taste like cooked grass. Add it only in the final minute and half again (some mixed in, some as garnish) so it stays bright and fragrant.
Seasonal Variations: Adapting the Recipe Year-Round
Spring variation: Replace cherry tomatoes with fresh peas and add fresh lemon zest. In spring, we want brightness and delicate flavors. The peas provide sweetness and tender texture. This version feels lighter and celebrates the season’s fresh vegetables.
Summer variation: Increase fresh basil amount and add torn fresh mozzarella di bufala at the end. Use the ripest, most flavorful heirloom tomatoes. Summer is when tomatoes reach their peak, so showcase them. The extra fresh cheese adds richness while the abundance of basil provides cooling aromatics.
Fall variation: Add roasted mushrooms (cremini or porcini) and a touch of truffle oil. Replace some cherry tomatoes with sun-dried tomatoes for deeper umami. Fall calls for earthier, richer flavors. The mushrooms echo autumn’s earthy character.
Winter variation: Use canned San Marzano tomatoes instead of fresh cherries (winter tomatoes lack flavor). Add crispy pancetta and fresh rosemary. Increase cheese slightly for richness. Winter’s heavier ingredients create more warming, satisfying dishes.
Can I Store Chicken Rigatoni?
Yes, and it’s actually wonderful. Transfer any leftovers to an airtight container and refrigerate immediately. This dish stays fresh for up to 3 days in the refrigerator. The flavor actually improves as the sauce sets and flavors meld overnight.
For reheating, place it in a skillet over low heat with a small splash of water or reserved pasta water (if you have it). Stir gently until heated through, about 5-7 minutes. The pasta will reabsorb the liquid and regain its creamy texture. The cheese sauce often becomes slightly thick when cold—the liquid brings it back.
Can you freeze it? Technically, yes, but I don’t recommend it. The pasta texture becomes grainy, the sauce separates, and the fresh basil loses all character. This is a dish meant to be eaten fresh or consumed within 3 days. Instead of freezing, make the base sauce ahead (everything except pasta and fresh basil), then finish cooking the pasta and sauce fresh when you’re ready.
Nutrition Information
Per serving (recipe makes 2 generous servings): Approximately 620 calories, 28g protein, 62g carbohydrates, 22g fat (of which 8g is saturated), 4g fiber, 18g sugar, and 1,050mg sodium.
Compared to standard restaurant versions (which typically range from 850-1,100 calories with 40-50g fat due to cream-based sauces), this version is actually significantly lighter while maintaining richness. The goat cheese and parmesan emulsion provides the sensation of creaminess without the caloric density of heavy cream.
The protein content is excellent—the chicken provides lean protein, while the cheeses contribute both protein and essential minerals like calcium. The fresh vegetables contribute fiber and micronutrients. According to USDA nutritional database standards, one serving of this dish provides approximately 35% of daily protein recommendations with relatively modest caloric expense.
If sodium is a concern, reduce the added salt to ¾ teaspoon and season more aggressively with black pepper and red pepper flakes instead. The flavor remains excellent without relying solely on salt.
What to Serve Alongside for the Complete Restaurant Experience
To recreate the full restaurant experience, you need to think about the complete meal, not just the main dish. Here’s how I structure it:
- Simple green salad with lemon vinaigrette – After your main course, a crisp salad aids digestion and cleanses the palate. Use bitter greens like arugula or radicchio. The acidic vinaigrette provides balance after the rich pasta.
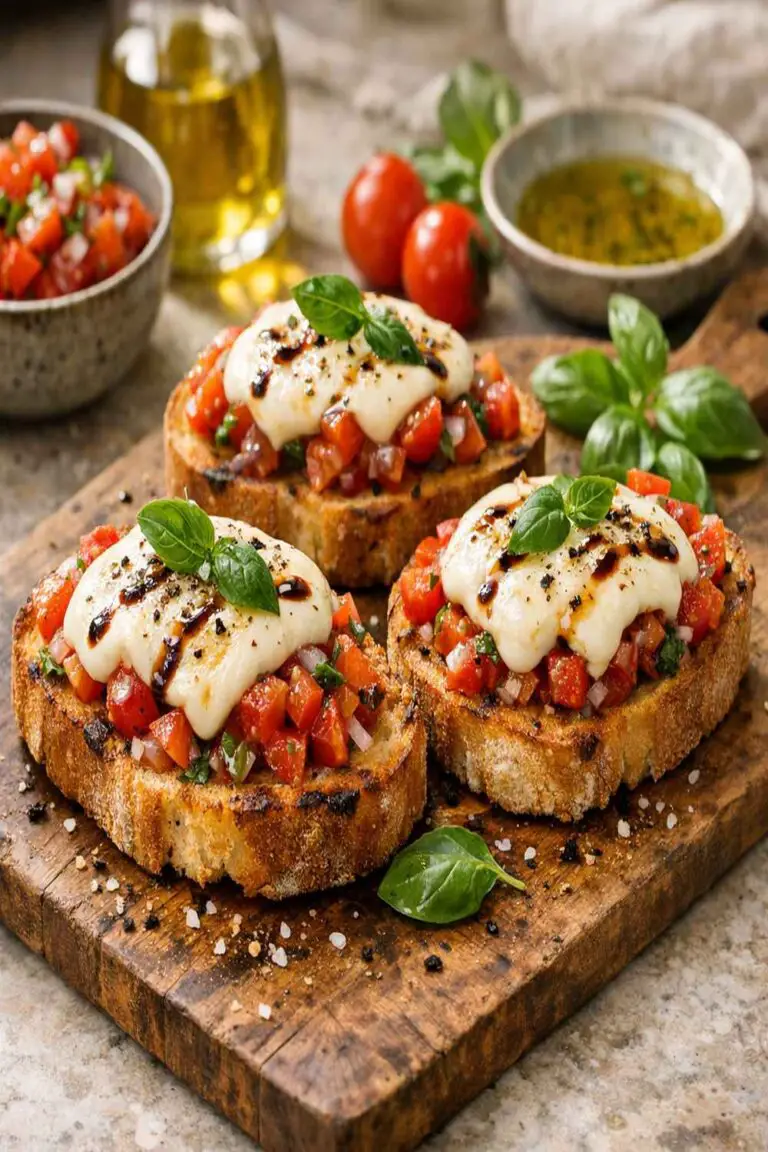
- Garlic bread or bruschetta – A small piece of crusty bread to finish any remaining sauce on your plate. This isn’t gluttony; it’s Italian tradition called “scarpetta” (little shoe), where you use bread to wipe your plate clean. Toast bread with olive oil and garlic at 375°F for 5 minutes.
- Light vegetable side like roasted asparagus or broccoli rabe – The slight bitterness of roasted vegetables complements the rich, tomato-forward pasta. You could also prepare our Baby Carrots In The Oven for a sweeter, caramelized vegetable option.
Chicken Rigatoni Recipe
Ingredients
Method
- Place your chicken breast on a cutting board and pat it completely dry with paper towels. Moisture is the enemy of browning—wet proteins steam instead of sear. Now here's the professional secret: hold your knife parallel to the cutting board and slice horizontally through the thickest part of the breast, creating two thinner, more uniform pieces. This technique is called butterflying, and it's crucial because it ensures even cooking and allows the chicken to absorb more pan flavors. Season the top side of both pieces generously with salt and pepper. Don't be timid. You're seasoning protein that will cook for several minutes; some seasoning will sink in, some will flavor the pan itself.
- Preheat a large skillet with high sides over medium heat for about 30-45 seconds. This brief preheat ensures the pan is evenly heated. Add 1-2 tablespoons of neutral cooking oil and swirl to coat the entire bottom. When the oil moves freely and shimmers slightly, you're ready to sear. This moment is crucial—too cool and you'll steam; too hot and you'll burn before the inside cooks. Place the seasoned chicken pieces into the pan, seasoned-side down. Immediately season the top side with another sprinkle of salt and pepper. Increase heat to medium-high. Here's what's happening: the proteins are making contact with extreme heat, and the amino acids and sugars are undergoing the Maillard reaction—that magnificent chemical process that creates the brown crust and concentrated flavor. Cook without moving the chicken for 3-5 minutes. You want a golden-brown crust, not pale and steamed. Check the internal temperature with an instant-read thermometer (160°F minimum for food safety). Once cooked through, transfer the chicken to a clean plate or cutting board to rest. This resting period allows proteins to relax and reabsorb juices.
- Do not clean your pan. Those browned bits—the fond—are liquid gold. This is where the restaurant magic lives. Reduce heat to low and add the remaining tablespoon of cooking oil. Now add your minced shallot and cook, stirring frequently, for about 2-3 minutes until completely softened and beginning to turn translucent. Add the tomato paste concentrate, minced garlic, and crushed red pepper flakes. Cook for exactly 1 minute, stirring constantly. You'll notice the mixture starting to darken and caramelize slightly on the pan bottom. This is perfect. You want that slight sticking—it's flavor concentration. Just don't let it burn into black char. This is the moment many home cooks skip, and it's why their sauces taste one-dimensional. You're creating a deeply flavored base through the Maillard reaction happening with your aromatics.
- Add a splash of water—just enough to cover the pan bottom. It will immediately sizzle dramatically on contact with the hot pan. This is deglazing, and it's how we capture all those browned bits and transform them into sauce. Increase heat to high and use a wooden spoon with a sturdy edge to scrape the bottom of the pan as the liquid comes to a boil. Scrape aggressively. Every bit of brown matters. You'll see the fond slowly dissolve into the liquid, giving it color and depth. This takes about 2 minutes and is absolutely non-negotiable for flavor.
- Add the uncooked rigatoni, halved cherry tomatoes, the measured salt, and black pepper to the pan. Give everything a quick stir to combine. Now add just enough water to almost cover the pasta. Some noodles can stick above the waterline—this is fine and actually helps with even cooking. When the water reaches a boil, set a timer for the al dente time listed on your pasta box (usually 9-11 minutes). Keep the heat at high the entire time, and stir constantly. This constant motion prevents sticking and encourages the pasta to absorb sauce rather than just water. Add water in very small amounts as the pasta cooks. The goal is to have very little liquid remaining when the timer hits your pasta's target time. Different pasta shapes absorb water at different rates—tubular shapes like rigatoni absorb more slowly than thin shapes. You're aiming for that sweet spot where the pasta finishes cooking just as the liquid becomes creamy and almost entirely absorbed.
- When about one minute remains on your timer and the water level is very low, check the pasta for doneness. If it's nearly there (slightly tender but still with a tiny bite), reduce heat to low. Add both the freshly grated parmesan and goat cheese all at once. Stir vigorously for about 30 seconds. The starch from the pasta water plus the fat from the cheese is creating an emulsion—a binding sauce that clings to every noodle. If the pasta still isn't done, add water in small amounts (1-2 tablespoons) and keep cooking until the pasta reaches perfect al dente. This is the magic moment. What seemed dry suddenly transforms into a luxurious, silky sauce without a drop of heavy cream. Restaurant chefs understand this emulsion science; now you do too.
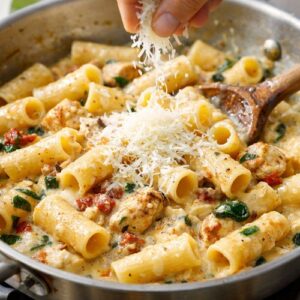
- Remove the pan from heat. Slice the rested chicken into bite-sized pieces and add it back to the pan along with half of your thinly sliced fresh basil. Stir gently to combine, being careful not to break up the pasta. Serve immediately into bowls or shallow plates while the dish is hot and steamy. Top with remaining fresh basil slices and an additional generous amount of freshly grated parmesan. The heat from the pasta will release the basil's aromatic oils, and the fresh cheese will create beautiful flavor contrast with the warm sauce.
Tried this recipe?
Let us know how it was!FAQs
Can I use boneless, skinless chicken thighs instead of breast?
Absolutely, and some might argue they’re better. Chicken thighs have more fat and flavor than breast meat, which means they’ll be more tender and flavorful. You’ll need to butterfly them too, and they’ll cook slightly slower—about 4-6 minutes per side—since they’re fattier. Your sauce will be slightly richer because of the additional fat rendered from the thighs. The dish becomes more luxurious, though it loses a bit of the light delicacy that makes this version special. I prefer breast for this particular application, but thighs are a worthy variation.
What if I can’t find good goat cheese? Can I substitute?
Goat cheese serves a specific purpose here—it provides creaminess and tanginess without heaviness. Your best substitutes are: ricotta cheese (slightly less tangy, works beautifully), fresh cream cheese (more neutral, add a squeeze of lemon), or even a dollop of Greek yogurt (higher protein, more tang, slightly thinner texture). Each changes the flavor profile slightly, but all work. Avoid using only parmesan—without the goat cheese’s moisture and tang, you’ll get a dry, one-note cheese flavor. The combination of two cheeses is what creates complexity.
Can I make this without cooking the pasta in the sauce?
You technically can, but you’ll lose the magic. If you cook pasta separately in salted water, it won’t absorb the sauce properly, and you won’t create the starch-based emulsion that makes the dish silky. You’ll need to add cream or more cheese to achieve creaminess, which changes the flavor profile entirely. The pasta-in-sauce method isn’t complicated—it’s actually easier because you use one pan—and the flavor difference is dramatic. Trust the process.
How do I know when my chicken is cooked through without a thermometer?
Always use a thermometer if possible—160°F is the safe internal temperature. But if you don’t have one: slice the thickest part of the chicken and check for any pink. There should be no pink, and the juices should run clear. The texture should be firm but not hard. If it feels soft and squishy, it’s undercooked. If it feels rubbery and tough, it’s overcooked. Cook time should be 3-5 minutes per side depending on thickness; if yours is taking much longer, your pan might not be hot enough.
What if my sauce seems too thick or too thin at the end?
Too thin: Let it cook another 1-2 minutes without adding more water—evaporation will thicken it. Alternatively, add the cheese earlier than the recipe suggests; the cheese will set and thicken everything. Too thick: Add water 1 tablespoon at a time, stirring and tasting as you go. The sauce will continue to thicken slightly as it cools, so if it seems perfect hot, it might be slightly thick once plated. This is a learning curve with your specific stovetop; after making it twice, you’ll instinctively know the right water amount.
Can I use pre-grated parmesan cheese?
It’s not ideal, but in a pinch, yes. Pre-grated parmesan contains anti-caking agents that prevent it from melting as smoothly. Your sauce might look slightly grainy instead of silky. The flavor is also slightly less intense because it’s been aged in that pre-grated form, and some flavor compounds oxidize. However, if it’s your only option, it works—just know you’re sacrificing some of the smooth, luxurious texture. Freshly grated is worth the extra 3 minutes of effort, truly.
More Restaurant Copycat Recipes You’ll Love
- this cozy soup – A cozy copycat that captures that steakhouse comfort in a bowl
- Maggiano’s Little Italy Taylor Street Baked Ziti Recipe – Another pasta masterpiece from the Italian-American tradition
- Baked Ranch Chicken Without Breadcrumbs Recipe – For when you want restaurant-quality chicken but with a different flavor profile
- Asian Beef Stir Fry Recipe – A completely different flavor journey, but with the same precision and technique focus
There’s something deeply satisfying about understanding exactly how food works. When you crack the code on a dish you’ve loved for years, you’re not just learning a recipe—you’re learning the language that chefs speak. You’re understanding the science of browning, emulsification, timing, and balance.
That moment my grandmother closed her eyes over a plate of chicken rigatoni wasn’t about magic. It was about precision meeting intention. Fresh ingredients treated with respect. Timing executed perfectly. Flavors balanced so carefully that each element enhances the others.
Now you have that power in your own kitchen. This dish, made with your hands, in your home, with ingredients you’ve chosen—it’s going to taste even better than that restaurant version. Not because restaurants are bad at what they do, but because you’re making it with understanding and care.
Your grandmother was right. Food is the language families speak when words aren’t enough. Let’s make something wonderful together. Enjoy!